

Learn how to make your very own DIY hair scrunchie with this easy step-by-step tutorial. I’ll show you how to sew a seamless, professional-looking scrunchie with a sewing machine or by hand. Plus, I’ll give you three easy options to add bows or tails to your custom scrunchies.
DIY Hair Scrunchies
Scrunchies are everybody’s favorite 90’s hair accessories. And they’re coming back in a big way! Keep reading to learn how to make scrunchies yourself.
If you’re up for a little sewing project, it’s easy to make your very own custom scrunchies at home! Custom hair scrunchies are a great handmade gift idea for friends and family.
Scrunchies are a great project for beginning sewists or anyone looking to practice their sewing skills. With this easy pattern, you can make a seamless, professional-looking scrunchie in almost no time at all.
A Great Project for Beginners
Making a hair scrunchie is a quick and easy sewing project that’s perfect for beginning sewists.
Scrunchies are inexpensive to make, too! One scrunchie takes just 15 minutes and $1 worth of fabric and materials.
You can make scrunchies with or without a sewing machine. I prefer to sew this pattern on a sewing machine because it makes the process a little quicker. But, you can absolutely sew this scrunchie pattern by hand.
Make a Professional Looking Scrunchie
In this tutorial, I’ll teach you how to sew a classic scrunchie. I’ll also show you how to add 3 different bow variations to your scrunchies.
This pattern doesn’t take shortcuts – so I can’t promise that it’s the fastest one out there on the internet. But I can promise it will give you a scrunchie with a professional-level finish and no visible seams!
Almost all steps can be completed with a sewing machine — there is only the tiniest bit of hand sewing required. That said, if you don’t have a sewing machine, you can easily hand-sew all of the steps. (I’ll show you how to modify this pattern into a no-sew project, too.)
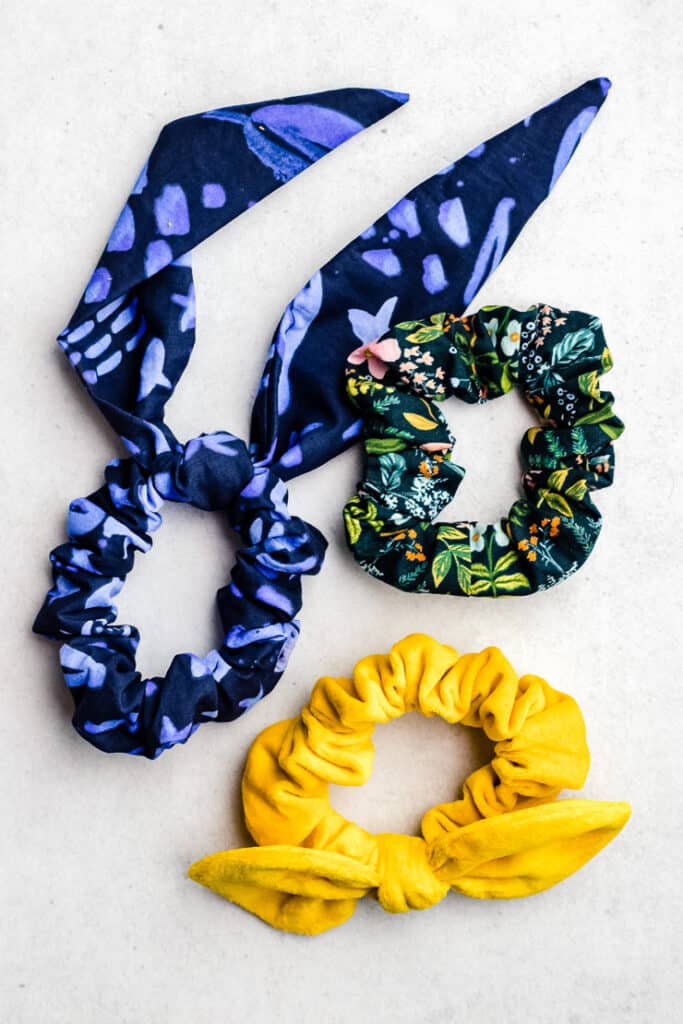
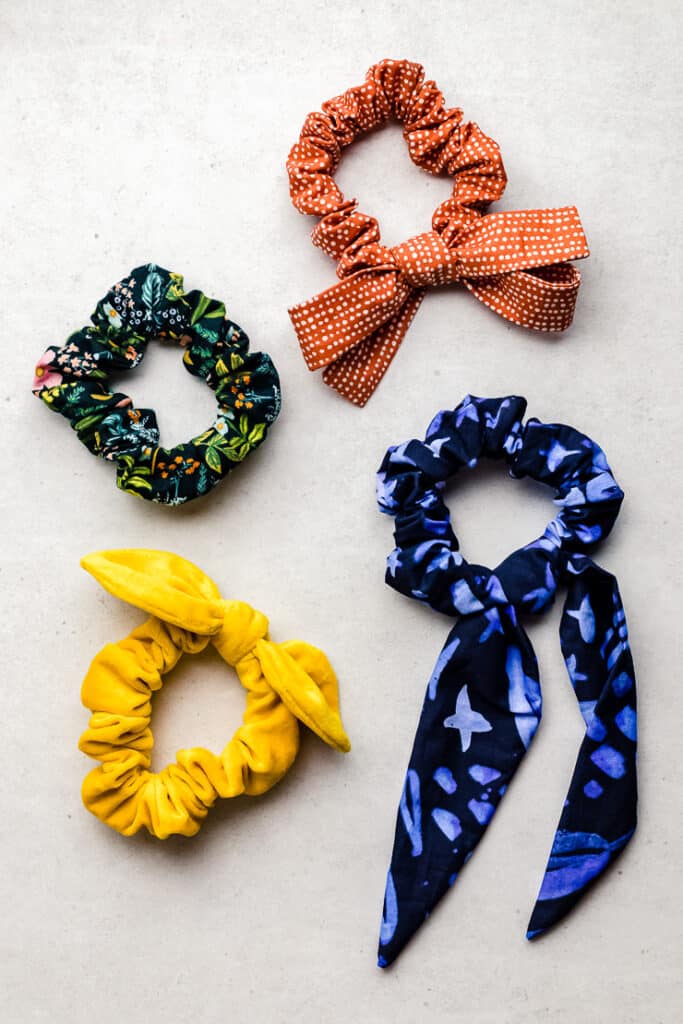
Scrunchies with Knots, Bows, or Tails
If you’d like to add a bow to your scrunchie, here are 3 popular bow styles you can make:
- Scrunchie with a Knot Bow
- Scrunchie with a Classic Bow
- Scarf Scrunchie with Tails
You can find the patterns for these scrunchie bows after the pattern for the scrunchie itself.
Best Fabric for Scrunchies
Hair scrunchies can be made in a wide variety of fabrics to match your style and your wardrobe. Each type of fabric will give the finished scrunchie a slightly different look.
You can use almost any type of fabric you like, from quilting cotton to crushed velvet. Here are some things to consider:
- Lightweight fabrics like quilting cotton, chambray, jersey, and rayon will gather easily and will give your scrunchie a full, ruffled look.
- Heavier fabrics like velvet look expensive and sophisticated. But they can be a bit harder to sew because the pile makes them slip around underneath the sewing machine’s presser foot.
- Smooth and shiny fabrics like silk, satin, or polyester blends can be quite slippery. So they might not hold your ponytail as tightly as other fabrics.
If you’re a beginner, I recommend starting with cotton, since it’s one of the easier materials to sew.
You don’t need a lot of fabric to get started, either. Scrunchies are a great project for using small pieces of fabric from your stash. For instance, you can get about 5 scrunchies from 1 fat quarter-size piece of fabric.

Materials List
- Safety Pins
- 3/8″ wide elastic, 8″ long
- Fabric, 3.5″ by 22″
- Matching thread
- Sewing machine
- Sewing needle
- Turning tool, optional
Cutting Instructions
Here are the instructions for cutting out your fabric and elastic. Plus, I’ve given you some advice on customizing the size of your scrunchie to fit your style.
Fabric
Cut a rectangle of fabric measuring 3.5″ by 22″.
If you want more ruffles, you can increase the length to 24″.
If you want a thinner scrunchie, you can decrease the height of the fabric rectangle to 3″.
If you want a wider scrunchie, you can increase the height of the fabric rectangle to 4.5″
Elastic
I like to use 3/8″ wide elastic because it’s thin like a normal ponytail holder, but has enough strength to hold my thick hair. You can easily substitute 1/4″ or even 1/2″ elastic.
Cut a length of elastic measuring 8″. Or, cut 9″ if you have thick hair, or you’re using thick fabric like velvet.
After you’ve made a couple of scrunchies, you might want to adjust the length of the elastic longer or shorter to get a better fit.
To wear the scrunchie as a bracelet: You may want to adjust the length of the elastic to fit comfortably around your wrist. Use a measuring tape to measure your wrist, and add 1/2″ to the result.
How to Sew a Scrunchie
Here are the basic steps to make a scrunchie:
- Cut the fabric and elastic to length.
- Fold the fabric in half lengthwise and sew the long edge.
- Turn the tube right side out, halfway, and sew the short ends.
- Turn the scrunchie right side out.
- Insert elastic and stitch the ends together.
- Sew the small opening closed.
Let’s go through the steps in more detail with pictures.

Step 1. Cut the fabric and elastic.
Cut the fabric into a 3.5″ by 22″ rectangle. Cut an 8″ length of elastic.
Step 2. Fold and sew the long edges.
Fold the fabric in half lengthwise with the right sides together. Use pins to secure the layers.
You will start your seam from 1 1/2 inches down from the top edge and end your seam 1 1/2 inches up from the bottom edge. I like to use pins as a visual reminder of where to start and stop my seam.
With a scant 3/8 seam allowance, sew a straight line along the long edge.
Tip: Don’t forget to backstitch at the beginning and end of your seam to secure the stitches in place. These short backstitches keep the seam from coming undone when you turn the scrunchie right side out.
When you’ve finished, remove the pins.
Step 3. Match and sew the short ends.
Turn the tube right side out – but only halfway! To do this, pin a safety pin through one of the fabric layers at one end of the tube. Put the safety pin into the opening of the tube, pushing it through to the opposite end.
Have patience, here. It can take a little work to get the fabric to turn right-side out.
If you have a tube-turner, this is the time to use it!
Once you’ve gotten the short end to meet each other, match up the edges with the right sides together. Use pins to secure the layers. Sew with a 3/8″ seam allowance.

Step 4. Turn right side out.
You’ll still have a small opening in the tube, right next to the short seam you’ve just completed. Reach into this opening and turn the tube of fabric right side out. It should come through pretty easily.
After this step, you’ll have a large tube of fabric, right side out, that looks like a stretched-out scrunchie.

Step 5. Insert the elastic and stitch the ends together.
The next step is to feed the strip of elastic through the middle of the tube.
I like to use a safety pin to pin one end elastic to the outside of the tube. This helps me not lose the elastic inside the tube while I work.
Then, pin the second safety pin to the other end of the elastic. Use the safety pin to feed the strip of elastic through the tube. When you’ve finished, you should have both ends accessible through the opening on the side of the tube.
Before you sew the ends together, double-check that the elastic hasn’t twisted inside the tube. Then, overlap the ends of the elastic by about 1/2″. Stitch the ends of the elastic together. (I like to use a zig-zag stitch for this step.) It doesn’t have to be pretty, it just needs to be strong and secure.

Step 6. Sew the remaining opening.
Now that the elastic is inside the tube, it’s time to sew the remaining opening closed. For a truly seamless finish, you can sew this opening by hand. Using a blind stitch, or an invisible ladder stitch, stitch the remaining opening closed.
If you don’t want to sew the opening by hand, you can sew the gap closed using a sewing machine. To do this, fold the opening closed, and secure it with pins. Using a straight stitch, sew very close to the edge of the fabric. There will be a small seam, but I don’t think you’ll notice it much while you’re wearing the scrunchie.
Alternatively, you could even glue the opening closed with a little dab of quick-drying fabric glue! Don’t let the fear of hand sewing keep you from making these scrunchies!
Keep reading for the 3 bow variations and patterns!

How to Sew a Scrunchie by Hand
You can make this scrunchie without a sewing machine by substituting hand sewing with a needle and thread in each step that calls for machine sewing.
Choose an all-purpose sewing thread in a color that matches your fabric. Use a hand-sewing needle to sew along the seams with a small running stitch.
How to Make a No-Sew Scrunchie
You can also make a scrunchie without sewing by substituting glue for the stitching. I recommend using a strong, fast-drying fabric glue. But, a hot glue gun would do in a pinch.
If you want to make a DIY scrunchie without sewing, you can use the no-sew directions below:
- Follow the cutting instructions for the fabric. Cut a 9″ piece of elastic (instead of the normal 8″)
- In step 2, use fabric glue to seam the long edges.
- In step 3, use glue to seam the short edges together.
- In step 5, tie the two ends of the elastic together in a knot.
- In step 6, use glue to close the remaining opening.
3 Bow Options for Scrunchies
If you want to add a little extra flair to your hair scrunchies, here are three bows you can add.
First, make the base scrunchie as described in the pattern above. And then, add the bow pieces according to the patterns that follow.

How to Make a Knot Bow Scrunchie
Here is a quick and easy bow to tie on a finished scrunchie. This pattern will give you a “knot bow” that reminds me of bunny ears.
First, download and print the PDF template for the knot bow piece. Then, follow the sewing instructions below:
Step 1: Cut 2 pieces from the bow pattern. Place the pieces’ right sides together, and pin them in place.
Note: If you are using a velvet fabric like I am, you might want to use more pins than normal to prevent the fabric from shifting under your presser foot.
Step 2. Using a 3/8″ seam allowance, sew along the edges of the bow pieces. Leave a 2″ gap on one side so you can turn the pieces right side out afterward. Remember to backstitch to secure your stitching.
Step 3: Using scissors, clip the curves. (This creates a smooth outer edge when you turn the fabric right side out.) Turn the bow right side out through the remaining gap. Press if desired.
Step 4: Using hand sewing, machine sewing, or fabric glue, close the remaining gap.
Then, once you’ve finished making the bow piece, tie it onto the scrunchie. And, if you are worried about the knot untying, you can secure it with a few hand stitches or a dab of fabric glue.

How to Make a Scarf Bow Scrunchie
Next, we have a sophisticated scarf bow that gives your scrunchie the look of handkerchief or scarf “tails”. It’s very easy to make, too.
This pattern makes a scarf with two tails that are approximately 8 inches long. I find that this is a great size length for everyday wear. That said, you can definitely extend the pattern template, following the established curves, to get the length you’re looking for.
First, download and print the PDF template for the scarf bow piece. Then, follow the sewing instructions below:
Step 1: Cut 1 piece from the scarf pattern. Take care to arrange the pattern piece on a twice-folded piece of fabric, as described in the template PDF. (You should have 2 folds, and thus four layers of fabric. The unfolded piece looks like a long, skinny oval.)
Step 2. Fold the pattern piece in half lengthwise with the right sides together. Pin in place.
Step 2. Using a 3/8″ seam allowance, sew along the edge of the scarf piece. Leave a 2″ gap on one side so you can turn the piece right side out after sewing. Remember to backstitch to secure your stitching.
Step 3: Clip the corners. Turn the scarf right side out through the remaining gap. Press if desired.
Step 4: Using hand sewing, machine sewing, or fabric glue, close the remaining gap.
Then, once you’ve made the scarf piece, tie it onto the scrunchie. You can secure the bow with a few hand stitches or a dab of fabric glue to keep it from untying.
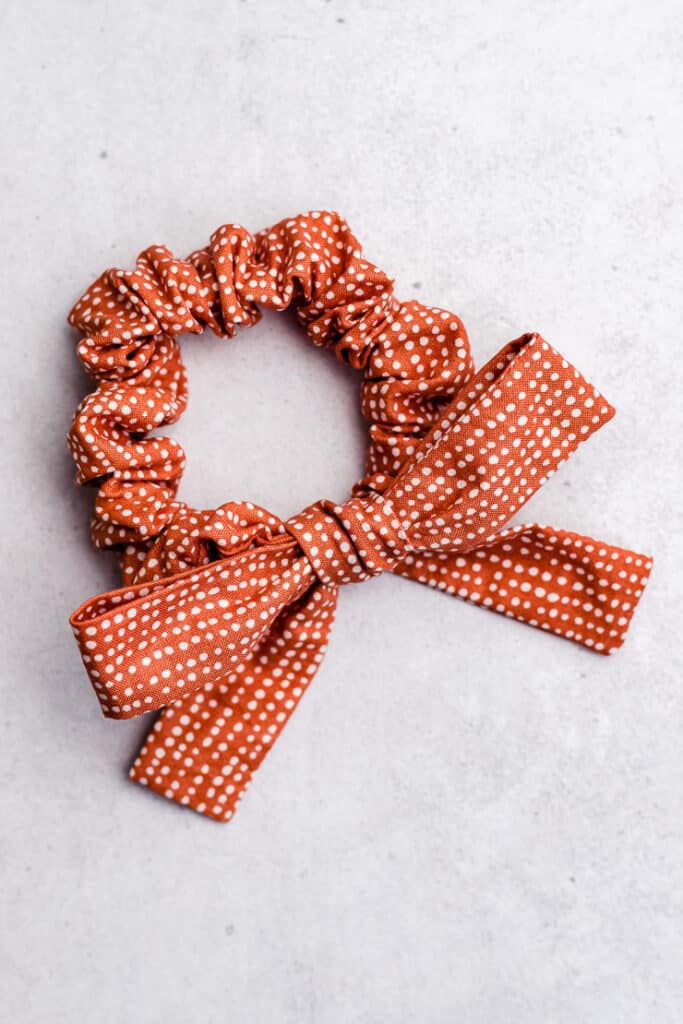
How to Make a Classic Bow Scrunchie
Finally, here is a pattern to create a scrunchie with a classic bow.
This pattern makes a bow with shorter tails. If you want a bow with long tails, you can cut a longer rectangle of fabric.
Step 1: Cut a rectangle of fabric that measures 22″ long by 3″ wide. Fold the fabric piece in half lengthwise with the right sides together. Pin in place.
Step 2. Using a 3/8″ seam allowance, sew along one short edge and the long edge of the fabric piece. Leave one short edge open so you can turn the piece right side out after sewing. Remember to backstitch to secure your stitching.
Step 3: Clip the corners. Turn the fabric tube right side out through the remaining open end. Press if desired.
Step 4: Tuck the raw edges inside the tube, about 3/8″ down. Using hand sewing, machine sewing, or fabric glue, close the remaining gap.
Then, once you’ve made the bow piece, tie it onto the scrunchie. I highly recommend securing the bow with a few hand stitches or a dab of fabric glue.
And there you go! Three bow variations to add to your handmade scrunchies!
Have questions? Join the Facebook Group!
We hope this article was useful for you! If you have any additional questions, feel free to join my Facebook Group. We created this group for you to share pictures, ask questions, and help each other out.


What’s Next?
Pin this post: Save this tutorial to your Pinterest boards so that you can come back to it later.
Leave a comment: We love to hear your feedback. Tell me in the comments below!
Share on Instagram or Facebook: When you make this project, share it on social media and tag me @sarahmaker_. We love to see what you make!

How to Make Hair Scrunchies
Learn how to sew a hair scrunchie with this easy tutorial for beginners. Plus, I'll show you how to add 3 different bow variations to your DIY scrunchie.
Materials
- fabric, cut 3.5″ by 22″
- 3/8" wide elastic, cut 8" long
Tools
- safety pins
- matching thread
- sewing machine
- sewing needle
- turning tool, optional
Instructions
- Cut the fabric and elastic to length.
- Fold the fabric in half lengthwise with right sides together. Pin in place. With a 3/8" seam allowance, sew along the long edge. Start the seam 1 1/2 inches from the top, and end the seam 1 1/2 inches from the bottom
- Turn the tube right side out, halfway, and match the short ends with right sides together. Pin in place. With a 3/8" seam allowance, sew the short ends.
- Turn the scrunchie right side out.
- Use a safety pin to insert the elastic through the fabric tube. Overlap the ends of the elastic by 1/2", and stitch them together. and stitch the ends together.
- Hand stitch the remaining opening closed. Alternatively, close the opening with machine stitching or fabric glue.
Notes
See the post above for bow instructions and patterns.
Need those pattern files? Just let me know where to send them using this form, below.


Similar Posts
Pleated Face Mask Sewing Pattern with Ties or Elastic – Free Printable
Free Quilted Christmas Stocking Pattern
How to Fold a No-Sew Bandana Face Mask
How to Add Nose Wire to Fabric Face Masks