

Learn how to DIY your own tie-dye sweatshirt with bleach! Use this fun and easy bleach tie-dye technique to make custom sweatsuits, sweatpants, hoodies, and more! Keep reading for the step-by-step tutorial and video.
How to Tie Dye Shirts with Bleach
If you’ve ever wanted to try reverse tie-dye using bleach, you’re in luck! I’ll show you how to transform your dark-colored shirts with this easy guide to bleach tie-dye.
What is Bleach Tie Dyeing?
Tie-dying with bleach is a big trend right now, and it’s not hard to see why it’s so popular. It’s a fun DIY style craft that you can do at home with just a few common supplies.
You can transform a plain black or navy sweatshirt by tying it up with rubber bands, and lightening the exposed fabric with household bleach.
There are a lot of different folding techniques you can use to create unique designs and patterns in your bleach dyed items.
You can even go an extra step and try Reverse Tie Dye — which is adding a new tie-dye color to the bleached areas. To learn how to add color with dye, check out: How to Tie Dye – Easy Techniques for Beginners.
For even more tie dye ideas, check out this list of 17+ cool tie dye patterns.
Bleach Tie Dye Tutorial Video

Supplies for Dyeing with Bleach
The great thing about this DIY project is that it requires only a handful of inexpensive supplies. You likely have everything you need at home already. Here are the materials you’ll need for this project.
- a dark-colored cotton sweatshirt, or other garment
- household bleach
- a plastic bucket
- a pair of gloves
- several rubber bands
- spray bottle (optional)
- mild laundry detergent
I mixed 2 cups of bleach with 2 cups of water to create my diluted bleaching solution. I then dipped my sweatshirt into this solution.
Another method you can try is to use a spray bottle to spray the bleach solution onto the garment. This will give you a different look.
If you don’t have regular liquid bleach, you can try using a spray bottle of bathroom cleaner that contains bleach. I haven’t tested it myself, but I’ve seen other people have success using gel bleach cleaners, like Clorox Toilet Bowl Cleaner. In this case, the cleaner was applied directly to the tied shirt.

Best Types of Clothes to Bleach Tie-Dye
You can use this bleach dye process to create all sorts of garments, like shirts, sweatshirts – and even a tie dye hoodie. For this project, you’ll have the best results with dark-colored clothes that are made from cotton. 100% cotton fabrics are preferred, but cotton blends will also work well.
If you are unsure how your shirt will react, you can always test a small corner of the garment with a dot of bleach. That way, you’ll know what color the garment will turn without committing to the entire process.
Here are some of the types of clothes to tie-dye with bleach:
- sweatshirts
- hoodies
- sweatpants
- black shirt
- navy shirt
What color will it turn?
It’s hard to know exactly what color your sweatshirt will turn in the bleach solution. Sometimes the color-change results can be really unexpected!
If you want to know what color your finished sweatshirt will be before you dye it, I recommend testing a small inconspicuous corner of the fabric. To do this, dab a small amount of bleach on the inside part of the sleeve cuff or waist.
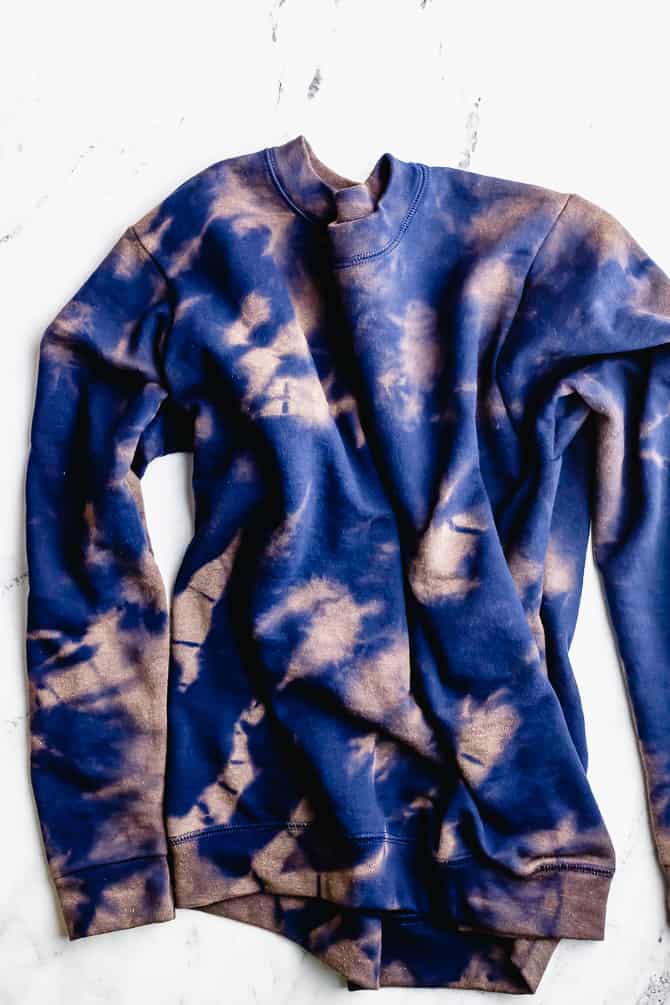
In most cases, black sweatshirts turn red, faded orange, or tan. Navy shirts can turn a faded red-orange as well. Purple and maroon shirts turn a pink color. And most lighter blue shirts will turn white.
Find a Safe Workspace
Here are some important considerations when working with a strong chemical like bleach.
- Wear rubber gloves to protect your hands while you’re dying with bleach.
- Remember that bleach is a strong chemical, and its fumes can be dangerous. So work in a well-ventilated area, or outside if you can.
- Wear old clothes that you don’t mind getting bleach on.

Prepare your Shirt for Dyeing
Before you start the project, make sure that your shirt is clean.
You can start with a dry shirt, or you can start with a slightly wet shirt. Try misting it with a spray bottle of water until it’s just damp. (In the photos above, I started with a dry shirt.)
Then, tie the shirt in any tie dye pattern you like. You can use rubber bands to tie up your shirt in a spiral, in a bullseye, or in another design of your choice.
Bleach Tie-Dye Patterns
For my sweatshirt, I used the Crumple Tie Dye technique. I folded the sweatshirt up, somewhat randomly, and secured the folds with plenty of rubber bands.
The parts of your shirt that are tied up will stay the original dark color, while the exposed fabric will turn a lighter color when it interacts with the bleach.
So, if you want less of the shirt to be bleached, tie it tightly. If you want more of the shirt to be bleached, tie it loosely.
If you prefer the swirly Tie-Dye Spiral look, pinch a small amount of fabric in the center of the shirt, and twist it around until all the fabric is in a tight spiral. Secure it with 3 rubber bands. Criss-cross the rubber bands across the middle point so that it creates 6 wedges shapes.)
For even more tie-dye patterns, read: 5 Folding Techniques for Bleach Dye and 17+ Tie Dye Patterns and Folding Techniques

Apply the Bleach
Here are a few different ways to apply the bleach.
Bucket Method: Fill a plastic bucket with a solution of 1 part bleach to 1 part water. Put the tied-up sweatshirt into the bucket, and submerge it. Leave the shirt in the bleach for about 10 minutes, until you start to see a color change.e
Spray or Squeeze Bottle Method: Fill a spray or squeeze bottle with a mixture of 1 part bleach to 1 part water. Spray the bleach solution on to the exposed fabric of your garment. You can use more or less bleach depending on how intense you want the color change to be.
Gel Toilet Cleaner Method: For best results, start with a slightly damp shirt. Squeeze the gel cleaner onto the exposed fabric. You can create different looks by applying the bleach to some areas, and not to others.
After you apply the bleach, you will need to let it sit for a while, about 5-20 minutes. The amount of time the sweatshirt needs to soak in the bleach solution will vary based on the type of fabric it’s made from. For example, 100% cotton fabrics will bleach faster than cotton-poly blends.
Note: Some dyes bleach a lot more quickly than others. It’s a good idea to do a small test in an inconspicuous area if you’re unsure how your fabric will react.
I recommend setting a timer for 5 minutes and then checking in on your sweatshirt to see if you have the desired amount of color change. You may need to wait longer, up to 20 minutes.

Rinse and Wash your Sweatshirt
After you’ve let the sweatshirt soak in the bleach solution for a few minutes, you will start to see a visual color change. Let the fabric sit in the bleach until you are happy with the amount of color change.
Tip: Remember that the colors will look lighter after you wash and dry the sweatshirt!
When the timer is done, remove the rubber bands and rinse the sweatshirt thoroughly. You’ll want to wash the shirt right away to stop the bleaching process. If you want, you can run the shirt through a regular cycle in the washing machine. Just to make sure no other clothes get bleached, you may want to wash it by itself.
How long is too long? For some fabrics, you may want to leave the bleach on for 15 minutes, or even up to 20 minutes. Be careful, though. If you leave the bleach mixture on for too long, the bleach can damage the fabric of your sweatshirt.
Explore More Tie Dye
Learn more about tie dye techniques with these related articles.
What’s Next?
Pin this post: Save this tutorial to your Pinterest boards so that you can come back to it later.
Leave a comment: We love to hear your feedback. Tell me in the comments below!
Share on Instagram or Facebook: When you make this project, share it on social media and tag me @sarahmaker_. We love to see what you make!

Bleach Tie Dye Sweatshirt
Learn how to make a custom tie-dyed sweatshirt with bleach.
Materials
- a dark-colored cotton sweatshirt
- household bleach
Tools
- a plastic bucket
- a pair of gloves
- several rubber bands
- spray bottle (optional)
Instructions
- Protect your hands with rubber gloves, and work in a well-ventilated area.
- Fold or crumple up the sweatshirt, and secure the folds with the rubber bands.
- In the plastic bucket, prepare a mixture of 1 part bleach to 1 part water.
- Let the sweatshirt sit in the bleach mixture for about 10 minutes, or until you are satisfied with the color change.
- Remove the rubber bands and rinse the sweatshirt thoroughly. Wash with mild detergent and rinse as normal.
Notes
Remember that the colors will look lighter after you wash and dry the sweatshirt!
Don't let the bleach sit too long, or it can damage the fabric of the shirt.
Share this DIY!
Save this project to your Pinterest board, or share it on Facebook.


Similar Posts
How to Tie Dye Socks: A Step-by-Step Guide
Can You Tie Dye Polyester? Read this First!
How Long to Let Tie Dye Sit Before Rinsing It Out
How to Set Tie Dye So It Won’t Fade
17+ Tie Dye Patterns and Folding Techniques
How To Get Tie Dye Off Your Hands: 7 Easy Ways