

Learn how to do punch needle embroidery with this free punch needle pattern. Whether you are a beginner or an experienced fiber artist, I think you’ll love this modern rainbow punch needle pattern.
I’m so excited to share this happy rainbow punch needle pattern with you today. If you’ve ever wanted to learn how to punch needle, this free pattern is the perfect place to start.
I hope you’ll try your hand at a new craft and create a beautiful punch needle pillow or wall hanging.

Punch Needle Supplies
One of the things I love about punch needle is that you don’t need a whole lot of supplies to get started. In fact, the required materials are relatively inexpensive and don’t take up a lot of space. Here are the things you need to make this project.
Punch Needle Supplies
- punch needle tool
- wool rug yarn or bulky weight craft yarn
- monk’s cloth for the foundation fabric
- q-snap frame, or gripper strip frame
And, of course, you’ll need the free rainbow pattern. You can download the pattern file here: Rainbow Punch Needle Pattern
You’ll also want basic craft supplies like scissors and a permanent marker to transfer the pattern to your fabric.
If you want to finish this pattern as a wall hanging with fringe (as shown in the photos), you’ll also need extra yarn to make the fringe, a crochet hook or rug hooking tool to help attach the fringe, and a 16” long dowel rod to hang the piece.
Beginner’s Tip: The correct materials are crucial to the success of this project. If you are experiencing any problems with your punch needle project (like your yarn won’t stay in, for example) it’s likely you have the wrong type of monk’s cloth or yarn.
If you need help finding the correct materials, check out this blog post for more information about punch needle supplies and all of the shopping links you need.

Transfer the Pattern
After you’ve downloaded the free rainbow pattern, print it out and tape the pieces of paper together.
Then, it’s time to transfer the design to the foundation fabric. Here are a few ways to transfer the printed pattern onto your monk’s cloth.
Simple Tracing Method
You can transfer the designs directly onto the monk’s cloth fabric using a light source such as a lightbox or window. To do this, put the printed paper pattern behind the monk’s cloth, and hold both of them up to a window or a lightbox.
If the light is bright enough, you should be able to see the printed pattern lines through the monk’s cloth fabric. Then, all you’ll need to do is trace the pattern lines onto the monk’s cloth with a permanent marker.
Carbon Paper Transfer
You can also transfer the pattern with carbon tracing paper. To transfer a design using transfer paper, lay the fabric face-up on a hard surface. Center the transfer paper over the fabric, with the waxy side down, and place the pattern on top of the transfer paper.
Transfer the design to the fabric by tracing the lines with a ballpoint pen. Be sure to press hard enough with the pen to transfer the design to the fabric through the layers of paper.
How to Make a Punch Needle Wall Hanging
If this is your first time doing punch needle embroidery, I encourage you to take a minute and read my Beginner’s Guide to Punch Needle first, which will give you a more in-depth explanation of how to punch needle. If you need help learning how to thread a punch needle tool, how to make stitches, or how to change colors, go ahead and check out that article first.
Here are the steps for punch needle embroidery:
- Transfer the Design. Trace your pattern onto the “wrong” side of the fabric, remembering that it will be reversed when turned over.
- Stretch the Fabric. Stretch the monk’s cloth foundation fabric on the frame. It is important to stretch the fabric tightly in the frame or hoop for best results — think “tight as a drum”!
- Thread the Needle Tool. You can thread the Amy Oxford punch needle by hand — first by threading the yarn through the eye of the needle and then pulling the yarn up through the slot in the handle.
- Punch the design. Start with the outlines, then fill in the shapes.
- Finish. When you’re done punching, simply trim your thread, leaving a small tail on the “right” side of your work. Remember, no knots are needed. Use scissors to trim any yarn tails to match the height of the loops.

Punch Needle Finishing Techniques
Once you’ve punched the rainbow design, it’s time to decide how to display the piece.
You can hang it on your wall as a one-of-a-kind piece of fiber art. You can add fringe to turn it into a textured wall hanging. Or, you can sew it into a decorative pillow. For more information about making punch needle pillows, check out this tutorial: How to Make a Punch Needle Pillow.
Wall Hanging Instructions
Here is how to turn your rainbow design into a punch needle wall hanging with fringe.
To Finish the Edges
Trim the monk’s cloth so that you have about 2-3” seam allowance on the left, bottom, and right sides. Leave a little more, about 4”, on the top side.
For the left, right, and bottom sides: Place the wall hanging right side down. Fold the seam allowances in half toward the piece, and then fold them over once again onto the back of the piece. (This will enclose the raw edges of the monk’s cloth in the fold.) Then, with a needle and thread, whipstitch the seam allowance to the back of the piece. Make the stitches shallow enough that they won’t show through to the front side.
For the top side: Finish the top side in a similar way, after you’ve done the other three sides. Leave the sides open, so that you can slide a dowel rod through the folded sleeve allowance.

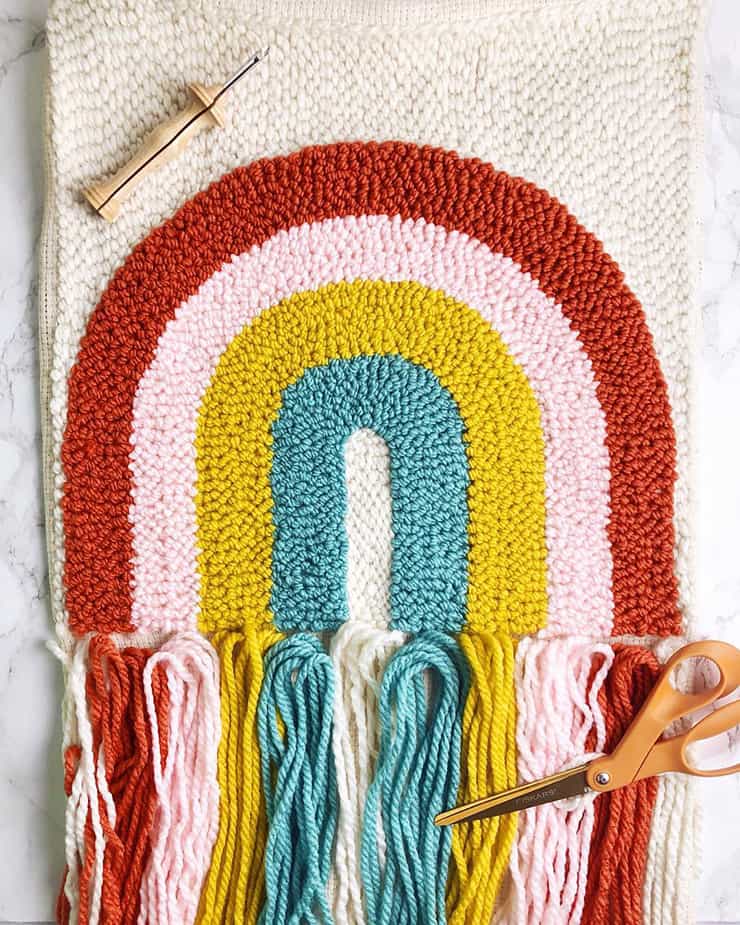
To Add Fringe
Cut 30” long lengths of yarn. Once they are attached, the fringe will be 15” long. (You can make your fringe longer or shorter as desired.)
Use a crochet hook or a rug hooking tool to help you thread the yarn through the holes in the monk’s cloth. Pull the ends of each yarn piece even, so that it will give you 15” fringe.

If you missed it, here is the link to the pattern again. You can download the pattern file here: Rainbow Punch Needle Pattern
Have questions? Join the Facebook Group!
We hope this article was useful for you! If you have any additional questions, feel free to join my Facebook Group. We created this group for you to share pictures, ask questions, and help each other out.

What’s Next?
Pin this post: Save this tutorial to your Pinterest boards so that you can come back to it later.
Leave a comment: We love to hear your feedback. Tell me in the comments below!
Share on Instagram or Facebook: When you make this project, share it on social media and tag me @sarahmaker_. We love to see what you make!

Punch Needle Wall Art
Learn how to make a modern rainbow punch needle wall art piece and finish it with fringe.
Materials
- monk's cloth fabric
- wool rug yarn or bulky weight craft yarn
- wooden dowel for haning
Tools
- punch needle tool
- q snap frame or gripper strip frame
- scissors
Instructions
Punch the Rainbow Design
- Transfer the pattern design onto the “wrong” side of the fabric, remembering that it will be reversed when turned over.
- Stretch the monk’s cloth foundation fabric on the frame. It is important to stretch the fabric tightly in the frame or hoop for best results — think “tight as a drum”!
- Thread the needle tool with yarn.
- Start by punching in the outlines of the shapes. Then, fill in the shapes.
- Trim your thread, leaving a small tail on the “right” side of your work. Use scissors to trim any yarn tails to match the height of the loops.
To Make a Wall Hanging
- Trim the monk’s cloth so that you have about 2-3” seam allowance on the left, bottom, and right sides. Leave a little more, about 4”, on the top side.
- Fold the sides and bottom seam allowances in half toward the piece, and then fold them over once again onto the back of the piece. Whipstitch down to secure.
- Finish the top seam allowance in the same way, but leave the sides open so that you can slide a dowel rod through the folded sleeve allowance.
To Add Fringe
- 1. Cut 30” long lengths of yarn. Use a crochet hook or a rug hooking tool to help you thread the yarn through the holes in the monk’s cloth. Pull the ends of each yarn piece even, so that it will give you 15” fringe.


Similar Posts
How to Make A Punch Needle Pillow
How to Punch Needle: Complete Guide
The Best Punch Needle Supplies
10 Tips for Punch Needle Embroidery Beginners
Punch Needle FAQs : Troubleshooting Problems