

Ready to start making your own friendship bracelets? First, you’ll need to learn the 4 basic knots. In this article, I’ll walk you through each of the knot techniques step-by-step. You’ll be making your own bracelets in no time!

Friendship Bracelet Knots
In the world of friendship bracelets, there are 4 basic types of knots. Learning each of the 4 knots is key to understanding how to make and design your own friendship bracelets.
Each of the 4 knots is composed of two halves – called hitches. The four basic friendship bracelet knots use two hitches stacked together in different combinations.
The Hitch
The hitch is the building-block of friendship bracelet knots. Each of the four basic knots is made from two hitches, one tied right after the other.

The hitch can be tied in the forward or backward direction.
To make a forward hitch: Cross the left-hand (yellow) string over the right-hand string (pink). Pass the yellow string under the pink string and back up through the loop. Tighten.
The forward hitch is sometimes referred to a “4” knot. You can see that when the left-hand (yellow) string passes over and around the right-hand string (pink), it resembles the number “4”.
This can be a useful way to remember how to tie the forward hitch. Think “forward means four“.

To make a backward hitch: Cross the right-hand (pink) string over the left-hand string (yellow). Pass the pink string under the yellow string and back up through the loop. Tighten.
The backward hitch is sometimes referred to a “P” knot. You can see that when the right-hand (pink) string passes over and around the left-hand string (yellow), it resembles the letter “P”.


The Forward Knot
Forward knots create a knot the same color as the left-hand string. The string will also travel from left to right in a forward direction.
The forward knot is made by tying a forward hitch followed by a second forward hitch.
In other words, you will tie two hitches in a row using the left-hand string on top of the right-hand string.
After making a forward knot, the strings should have switched place. The color of the knot will be the same color as the string that began on the left.


The Backward Knot
Backward knots create a knot the same color as the right-hand string. The string will also travel from right to left in a backward direction.
The backward knot is made by tying a backward hitch followed by a second backward hitch.
In other words, you will tie two hitches in a row using the right-hand string on top of the left-hand string.
After making a backward knot, the strings should have switched place. The color of the knot will be the same color as the string that began on the right.

The Forward-Backward Knot
Forward-Backward knots create a knot the same color as the left-hand string. The string will stay in the same position. In other words, it won’t switch place with the string next to it.
The Forward-Backward knot is made by making a forward hitch followed by a backward hitch.
In other words, use the left-hand string (yellow) to tie a forward hitch on top of the right-hand string (pink). The strings will switch place.
Then, use the new right-hand string (which is now yellow) to make a backward hitch on top of the left-hand string (which is now pink). The strings will switch place.
Because the strings switched place twice, they will end up in the position as they started in.

The Backward-Forward Knot
Backward-Forward knots create a knot the same color as the right-hand string. The string will stay in the same position. In other words, it won’t switch place with the string next to it.
The Backward-Forward knot is made by making a backward hitch followed by a forward hitch.
In other words, use the right-hand string (pink) to tie a backward hitch on top of the left-hand string (yellow). The strings will switch place.
Then, use the new left-hand string (which is now pink) to make a forward hitch on top of the right-hand string (which is now yellow). The strings will switch place.
Because the strings switched place twice, they will end up in the position as they started in.
Friendship Bracelet Knot Symbols
When you look at friendship bracelet patterns, you will read the pattern as a series of symbols laid out in a diagonal grid.
The colors of the strings and the types of knots are described by the symbols you see below:
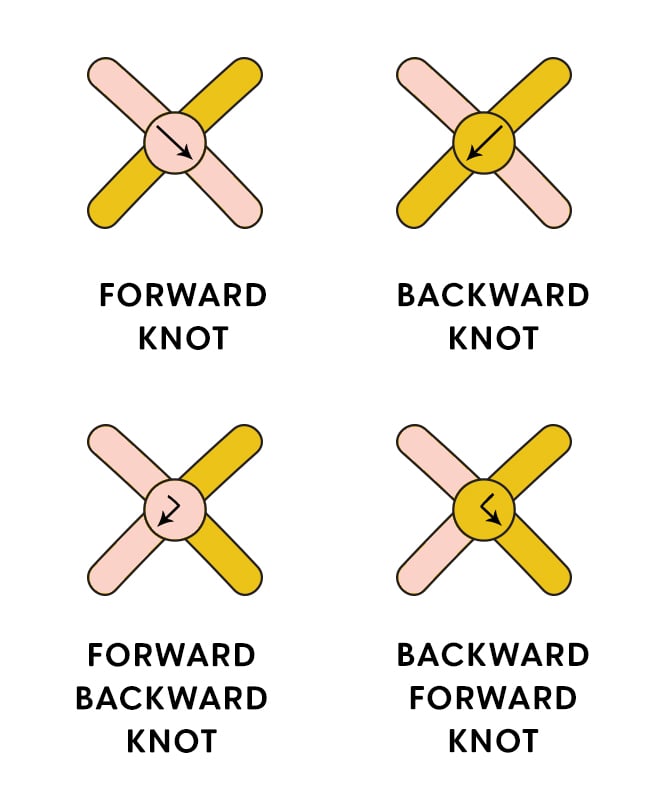
The colored lines in the symbol represent the left and right strings that you will use to tie the knot.
The circle in the center of the “X” represents the color and direction of the knot. The arrow tells you the types of the two hitches that make up the knot.
How Tight Should Friendship Bracelet Knots Be?
How tight should you tie your knots? It’s a bit of a Goldilock’s scenario. You don’t want the knots to be too loose or too tight. You want them to be just right.
Nothing but lots of practice will help you find the right tension that will give you the look you want.
If you make your knots too loose, you may see some string in between your knots. Your bracelet might have gaps or look like a net. As a result, it will be harder to see the design of your pattern.
If you make your knots too tight, the knots might “pop” or you may have trouble with the string colors flipping.
Practice Makes Perfect!
Making friendship bracelet knots can be a little tricky at first! But keep working at it! In this case, practice really does make perfect.
With a little patience, you will master these knots. And after that, you are well on your way to mastering ever bracelet pattern you can find online.
What’s Next?
Pin this post: Save this tutorial to your Pinterest boards so that you can come back to it later.
Leave a comment: We love to hear your feedback. Tell me in the comments below!
Share on Instagram or Facebook: When you make this project, share it on social media and tag me @sarahmaker_. We love to see what you make!


Similar Posts
19 Easy Friendship Bracelet Patterns for Beginners
How to Make a Chevron Friendship Bracelet
How to Read Friendship Bracelet Patterns
How to Make a Diamond Friendship Bracelet Pattern
Friendship Bracelet Color Ideas and Combinations
How to Start A Friendship Bracelet with a Loop (Buckle)