

Wondering how to read friendship bracelet patterns? It’s easier than you think! Keep reading for my in-depth tutorial that will teach you how to read the friendship bracelet symbols and pattern grids.

Reading Bracelet Patterns
Making friendship bracelets is a simple craft that is surprisingly fun to do. Once you learn how to make the four basic friendship bracelet knots, there’s no limit to the beautiful patterns you can create!
There is a seemingly endless supply of friendship bracelet patterns available on the internet. Stripes, chevrons, hearts, arrows – whatever design you can think of, you can find!
Types of Friendship Bracelet Patterns
You may already know that there are a few different types of friendship bracelet patterns. Here are the two main types.
- Normal patterns are the most well-known type of pattern. You’ll know your pattern is a “normal” type pattern when the knots move in a diagonal direction. The charts for normal patterns look like diagonal grids.
- Alpha patterns are another type of friendship bracelet pattern with horizontally tied knots. Alpha patterns are often used to make designs with letters or simple images. The charts for Alpha patterns look like a grid.
This article will focus on teaching you how to read normal patterns.
Where to Find Patterns
My favorite place to look for patterns is a website called BraceletBook. Another great site with friendship bracelet patterns is friendship-bracelets.net.
Looking for even more pattern inspiration? For beginners, I’ve rounded up a collection of the best easy friendship bracelet patterns. For more experienced bracelet makers, I’ve collected an amazing list of advanced friendship bracelet patterns, too.
Once you learn to read friendship bracelet patterns, you’ll be able to make any design you come across.
Parts of a Friendship Bracelet Pattern
Let’s use an example of a chevron bracelet pattern. Here are the parts of a bracelet pattern that you need to know.
Pattern preview image. The pattern will usually include a small preview image at the top of the chart. This will show you how your friendship bracelet will look when you have completed the project. The colors in the preview image correspond to the colors in the chart.
If you’re using a tool like Bracelet Book, you can change the colors, or the order of the colors, as you like. Then, check out the new preview image to see what the bracelet will look like.

Strings. Across the top of the chart, you will see a number of strings, labeled with letters. The pattern will use one letter for each color. And if you have two strings with the same colors, they will have the same letter.
For example, in this chevron bracelet pattern, there are 8 strings, two of each color. That means 2 A’s, 2 B’s, 2 C’s, and 2 D’s.
Next, look at the order of the strings.
Let’s say that the letters across the top read “ABCDDCBA”. This means that you will start your bracelet with the 8 strings arranged in that particular order.
Rows. On the sides of the chart, you will see numbered lines. These numbers indicate the rows of the pattern.
Important note: Some bracelet patterns have an even number of strings, and some have an odd number of strings. For bracelets with an even number of strings, you will see that odd-numbered rows have knots for each pair strings. Even-numbered rows have one less knot – the two outer strings are not used to tie any knots in the row.
Knot Symbols. The circles at the intersections of the strings represent the knots. The arrows indicate the type or direction of each knot.
The bent “elbows” at the outer edges of even-numbered rows indicate that the two outer strings are not used.
Pattern Repeat. The pattern chart usually includes one full repeat on the pattern. When you reach the end of the chart, the strings should be lined up in the correct order so that you can start the chart over again. You will likely need to make many repeats of the pattern to make a finished bracelet.
Review of Basic Friendship Bracelet Knots
There are four basic types of friendship bracelet knots.
- Forward Knot
- Backward Knot
- Forward-Backward Knot
- Backward-Forward Knot
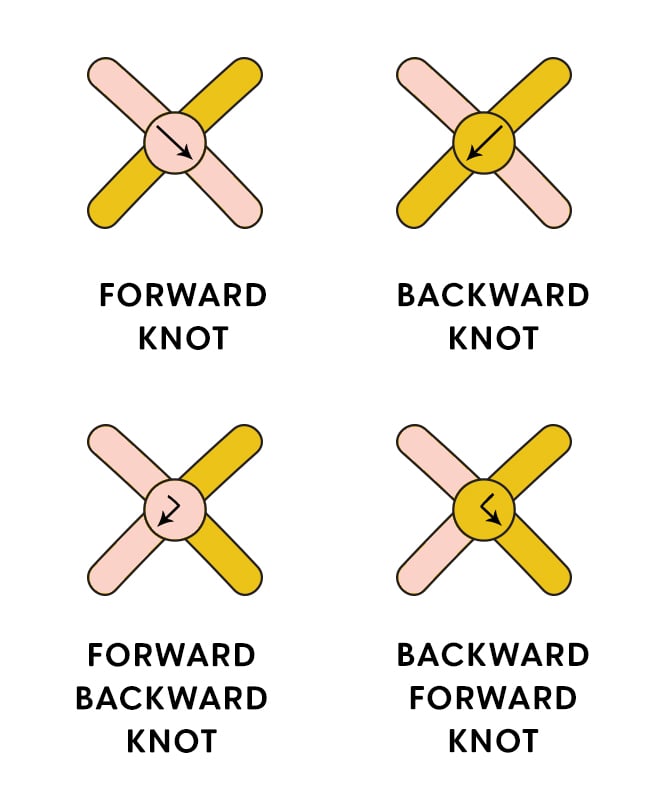
Each of the four knots is composed of two half knots – called hitches. The four basic friendship bracelet knots use two hitches stacked together in different combinations.
Forwards knot: forward hitch + forward hitch
Backward knot: backward hitch + backward hitch
Forward-Backward knot: forward hitch + backward hitch
Backward-Forward knot: backward hitch + forward hitch
For a full explanation of the different types of friendship bracelets knots, with lots of diagrams and pictures, be sure to read How to Tie the 4 Basic Friendship Bracelet Knots.

How to Read a Friendship Bracelet Pattern
After you’ve chosen a bracelet pattern and selected your string colors, it’s time to start making your project.
- Cut about 36″ of embroidery floss for each strand. You can also cut 72″ of floss and fold it in half to create two strands of the same color.
- Tie all of the strands together with a simple overhand knot. Leave about a 3-4″ tail.
- Secure the tail of the bracelet to a tabletop with masking tape, clip the tail of the bracelet in a clipboard. You can also use a safety pin to secure the knot to your jeans.
- Arrange the strings in the color order indicated by the letters at the top of the pattern.
- Working one row at a time, make the knots as indicated by the circled arrows. Let’s say you were making the pattern example in this post. Starting with Row 1, you would make a forward knot, a forward knot, a backward knot, and a backward knot.
- Move on to Row 2. This is an even-numbered row, so you won’t use the outer two strands. If you were making the pattern example in this post, you would make a forward knot, a forward knot, and a backward knot.
- Continue along each row, repeating the pattern chart as many times as necessary.
- When the bracelet is as long as you’d like, tie all of the strings together with another overhand knot. Leave a longer tail so that you will be able to tie the bracelet on to your wrist.
And there you go! You’ve learned how to read friendship bracelet chart patterns.
What’s Next?
Pin this post: Save this tutorial to your Pinterest boards so that you can come back to it later.
Leave a comment: We love to hear your feedback. Tell me in the comments below!
Share on Instagram or Facebook: When you make this project, share it on social media and tag me @sarahmaker_. We love to see what you make!


Similar Posts
How to Make a Diamond Friendship Bracelet Pattern
How to Make Friendship Bracelets
Friendship Bracelet Color Ideas and Combinations
How to Start and End Friendship Bracelets for A Finished Look
How to Make a Candy Stripe Friendship Bracelet
19 Easy Friendship Bracelet Patterns for Beginners