Have you ever wanted to learn how to macrame?
Macrame is a decorative knotting craft that anyone can do with just a little bit of practice! It’s is a great way to create beautiful and functional pieces of art to decorate your home with vintage flair.
In this article, I’ll show you the common macrame knots, recommend my favorite macrame materials, and show you how to start your first project. Keep reading to learn how to macrame with this easy step-by-step guide.
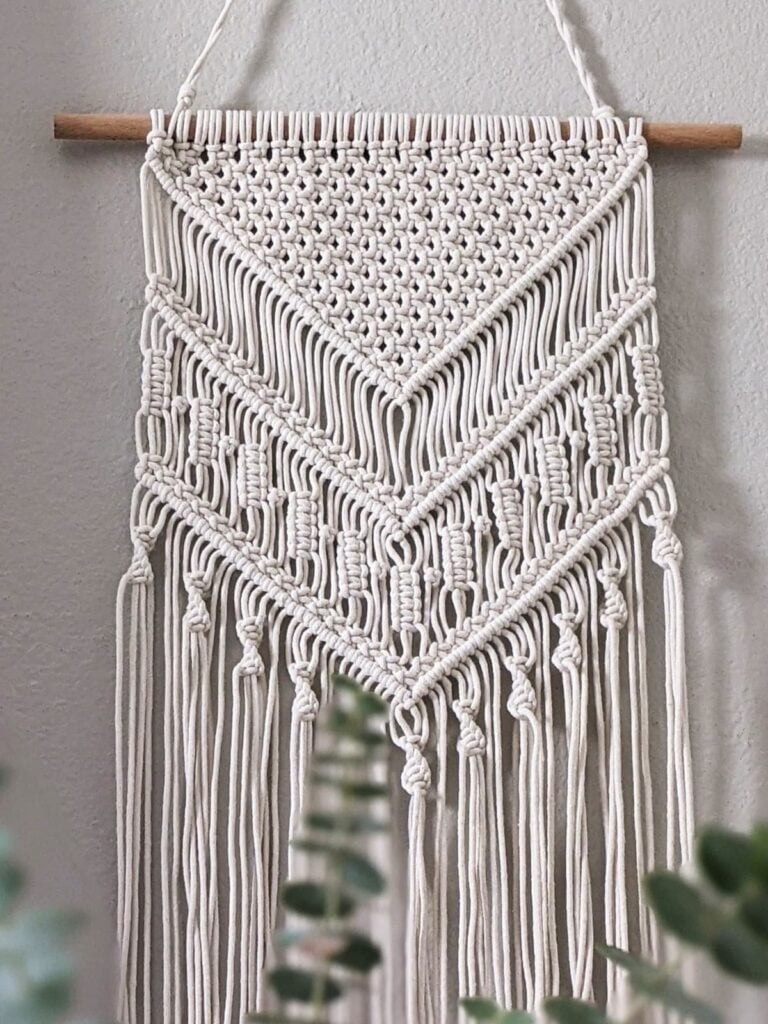
What is Macrame
Macrame is a creative knotting technique that can be used to make a variety of items, including jewelry and other decorative items. It’s a great way to relax and create beautiful art pieces for your home.
Macrame is traditionally made with cotton or hemp rope. The ropes are tied in different knots to create beautiful knotted patterns.
History of Macrame
The craft of macrame is believed to have originated with Arabic weavers during the 13th century, who used knotting techniques to create towels, shawls, and tapestries. From there, it spread across Europe and the rest of the work.
Macrame has been popular in many periods throughout history, including the Victorian Era, the 1970s, and now. Today, you’ll see macrame being used to create modern wall hangings, plant hangers, friendship bracelets, belts, and bags.
How to Get Started with Macrame
It’s easy to get started with macrame – all you need is some macrame cord and a little bit of practice.
This macrame beginner’s guide will teach you everything you need to know to get started. I’ll show you:
- what supplies you’ll need
- how to set up your workspace
- and how to tie the basic macrame knots.
Plus, I’ll show you where to find free macrame patterns.
Is macrame easy to learn?
Yes, macrame is easy to learn! Although it may look complicated at first glance, macrame is a simple craft that anyone can learn to do.
Once you learn how to tie the basic macrame knots, you can combine them in different ways to create any pattern you can imagine.
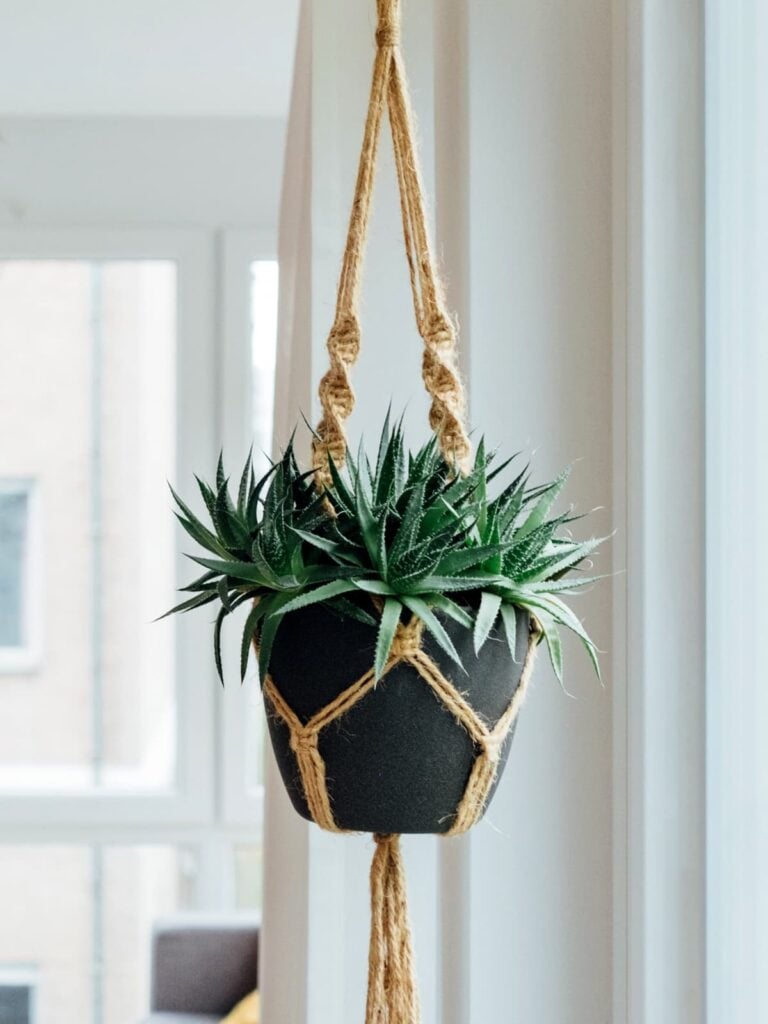
Macrame Supplies
You don’t need any complicated tools or expensive materials to do macrame. For most projects, you’ll only need:
- rope
- scissors
- measuring tape
You can make macrame with cords made from a variety of materials, including cotton, linen, hemp, jute, leather, or wool.
Some projects will require special hardware, like metal hoops, wooden rings, purse handles, or belt buckles.
You can add other decorative elements, like glass or wood beads.
Best Rope for Macrame
The best type of macrame cord is cotton twine or rope. Cotton rope is soft, flexible, and widely available. It’s easy to tie, and it won’t stretch out over time.
Cotton rope can be purchased online or at most craft stores for a reasonable price. For most home decor projects, I prefer to use a 4-6mm 3-ply cotton cord.
For jewelry projects (micro-macrame), choose a cord that is less than 2mm in diameter.
Other Materials
You can also use hemp rope or jute to give your projects a more rustic, natural look. These materials are slightly more challenging to work with, but they provide a durable and textured finished product.
Other materials you can use include leather cord, nylon paracord, and polypropylene rope.
Can you use yarn for macrame?
You can use yarn for macrame, but it wouldn’t be my first choice. The type of yarn that you’d normally use for knitting or crochet is usually too thin and stretchy. Most knitting yarns compress so much that the knots you’d make would be smaller than expected.
That said, you can use cotton yarn for small macrame projects since it’s not as stretchy or compressible.
Setting up your Workspace
Before you start a new project, you’ll need to set up a macrame workspace. Make sure you have adequate lighting and enough room to move around comfortably.
Depending on the type and size of your project, you can work horizontally on a flat surface, or vertically on a hanging setup.
Horizontal Setup
You can do some smaller projects on a flat, horizontal surface – like a tabletop. Secure the starting end of the piece to the table to keep tension on the cords as you work. For smaller pieces, like macrame bracelets, you can secure them underneath the clip of a clipboard.
Vertical Setup
Larger projects, especially wall hangings, will require a vertical workspace. Hang your work high enough that you can work comfortably.
Here are a few strategies for hanging your piece:
- Hang a wood dowel rod from a clothing rack.
- Over the back of a door
- Over the back of a tall chair
- From a doorknob
If you’ll be making a lot of wall hangings, I highly recommend investing in a rolling garment rack.

Basic Macrame Knots
Now that you have your materials and your workspace, you’re ready to learn the basic macrame knotting techniques.
Macrame knots are easy to learn, but they do take some practice to truly master. Once you know these common macrame knots, you’ll be able to recreate all of the beautiful projects you see online.
Here are the knots you’ll need to know, broken down into four categories: mounting knots, square knots, hitch knots, and gathering knots.
Mounting Knots
Use mounting knots to attach your rope to a dowel rod or wooden ring.
Lark’s Head Knot
The lark’s head knot is a super simple knot used to attach your rope to a dowel rod, ring, or even another rope. It can be tied forward-facing or reverse-facing. Here’s how to tie both:
To make a Lark’s Head Knot:
- Measure and cut a length of cord. Fold the rope in half, bringing the ends together.
- Bring the folded loop up in front of the dowel, then back down behind the dowel. With the loop pointing downwards, pull the two ends of the cord through the loop.
- Pull down on the ends to tighten the knot, making sure both ends are even.
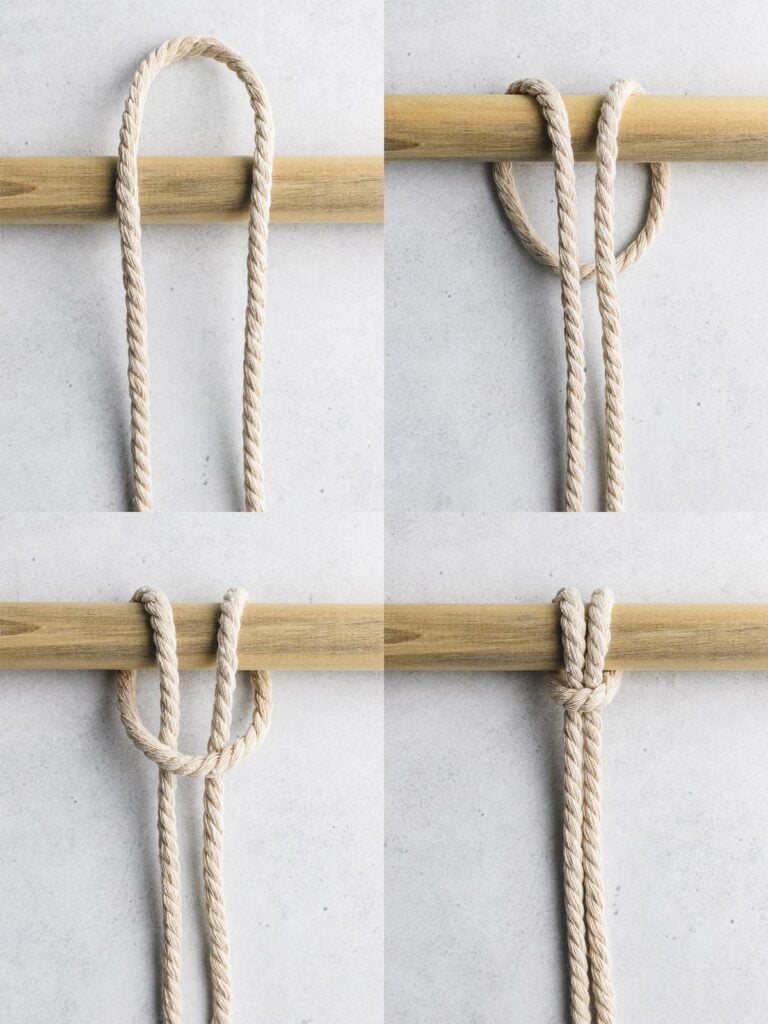
Reverse Lark’s Head Knot
To make a reverse lark’s head knot:
- Measure and cut a length of cord. Fold the rope in half.
- Bring the folded loop up behind the dowel, then forward and down in front of the dowel. With the loop pointing downward, pull the ends of the rope up and through the loop.
- Pull down on the ends to tighten the knot, making sure both ends are even.
Square Knots and Variations
Square Knots and Half Square Knots are versatile macrame knots that you’ll use in almost every pattern.
This category of knots is made with four cords: two outer cords, called working cords, around two middle cords, called filler cords.
Half Square Knot
Cut two pieces of rope, and attach them to a wooden dowel with a lark’s head knot. You will now have four strands of cord.
To make a half square knot:
- Bring the left working cord over the two filler cords and under the right working cord.
- Bring the right working cord under the two filler cords and up over the left working cord.
- Tighten the knot.
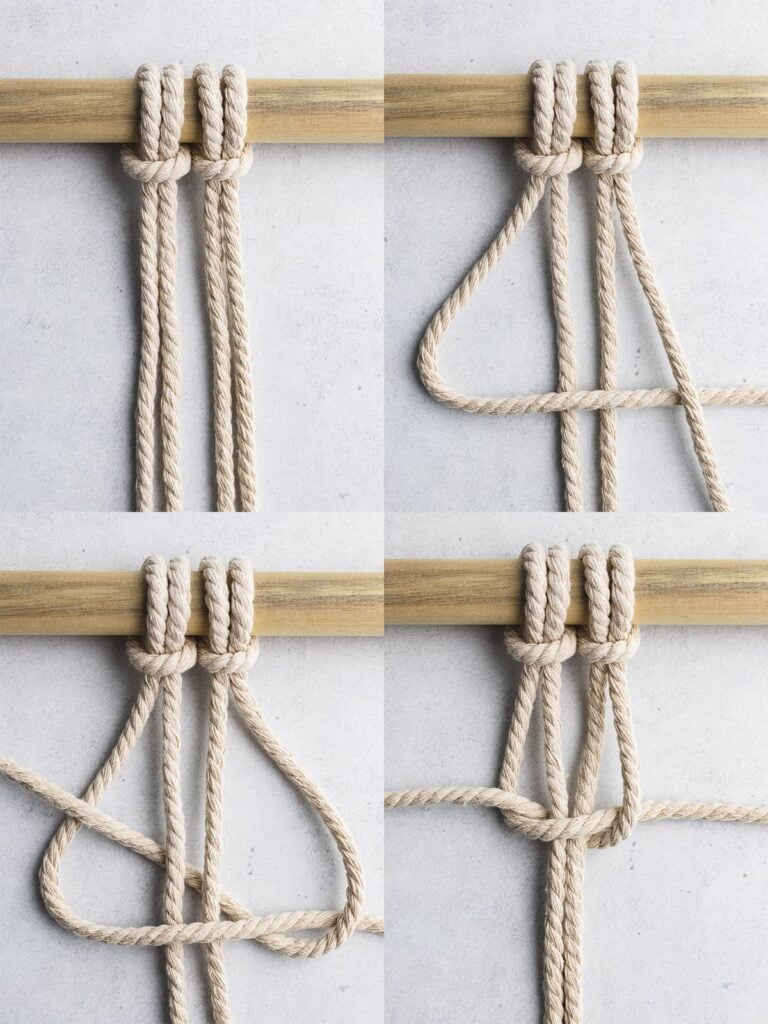
Right Half Square Knot
This is the mirror image of the previous half square knot.
- Bring the right working cord over the two filler cords and under the left cord.
- Bring the left working cord under the two filler cords and up over the right cord.
- Tighten the knot.
Square Knot
Each square knot is made from two half square knots, worked one after the other.
Square Knot, also called Left-facing Square Knot
Work a left half-square knot followed by a right half-square knot.
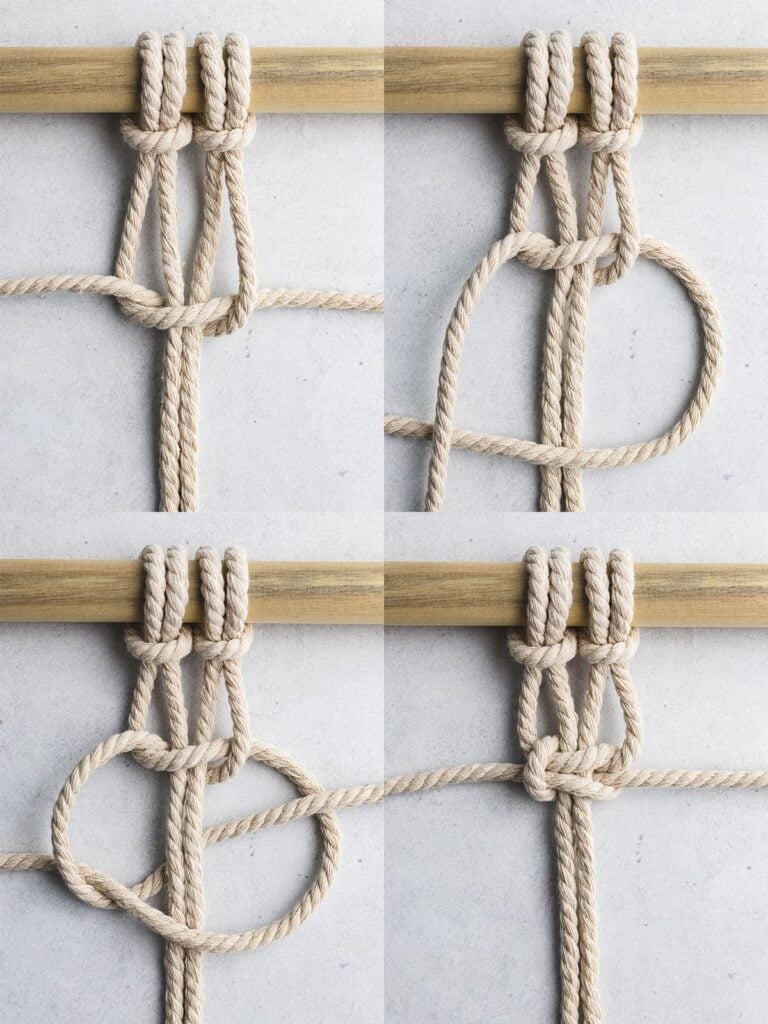
Right-Facing Square knot
Work a right half-square knot followed by a left half-square knot.
Half Knot Spiral
The spiral knot is a sequence of half-square knots worked one after another. Make sure all of the half square knots are facing the same way.
Hitches and Variations
This third category of knots makes beautiful designs but can be a bit trickier for beginners.
Half Hitch
The half hitch knot is a simple knot that can be combined in different ways. You can tie hitch knots with an existing project cord, or a new cord.
Double Half Hitch Knot, also called Clove Hitch Knot
This is a variation of the half hitch knot. It can be tied to create horizontal, vertical, and even diagonal lines in macrame pieces.
Horizontal Double Half Hitch
A row of horizontal double half hitch knots made a raised bar across your work. Each horizontal double half hitch knot is made from two half hitch knots made from the same working cord.
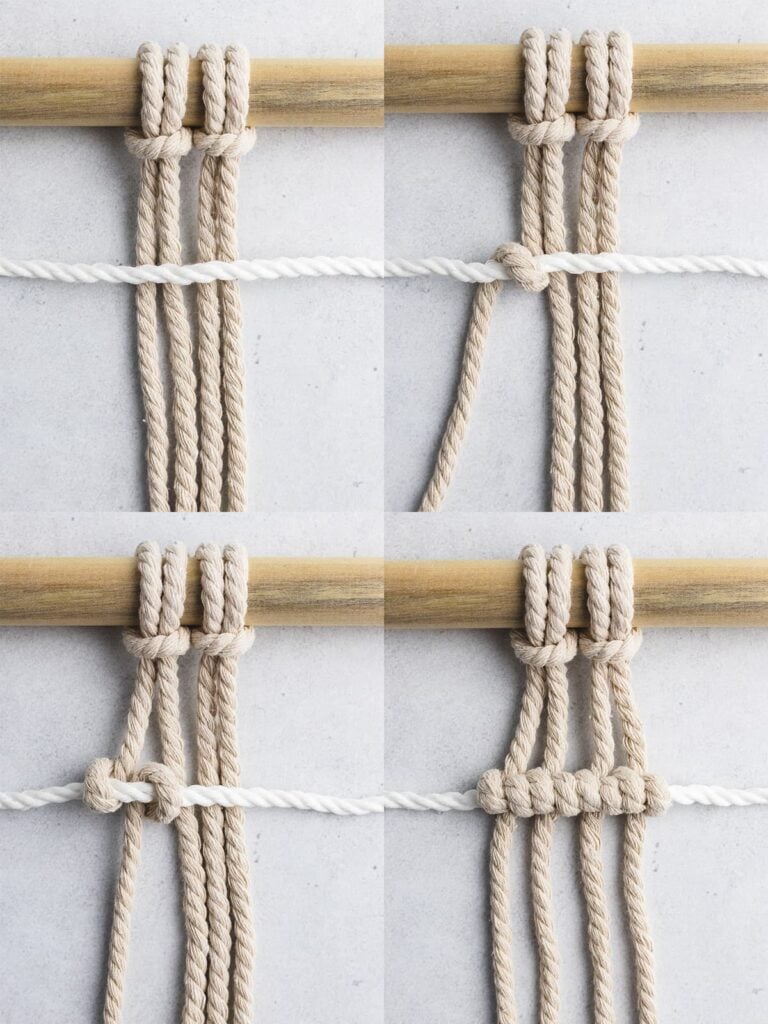
Diagonal Double Half Hitch Knot
Diagonal double half hitch knots are very similar to horizontal double half hitch knots, except the row of knots is positioned diagonally instead of horizontally.

Vertical Double Half-Hitch
A vertical double half hitch knot is made from two half hitch knots. To make vertical double half hitch knots, use one working cord to make double half hitch knots across multiple filler corder.

Gathering Knots
And finally, we have a group of knots that are used to finish projects.
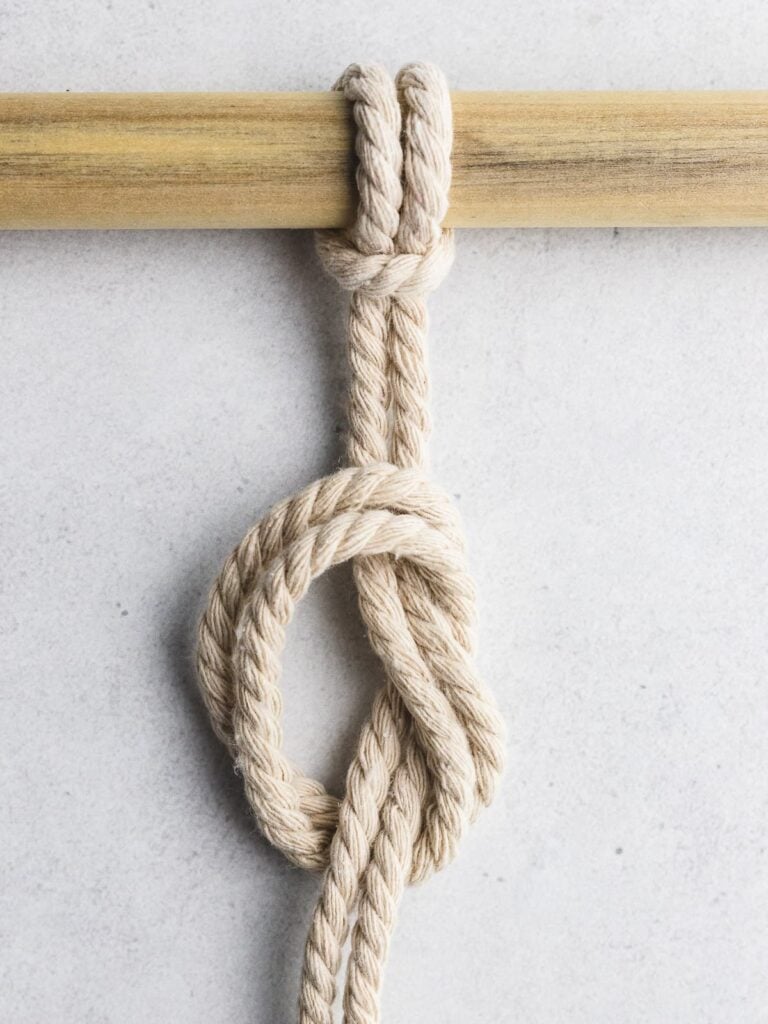
Overhand Knot
The overhand knot is often used to prevent the end of a length of rope from unraveling. Overhand knots can also be used to tie two cords together at the bottom of a piece.
Wrapping Knot
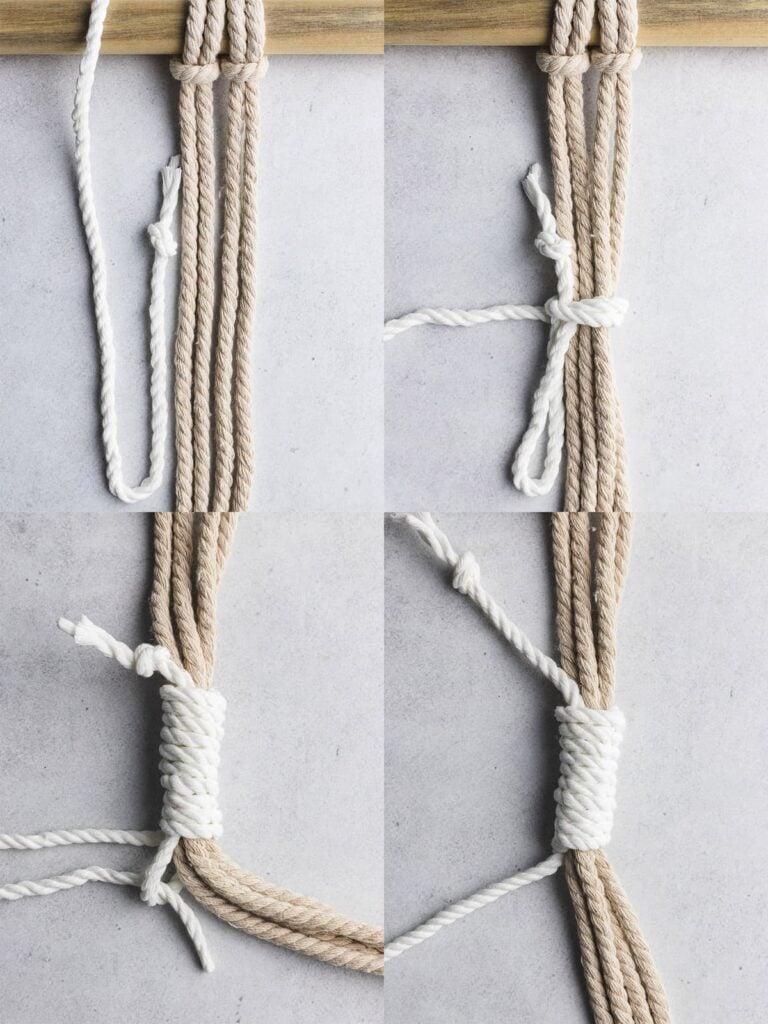
Use a wrapping knot to secure a group of cords. You can use this knot at the beginning or end of a macrame project.
- Cut a long length of cord. (You will trim it to size later.)
- Gather the group of cords that need to be wrapped. Bring the folded end of the working cord down to the area you want to wrap.
- Wrap the working cord around the grouped cords. Pass the working cord through the loop, and pull the other end to secure.
How to Add Fringe to Macrame
The type of fringe you can create depends on the type of cord you’ve used for the project.
- Trim the cords to your desired length.
- Use a stiff wire brush to brush the cords, starting and the ends and working up. Brushing the cords will separate the fibers to create a fine fringe.
- Trim the ends again with sharp scissors.
Macrame Project Ideas
Here are a few different patterns and easy macrame projects you can try.
Start with smaller projects made with thinner cords.
- Easy macrame plant hanger
- Micro-macrame hemp bracelets
- Macrame wall hanging
- Cute macrame keychains
Later, try larger projects made with thicker cords.
- Boho macrame table runner
- Outdoor macrame hammock
- Upcycled macrame circle chair
- Macrame curtain
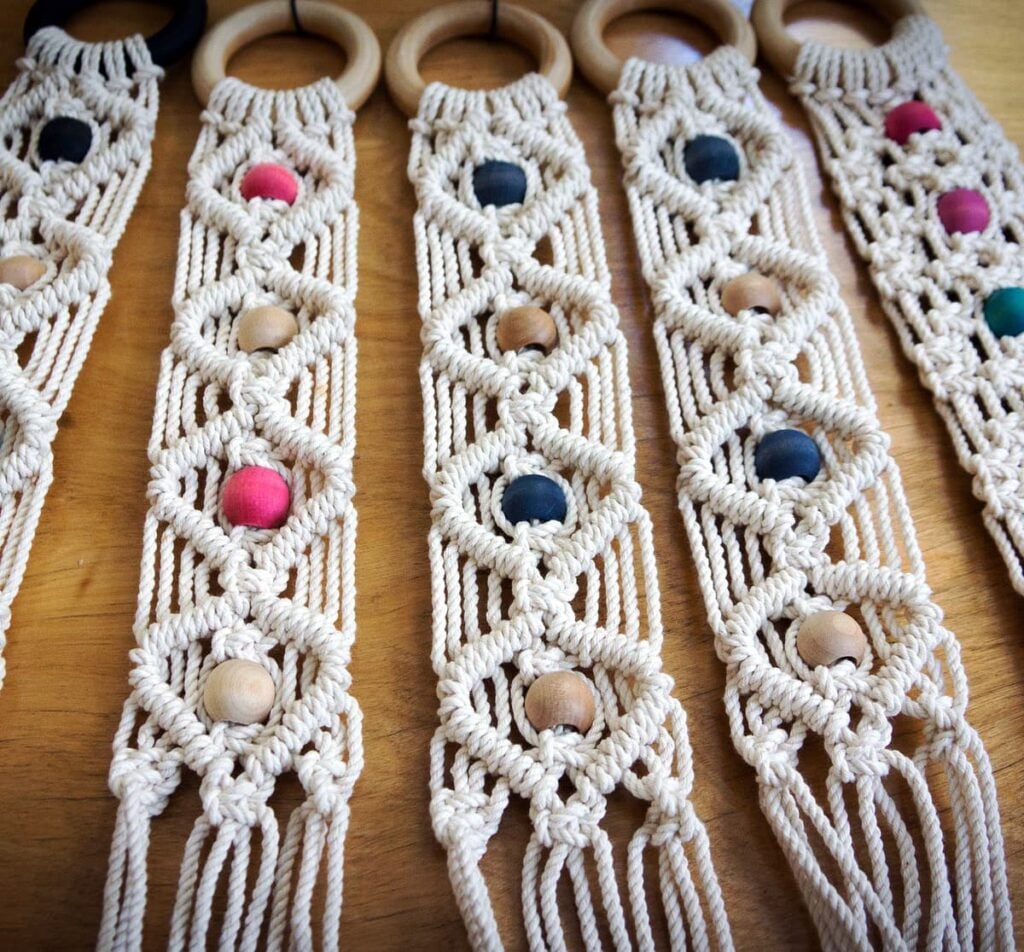
Frequently Asked Questions
Here are common questions that beginners ask when they first start to learn macrame.
What size cord should I use?
The right size cord will depend on the type of project. The smaller the string, the smaller the knots will be.
- Larger home decor projects like wall hangings and plant holders require a sturdier rope. For these types of projects, choose a cord that is 4mm-6mm in diameter.
- For smaller projects, like bracelets and necklaces, choose a soft, flexible cord that’s less than 2mm in diameter.
- For outdoor projects, like hammocks or chairs, consider a durable polypropylene rope.
How much rope do I need?
It can be hard to tell you exactly how much cord to buy. The length depends on the number and types of knots being tied on any given cord.
For example, filler cords that have few, if any, knots will be shorter than working cords.
But, as a general rule, allow yourself five or six times as much cord than the length of the projects. Add extra length if you want to make fringe at the bottom.
Remember that it’s better to have too much rope than too little – you can always trim off the excess!
Why are my knots uneven?
Everyone struggles with uneven knots when they first start macrame. My more important tip is to keep your tension even while tying knots. Find the balance between knots that are too loose (too big) and too tight (too small).
Neat and tidy knots will come with practice. Keep going until your fingers get into a good rhythm.
Explore More Macrame Ideas
For even more macrame inspiration, check out these related articles.
- 20+ Free Macrame Wall Hanging Patterns and Tutorials
- How to Make a Macrame Plant Hanger: Easy DIY Tutorial
- 21 Free Macrame Plant Hanger Patterns
- 25 Free Macrame Patterns for All Skill Levels
- How to Make Friendship Bracelets
What’s Next?
Pin this post: Save this tutorial to your Pinterest boards so that you can come back to it later.
Leave a comment: We love to hear your feedback. Tell me in the comments below!
Share on Instagram or Facebook: When you make this project, share it on social media and tag me @sarahmaker_. We love to see what you make!
Have questions? Join the Facebook Group!
We hope this article was useful for you! If you have any additional questions, feel free to join my Facebook Group. We created this group for you to share pictures, ask questions, and help each other out.


Similar Posts
20+ Free Macrame Wall Hanging Patterns and Tutorials
25 Free Macrame Patterns for All Skill Levels
17 Basic Macrame Knots: Step-by-Step Instructions
How to Make a Macrame Plant Hanger: Easy DIY Tutorial
21 Free Macrame Plant Hanger Patterns