

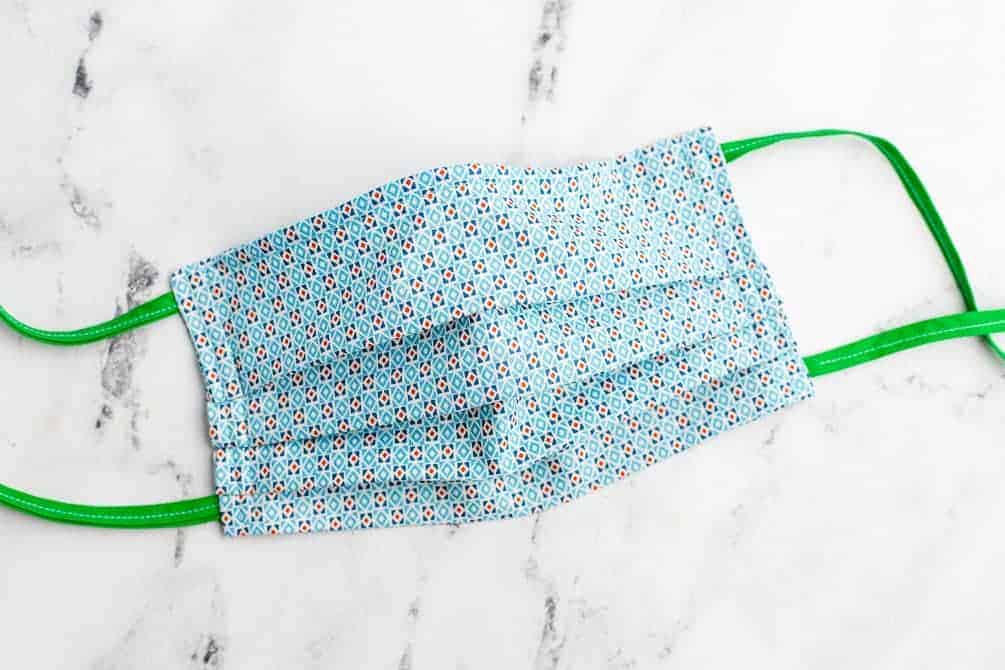
The DIY face mask pattern in this post will teach you to make a pleated fabric face mask with either elastic ear loops or fabric ties.
If you can’t find elastic to make elastic ear loops, the pattern includes additional instructions to make and use fabric ties. You can make fabric ties from cotton fabric, t-shirt material, or ready-made bias binding.
You can make this easy fabric face mask with or without an optional interior filter pocket. The filter pocket allows the wearer to insert additional layers of filtration material if they so desire.
The pattern also includes instructions for inserting nose wire into the upper nose bridge section to create a better-fitting fabric mask.
A free printable PDF version of these pattern instructions is available at the bottom of the post. And you can watch the video tutorial on Youtube.
If you don’t have a sewing machine, I have a separate post with 5 Ways to Make a No-Sew Face Mask and another free pattern showing you How to Fold a No-Sew Bandana Face Mask.
Is there a need for Fabric Face Masks?
Yes! The CDC says that the use of cloth masks can help slow the spread of disease.
Many makers have asked for a pattern to sew homemade surgical-style face masks for their families, communities, and local hospitals.
There is currently a high demand for all types of face masks. Since disposable masks are hard to come by, many people have been making fabric masks to use as protective face coverings.
Members of the community are encouraged to use reusable fabric face masks and other face coverings when in public, or in situations where social-distancing is difficult
What’s more, since there is such a high demand for protective equipment for healthcare workers, many hospitals across the country have requested homemade surgical masks as an emergency stopgap measure.
According to the CDC, fabric masks are a crisis response option when other supplies have been exhausted.
The CDC Now Recommends the Use of Cloth Face Coverings
Federal health officials now recommend people over the age of 2 cover their mouths and noses with cloth face masks when in public.
This is a voluntary public health measure meant to help “stop the spread” when people must visit public spaces such as grocery stores and public transit stations.
CDC is additionally advising the use of simple cloth face coverings to slow the spread of the virus and help people who may have the virus and do not know it from transmitting it to others.
Sewing a cloth face mask for yourself will allow medical-grade surgical masks and N95 masks to be reserved for healthcare professionals and patients.
Homemade Face Masks are Helpful
The Centers for Disease Control and Prevention (CDC) has explained that wearing a cloth mask can help protect the people around you, especially essential workers or other people with risk factors.
The CDC explains that while homemade masks are not a substitute for social distancing, they are an important tool for protecting ourselves and others.
Everyone should wear a cloth face cover when they have to go out in public, for example to the grocery store or to pick up other necessities.
CDC.gov
Making and wearing fabric face masks is important because it helps to reserve medical facemasks meant for healthcare workers.
I strongly caution you before you spend time sewing these masks:
- Follow the CDC guidelines as the situation develops.
- Contact your local hospital and clinic to ensure that they are accepting masks, and that any masks you make will meet their individual guidelines.
The Best Fabric to Use to Make A Face Mask
Researchers at Cambridge University tested the effectiveness of a wide range of household materials for use in homemade masks. They measured how well the household materials could capture and filter small particles.
Test data shows that the best choices for DIY fabric masks are cotton t-shirts, pillowcases, or other cotton materials. Using a double layer of material for your DIY mask adds a small increase in filtration effectiveness.
Other research has found that most effective masks were constructed of two layers of heavyweight “quilters cotton” with a thread count of at least 180, and had a thicker and tighter weave.
This face mask pattern has 2 layers of fabric, and an internal pocket in which you can add additional layers of disposable filtration material if desired.
An Important Distinction
Homemade face masks are not as effective as the N95 filtration mask recommended by the CDC, and are not a substitute for proper PPE.
Rather, they are meant:
- To respond to the hospitals’ requests for emergency backup masks.
- To help community members “slow the spread” in public settings where other social distancing measures are difficult to maintain.
Sources for further reading: Cambridge Study, Nature, Occ. Env Med, Annals Occ Hygiene
Some Hospitals are Requesting Homemade Surgical Masks
Some hospitals and clinics accept donations of homemade face masks. Organizations like Masks for Heroes have a searchable database of facilities currently seeking donations. If you are wondering where you can donate masks, they can help you find a hospital or clinic that needs them.
Before you spend time sewing a large batch of masks to donate, please call first to ask if they are accepting them. You should ask if this face mask pattern (2 layers of fabric with a pocket for additional disposable inserts) will meet their requirements. You should also ask about drop-off/pick-up procedures.

DIY Face Mask Pattern
The finished adult mask will be 7.75″ wide and 3.75″ tall.
View the full video tutorial on YouTube!
Materials
- 100% cotton fabric (with a tight weave)
- 1/8″ flat elastic for ear loops, or 4 fabric ties (you can use the same cotton fabric to make strips, use pre-made bias binding, or strips of cotton jersey)
- fabric scissors
- ruler
- pins or clips
- sewing machine and thread
Cut List
For an adult-size mask:
- Cut 1 fabric rectangle 16″ long and 8.5″ wide (40.5 cm by 21.5 cm)
- Cut 2 pieces of elastic, each 7″ long (or up to 8″ for larger adult size) (18 cm – 20 cm)
For a small child-size mask:
- Cut 1 fabric rectangle 14″ long and 6.5″ wide (35.5 cm by 16.5 cm)
- Cut 2 pieces of elastic, each 6″ long (15 cm)
For a large child-size mask:
- Cut 1 fabric rectangle 15″ long and 7.5″ wide (38 cm by 19 cm)
- Cut 2 pieces of elastic, each 6.5″ long (16.5 cm)
For fabric ties, if you aren’t using elastic:
- Cut 4 rectangles 18″ long by 1.75″ wide (46 cm by 4.5 cm). Fold the long sides to meet in the middle, then fold in half again to encase the raw edges. Stitch down the length of the rectangles along the edge to create the ties.
- 18″ may be too long for some people, especially kids. Please feel free to trim this down.

Step 1: Sew to the top side, with pocket
Fold the fabric rectangle in half, with the right sides facing each other.
Sew along the top 8.5″ width edge, using a large 5/8″ seam allowance. Leave a 3″ – 4″ opening in the center of this seam to create an opening for the filter pocket, and to allow the mask to be turned right side out after sewing. In the picture above, I’ve marked this opening with pins.
Update: Some people are finding it easier to insert/remove additional filter material if they make a larger opening. Instead of leaving a 3″ opening, you could make a 4″ inch opening.

Don’t want a filter pocket? If you don’t want or need a pocket, that’s totally fine. You will still need to leave an opening so that you can turn the mask right side out. After you’ve attached the elastic or ties (in the next step) and turned the mask right side out, you can stitch the opening closed. Then you can continue with the rest of the directions.
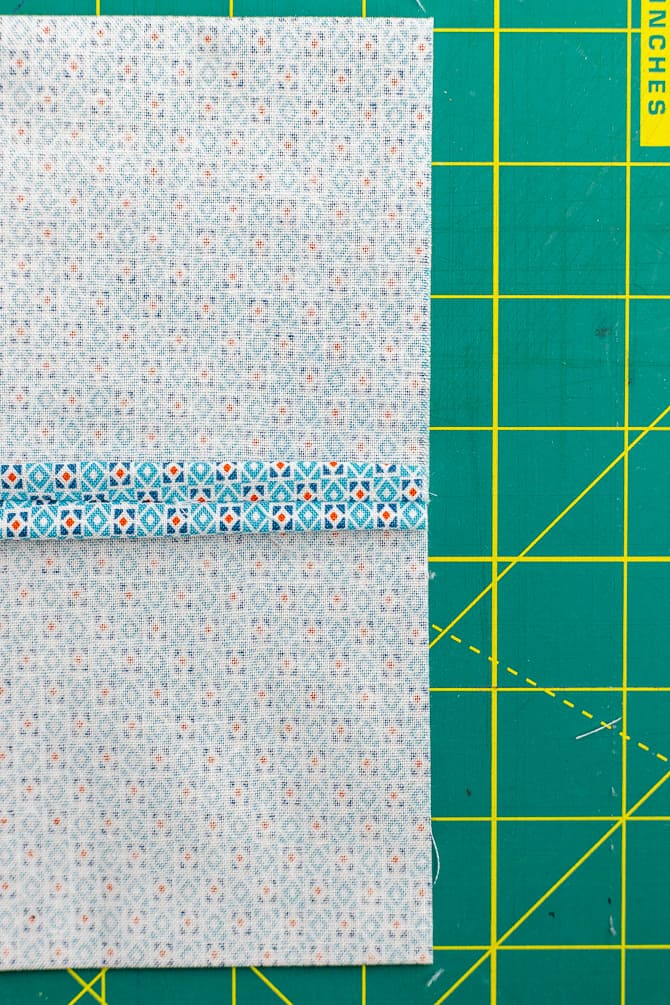
Next, turn the fabric so that the seam with the pocket opening is centered in the middle of one side. Using an iron, press the seam open.
Fold the excess seam allowance under, encasing the raw edge of the fabric. Topstitch or zig-zag stitch along each side of this seam to finish the edge. This will help keep the fabric from fraying when you insert and remove any filters.
See the next photo or the video for clarification.

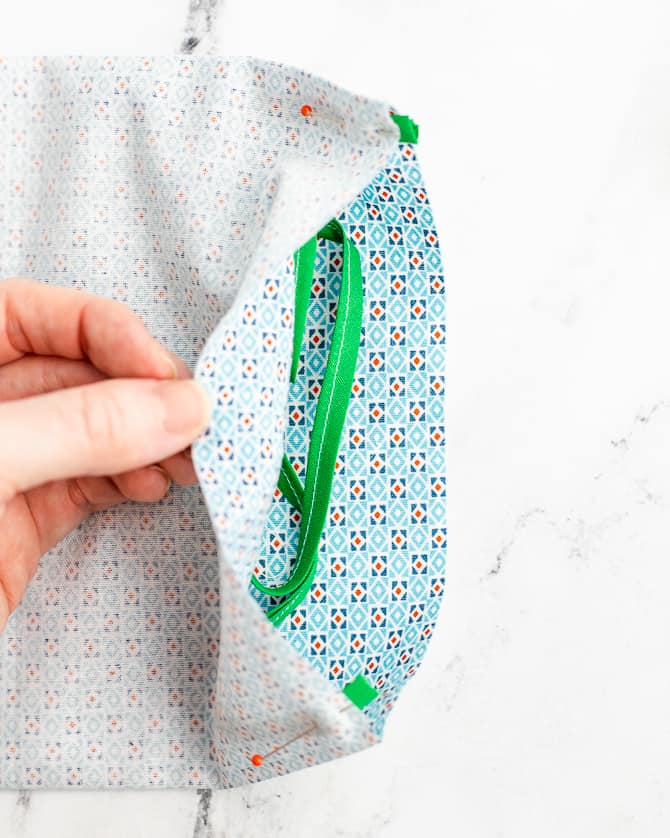
Step 2: Pin Elastic or Fabric Ties
If Using Elastic:
Pin one piece of elastic to each side of the mask, one end to the top corner and one end to the bottom corner of the fabric rectangle. This will create the ear loop once the mask is turned right side out and pleated. Place the ends of the elastic about 1/4″ to 1/2“ from the top and bottom corners of the fabric.
The piece of elastic itself will be sandwiched between the two layers of fabric. Once you turn the mask right side out, the elastic will be on the outside.
Repeat this process on each side to make two ear loops.

Alternative – Use fabric ties:
If you can’t find elastic, or prefer to use fabric ties, you can use 4 fabric ties, one in each corner. Each tie will be 18″ long. Sew one tie in each corner, being careful not to catch the ties in the side seams.
You can also use twill tape, bias tape, or strips from cotton jersey (t-shirt fabric).
The finished mask will then be worn by tying the fabric strips behind the head. See notes at the bottom of the post.
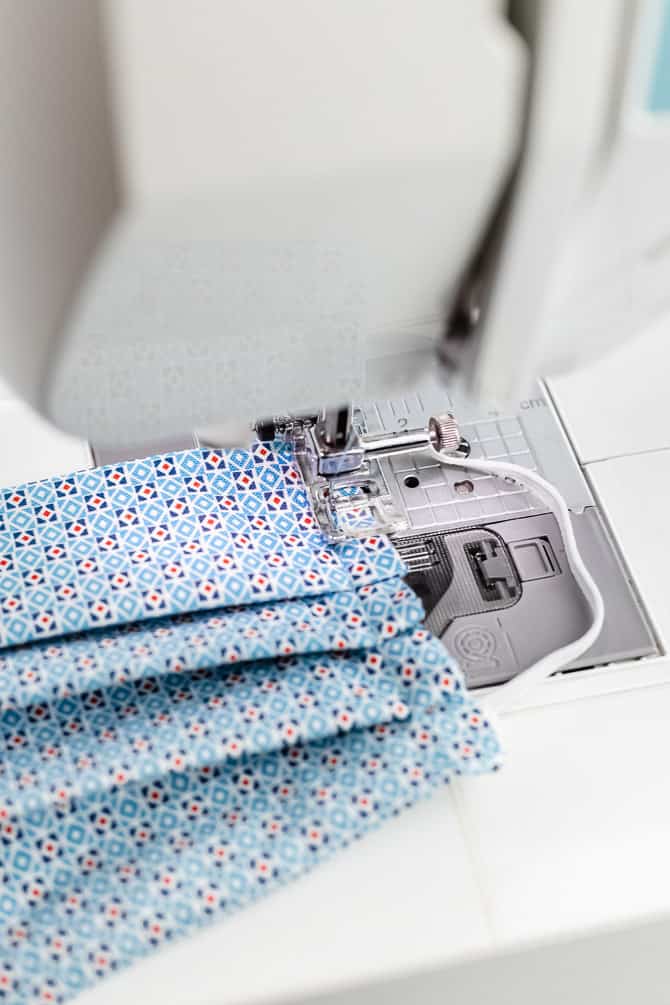
Step 3: Sew the Sides, Securing the Ties
With a 3/8″ seam allowance, sew each side of the facemask. Backstitch over the elastic or fabric ties to secure them. Trim the corners with scissors so that it will be easier to turn the mask right side out. Becare not to accidentally clip the stitches.
Turn the mask right side out and press with an iron. You can use a pencil to push out the corners.
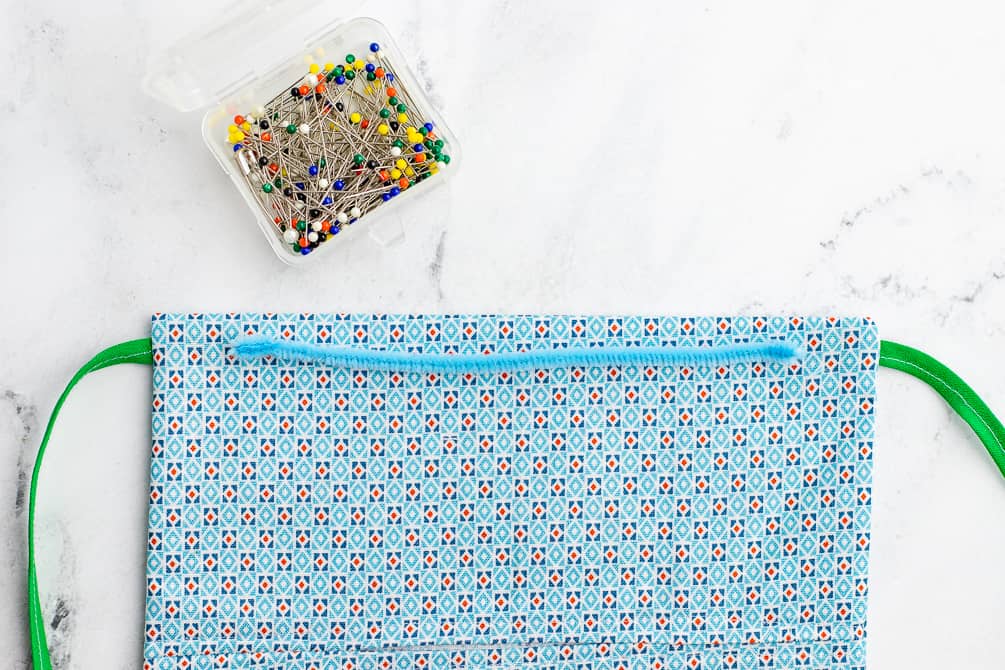
Optional: Insert a Flexible Nose Piece
Cut a 6-inch piece of pipe cleaner, floral wire, or other flexible wire to create a nose piece. I folded the ends of the wire back into to keep them from poking through the fabric. Place the wire through the pocket hole and slide it up to the very top of the mask. Stitch around it on all 3 sides to keep it in place.
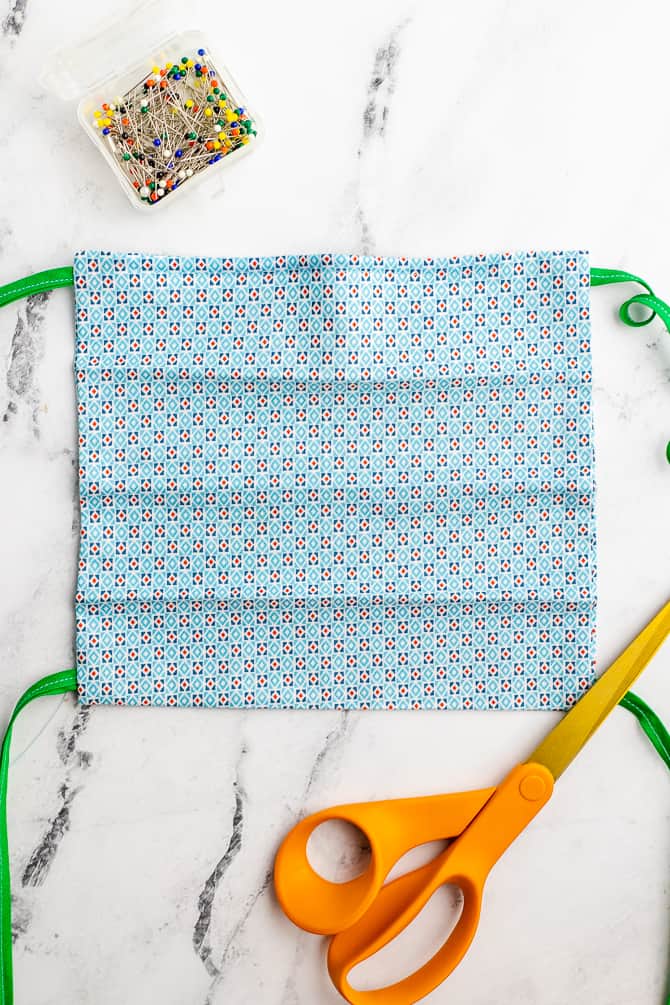
Step 4: Make the Pleats
Make the mask with three evenly spaced lines. To do this, you can measure and mark with a water-soluble fabric pen. Or, you can do what I did, and fold the mask in quarters – fold the sides to meet in the middle, and then fold again in half. Use an iron to make a crease.
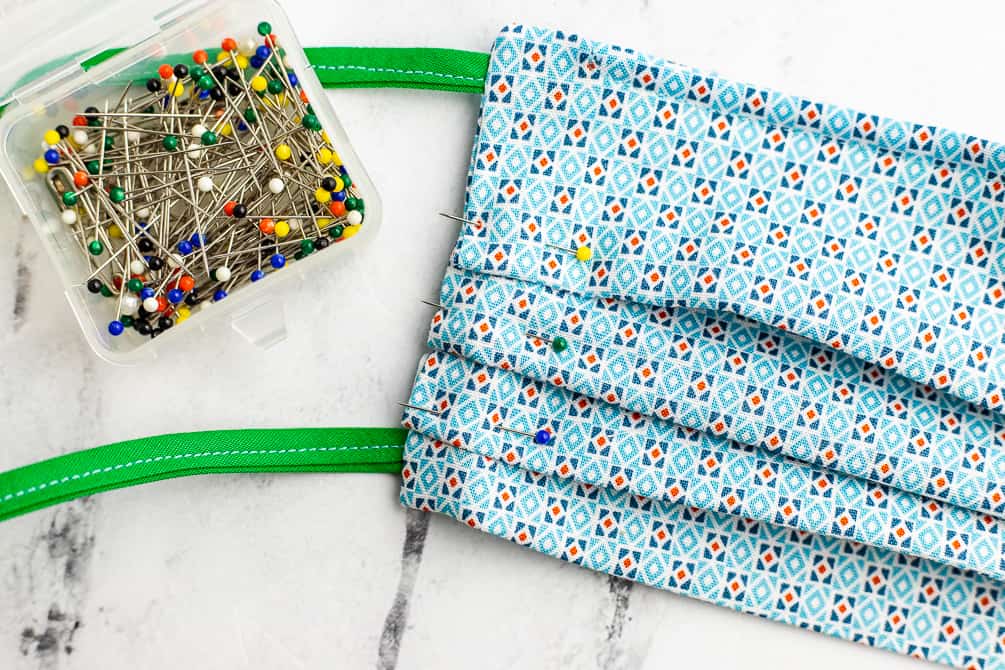
Use your markings to create three evenly spaced 1/2” pleats. Pin the folds down, and make sure all pleats are facing the same direction. Sew along the sides to secure the pleats. I like to sew down the sides twice, just to make sure.
When the mask is worn, the pleats should open downwards to prevent any particles from collecting in the fold pockets.
Troubleshooting the Pattern
What if you can’t find elastic?
I’ve heard from many people that are having a hard time finding elastic. If you can’t find elastic to make the ear loops, you can make a mask with fabric ties instead. You can use ready-made 1/4″ twill tape, double-fold bias tape, or cut long strips of the same tightly woven cotton fabric you are using for the rest of the mask.
To make bias binding fabric ties: Cut 18″ long strips of fabric, 1.75″ wide. Fold the long sides together (lengthwise or hot-dog style) so that they meet in the middle. Then fold the strips in half again (lengthwise) to encase the raw edges. Stitch down the strips along the edge to create the ties.

If you wanted these straps to have a bit of stretch, you could also cut long strips from cotton jersey or knit T-shirt material. The great thing about using jersey fabric is that it will form itself into a tube when you stretch it. And, it’s comfortable to wear since it keeps a bit of stretch.
Whichever option you choose, you’ll want to cut 4 pieces about 18″ long, and attach one strip to each of the corners. The mask will fasten by tying the straps behind the head.
What about metal to help the mask fit better?
To help the mask fit better around your nose, you can insert a length of flexible metal to the top inside of the mask, through the pocket insert opening before forming the pleats. Then, you can topstitch down around the metal insert so that it stays in place. I’ve seen people use pipe cleaners, floral wire, or twist ties.
I have another article all about how to add a nose wire to masks patterns and premade masks.
What can you use as a filter?
It is so important that everyone understands that while wearing a cloth face mask can offer some level of protection, it can’t protect against viruses the same way that an N95 mask can.
Many different types of filters have been suggested, like coffee filters, felt, and vacuum filter bags. Not all of these filters are effective, and not all of them are safe.
Without further research into the safety and efficacy of face mask filter materials, we won’t know what the best filter is.
Face Mask Filter Materials: Pros and Cons
- HEPA filters. In testing, a layer of HEPA vacuum cleaner bag seemed to perform the best. However, it is difficult to breathe through. In addition, many people have raised concerns over the safety of materials (like fiberglass) used to produce these filters. At this time I can’t recommend them.
- Coffee filters. One of the mask designs that the CDC has published includes a layer of a coffee filter. They are readily available and disposable.
- Blue shop towels. Others have tested the efficacy of blue shop towels, like these. They look promising, but the data hasn’t been released publically or verified.
- Dryer sheet or baby wipes. Because these items are coated in fragrances and other chemicals, I don’t recommend using these as a filter.
- Non-woven interfacing. This has been suggested many times in the comments. I can’t find research suggesting it will help. If you choose to use interfacing, avoid the fusible/iron-on types.
- Flannel or felt. These materials are not as closely woven as the cotton fabric on the outside of the mask, so it is doubtful they would improve filtration effectiveness. In addition, they may trap moisture.
- One more layer of cotton fabric. The research we do have suggests that the safest and simplest option for a filter is cotton t-shirt material or tightly woven cotton fabric.
If you are sewing for hospitals, they may have their own medical grade filters. Always call before you sew to check their requirements.
Disclaimer: This pattern has not been industry-tested and is intended for educational purposes only. The decision to use this device is solely your own.
Where can you donate masks?
Not all hospitals are requesting masks, but many are. Search your local hospital to see if they have requested donations.
Many groups, such as the Sewing & Craft Alliance, are working to connect healthcare organizations with volunteer sewists. Check out their website, WeNeedMasks.org.
Also, an organization called Masks for Heroes has a website with a searchable database of facilities currently seeking donations. If you are wondering where you can donate masks, they can help you find a hospital or clinic that needs them.
How do you wear a cloth mask?
It’s important to use proper procedures when putting on, and taking off your mask. Be careful not to touch your eyes, nose, and mouth when removing the mask and wash your hands immediately afterward.
Here is a clear, step-by-step guide to the best way to properly wear a face mask.
Important to Note: Per the CDC, masks “should not be placed on young children younger than 2 years of age, anyone who has trouble breathing, or is unconscious, incapacitated or otherwise unable to remove the cover without assistance.”
How do you clean and sanitize a cloth mask?
Wear only dry masks. When masks get moist, even if it’s just from your breath, they need to be cleaned.
Wash masks regularly, with regular detergent and in hot washing machine cycles. Dry completely.
Free Face Mask Printable Pattern
Click here to download a pattern PDF

DIY Fabric Surgical Mask
Homemade fabric surgical face mask to be worn as a last resort in a crisis situation.
Materials
- cotton fabric, tightly woven
- 1/8" elastic, or fabric ties
Tools
- sewing machine and thread
- scissors
- ruler
- sewing pins or clips
Instructions
- Cut the fabric. For an adult size mask, cut 1 fabric rectangle 16″ long and 8.5″ wide. Cut 2 pieces of elastic, each 7″ long. Or, cut 4 fabric ties 18" long.
For a child-size mask, cut 1 fabric rectangle 14″ long and 6.5″ wide. Then, cut 2 pieces of elastic, each 6″ long. - Sew the top side, with a pocket opening. Fold the fabric in half, with the right sides facing.
Sew along the 8.5″ width edge, using a 5/8″ seam allowance. Leave a 3” opening in the center of this seam to create an opening for the filter pocket, and to allow the mask to be turned right side out after sewing.
Press the seam open. Topstitch/zig-zag stitch along both sides of the seam for a neater edge. - Pin Elastic or Fabric Ties. Pin one piece of elastic to each side of the mask, one end to the top corner and one end to the bottom corner. If using fabric ties, pin one tie to each corner, with the rest of the tie sandwiched inside the two layers of fabric.
- Sew the Sides. Sew the sides of the facemask. Backstitch over the elastic or fabric ties to secure them.
Clip the corners, turn the mask right side out, and press with an iron. - Sew the Pleats
Create three evenly spaced 1/2” pleats. Pin the folds in place, making sure all pleats are facing the same direction. Sew down each side to secure the pleats.
Note: When the mask is worn, the pleats should open downwards to prevent any particles from collecting in the fold pockets.

Notes
- Some hospitals are requesting a larger pocket opening for faster filter changes -- try 4".
- For a smaller child size, start with a square that's 6.5" by 14".
- For a larger child size, start with a square that's 7.5" by 15"

Remember, before you start sewing a huge batch of masks, please call the hospital or clinic and make sure that they both want and can accept homemade masks.


Similar Posts
How to Make a Scrunchie (Plus 3 Bow Options!)
Free Quilted Christmas Stocking Pattern
5 Ways to Make a No-Sew Face Mask with Household Materials
How to Add Nose Wire to Fabric Face Masks
How to Fold a No-Sew Bandana Face Mask