

Ready to learn how to Slice in Cricut Design Space? Consider this blog post your ultimate guide to the Slice tool. I’ll explain how to use Slice in Cricut Design Space, as well as what it does and why it’s important. You’ll learn how to use the Slice tool to crop images and slice text. I’ll also show you why the slice button may be “grayed out” or not working – and how to fix it.
Once you read through this article, I think Slice will become one of your favorite tools in Cricut Design Space!
The Slice feature is an incredibly useful tool inside Cricut Design Space that will help you create unique projects with your Cricut machine. I use it all the time to crop images, slice text, and create new shapes.
The concept behind the Cricut Slice tool is pretty simple: Slice cuts a shape or text from another shape. Even though the Slice tool is easy to use, it does have a few quirks that can frustrate newer Cricut users.
If that’s you, don’t worry. This article will teach you everything you need to know about the Slice tool and how to use it. I’ll also show you my 5 favorite ways to use the Slice tool inside of Design Space and answer your common questions about the Slice feature.
The Slice Tool in Cricut Design Space
This step-by-step tutorial will explain to use Slice in Cricut Design Space. In this post, you’ll learn:
- What the Slice tool actually does, and where to find it
- How to cut out a shape from a larger shape
- How to crop or trim unwanted parts of images
- How to create new, custom shapes using the Shapes tool
- Why the Slice tool may be “grayed out,” and what you need to do to fix it.
Plus, I’ll show you my 4 favorite ways to use Slice in Design Space.
What is the Slice Tool?
Slice is a tool within Cricut Design Space that allows you to cut one image out of another image. You’ll find it at the bottom of the Layers panel, next to the other Design Space layer tools: Weld, Attach, Flatten, and Contour.
Brand new to the Cricut world? You may want to read this first: What is a Cricut Machine, and What Can it Do?
What Slice Actually Does
The Slice tool splits two overlapping images into multiple pieces by “cutting out” one image from the other image. Basically, the Slice tool creates new cut paths wherever the edges of the two images overlap.
You can think of it like a cookie cutter or a fancy hole punch: The Slice tool “punches out” the shape of one image from the shape of the other image.
As a result, the Slice tool creates completely new shapes from the original shapes. Each of the new shapes will show up in the Layers panel as an individual layer.
Why You Should Use Slice
Once you start using Slice, you’ll be surprised at how much it can do. The Slice function is particularly useful for cutting out shapes and text from larger background shapes. You can also use it to crop or trim away unwanted areas of shapes or images.
Here are some of my favorite ways to use Slice:
- “punch out” shapes and text from a larger background shape
- create new, custom shapes from two standard shapes in the Shapes panel
- crop, or trim away, unwanted parts of an image
- cut an image into multiple pieces, and separate those pieces into different layers
- modify or rearrange a ready-made image from the Cricut library
We’ll go into each of these different ways to use the Slice tool in more detail below.
How to Use the Slice Tool
You can use the Slice tool to cut out one shape from another shape, cut overlapping shapes from each other, or cut text from a shape.
Here are the basic steps to using the Slice tool.
- Arrange 2 images so that they are overlapping. Click and drag the images so that they overlap. If you try to Slice two images that aren’t overlapping, nothing will happen.
- Select both layers. Remember that when you’re using Slice with images, you can only work with two layers at one time. Once you select the two layers, a gray bounding box will appear around both images, and the individual layers will be highlighted in the Layers panel.
- Click the Slice button at the bottom of the Layers panel if you’re on a computer or in the Actions menu at the bottom of the screen if you’re using the iOS and Android app.
- See your results. Separate the layers to see your new shapes. Now you can edit the layers individually, and delete any layers you don’t need.
Once you get the hang of it, Slice is quite simple to use. It is really that easy!
Tips and Tricks for Working with the Slice Tool
I think Slice is a really useful tool – but it’s not without its quirks. Here are a few tips and tricks to keep in mind when using Slice.
- Slice works on two layers. When using Slice with images, you can only work with two layers at one time. If you select more than two layers, the button will be “grayed out,” and you won’t be able to use it.
- Slice works on overlapping images. In order to use Slice, the two images must be overlapping. If you Slice two images that aren’t positioned on top of each other, nothing will change.
- Slice can work on Grouped images, but only if the other images within the Group are hidden. If you want to Slice a layer that is part of a multi-layered Group, you must first hide or ungroup the other layers to activate the Slice tool.
- Slice works with text too. However, slicing with text (especially multi-layered text) has its own quirks that we’ll cover a little bit later.
Where to Find Slice
You’ll find the Slice tool inside the Cricut Design Space desktop app or mobile app.
On Desktop: You’ll find the Slice tool in the Layers Panel in the bottom right-hand corner of the screen, right next to the Weld Tool. You can also find the Slice function in the right-click menu.
On Mobile: You’ll find the Slice tool in the Actions sub-menu in the toolbar at the bottom of the screen, between Weld and Flatten.
5 Ways to Use the Slice Tool
Now that we’ve covered the Slice tool basics, let’s talk about a few of my favorite ways to use Slice within Cricut Design Space.
Cut shapes and text from a larger background shape
In this example, I’ll be making a gift tag. I’ve started with a long rectangle shape, and smaller circle, and the word “Congrats.”
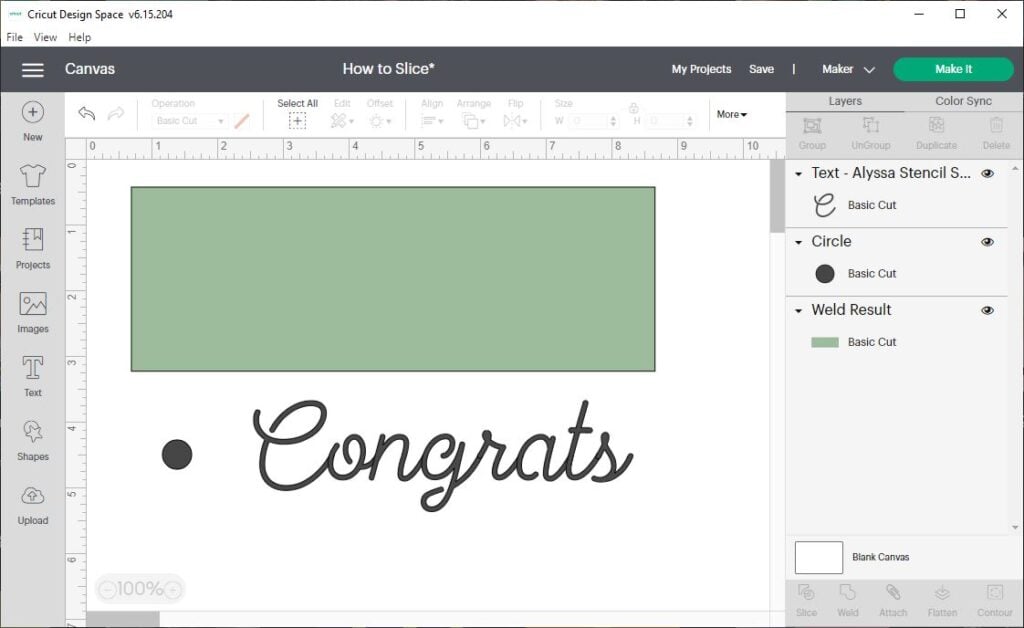
- Create a new project. Add the shapes and a text box to the Canvas.
- We’ll start by using the smaller circle to punch a hole in the rectangle gift tag, so we have a spot to tie a ribbon. Drag the circle on top of the rectangle. Select both layers, and click Align > Center Vertically to line them up. Then, with both layers still selected, click Slice. You’ll see the Slice Result in the Layers Panel on the right side of your screen.
- Next, we’ll repeat the process with the word “Congrats.” Drag the text on top of the rectangle. Select both layers, and click Align > Center Vertically. Then, with both layers selected, click Slice. You’ll be able to see the Slice Result in the Layers Panel on the right side of your screen.
Remember: We can only slice two layers at a time. So you’ll need to make this gift tag in two steps: slice the circle first, and then slice the word second.
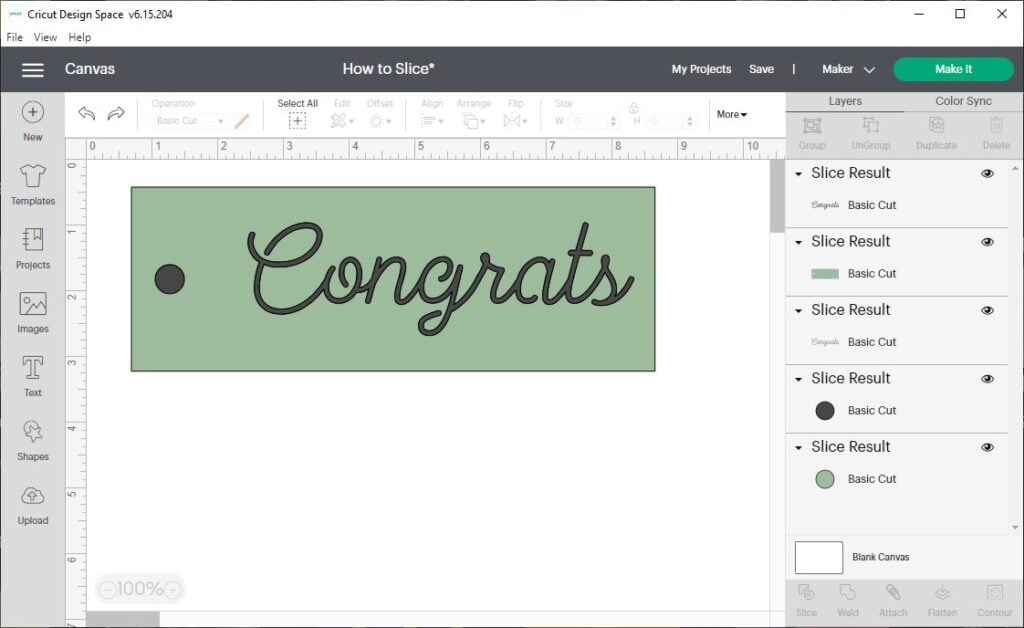
Let’s look at the results.
- First, you’ll see that we still have the original circle shape and the original text layer. (These layers are in black.)
- Second, you’ll see the original rectangle shape with the circle hole and the word “punched out” of it. (This layer is in green.)
- And third, you’ll see the “punch-outs” themselves. These layers were sliced from the rectangle. (These layers are in green, too.)
There may be more pieces on the Canvas than you expected, but that’s okay. If you look closely, you’ll see that the results are just like using a physical hole punch on a piece of cardstock. You have the punch itself, the cardstock shape, and the small circle that was punched from the card.
If you don’t need the extra words and circles, you can simply delete them from your Canvas.
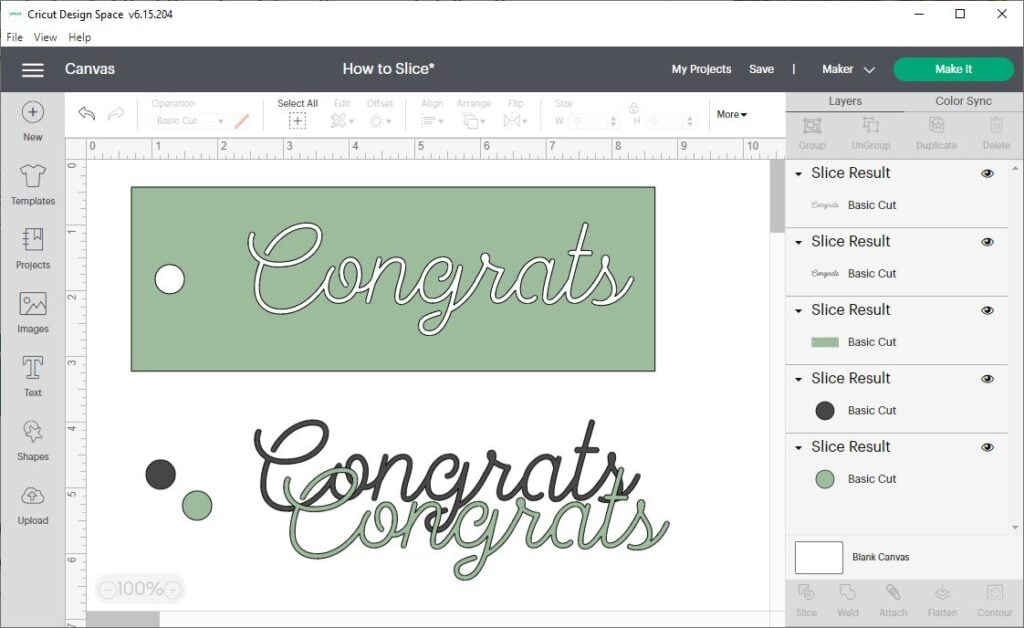
Important note about text: Take a closer look at the text layers in this example. You’ll see that when we first added the word “Congrats” to the Canvas, it was an editable Text layer. But after we used Slice, Design Space changed the “Congrats” layer to a Slice Result – this means it’s an image, not an editable text layer.
Create a new shape from two standard shapes
In this example, we’ll be creating a crescent moon shape from two circles.

- Start by adding two circle shapes from the Shapes toolbar to the Canvas. I’ve changed the colors of the circles to help show you exactly what’s going on – but you don’t have to do that in your own project.
- Drag one circle on top of the other circle, so that they are overlapping. Click Align > Center Vertically so that the circles are all lined up.
- With both circles still selected, click Slice. You’ll be able to tell it worked if you see the Slice Result layers in the Layers Panel on the right side of your screen.
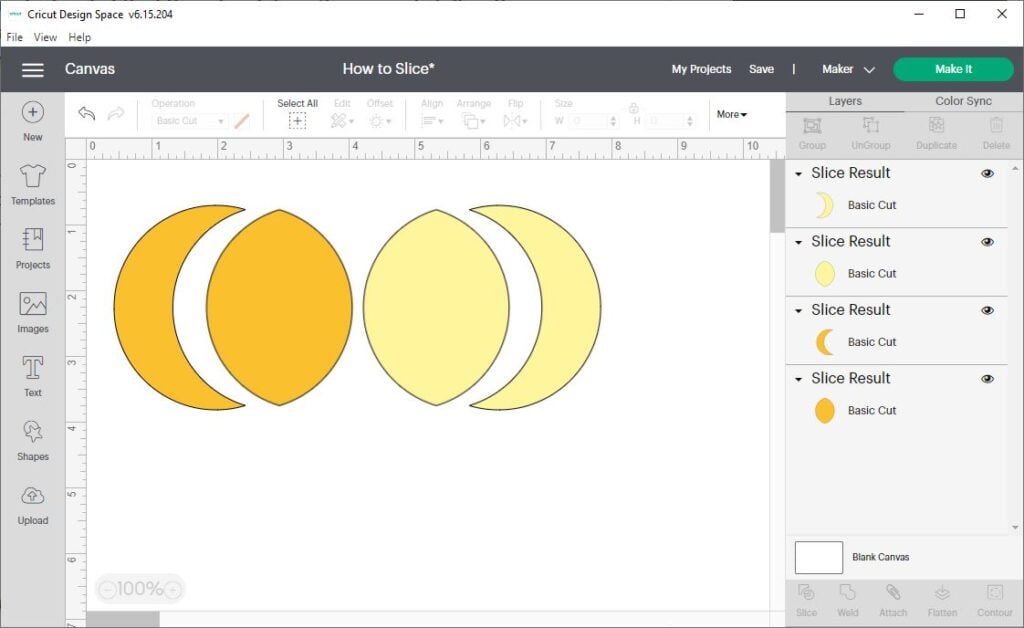
Let’s look at the results. You can see that the Slice tool has cut apart the layers wherever their edges overlapped.
- You’ll have the orange circle cut into two pieces, where it overlapped by the yellow circle.
- And, you’ll still have the yellow circle cut into two pieces, exactly where it overlapped by the orange circle.
You may have ended up with more pieces than you expected. But, you can see in this example how nothing was deleted or added to the Canvas. You still have the yellow and orange circle – they’re just sliced into two pieces each.
Since you probably don’t want all of these pieces for your project, you can simply delete the layers you don’t need.
Crop an image.
One of my favorite ways to use the Slice function is to crop a premade design or cut file. In this example, we’ll use Slice to trim away unwanted design elements from a Cricut Access Library image.
Start a new project and add an image to the Canvas. In this example, I’ll be using this Father’s Day Banner.
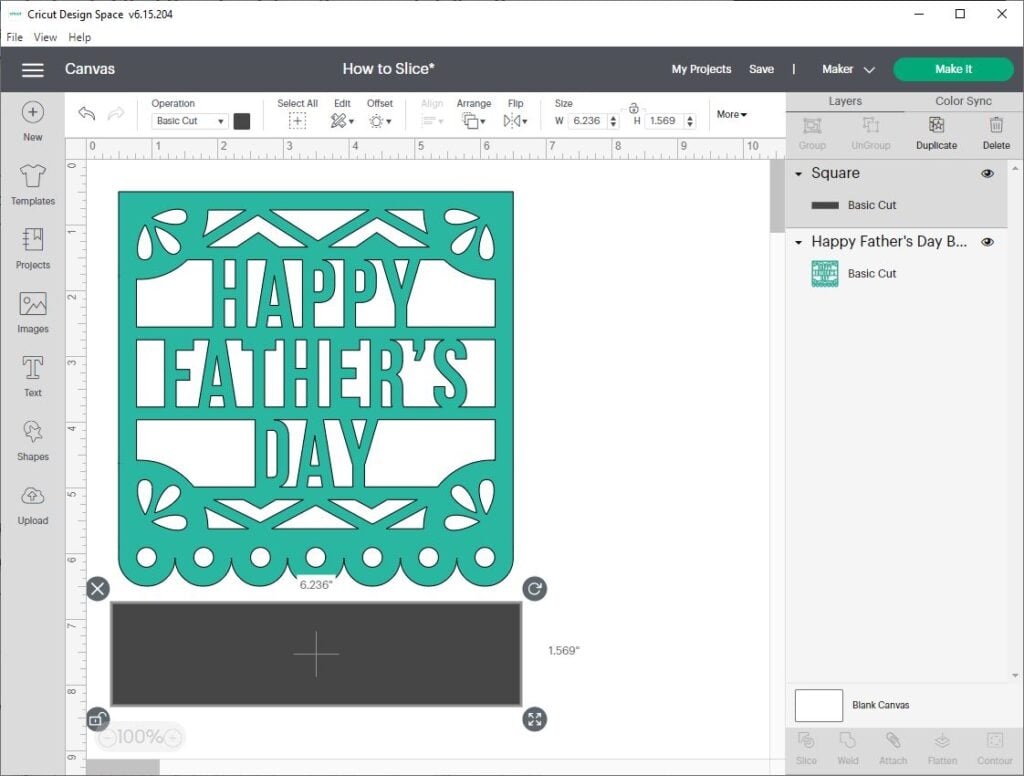
Now, I really like this design – but let’s pretend I need to cut off the scalloped bottom edge so that I can turn it into a greeting card.
- First, add a square shape to the Canvas, and resize it to be large enough to cover the bottom edge of the banner design.
- Drag the shape over the banner layer, and position it to overlap the area of the banner you want to trim off.
- Select both layers, and click Slice. You’ll know it worked if you see the Slice Result layers in the Layer panel.
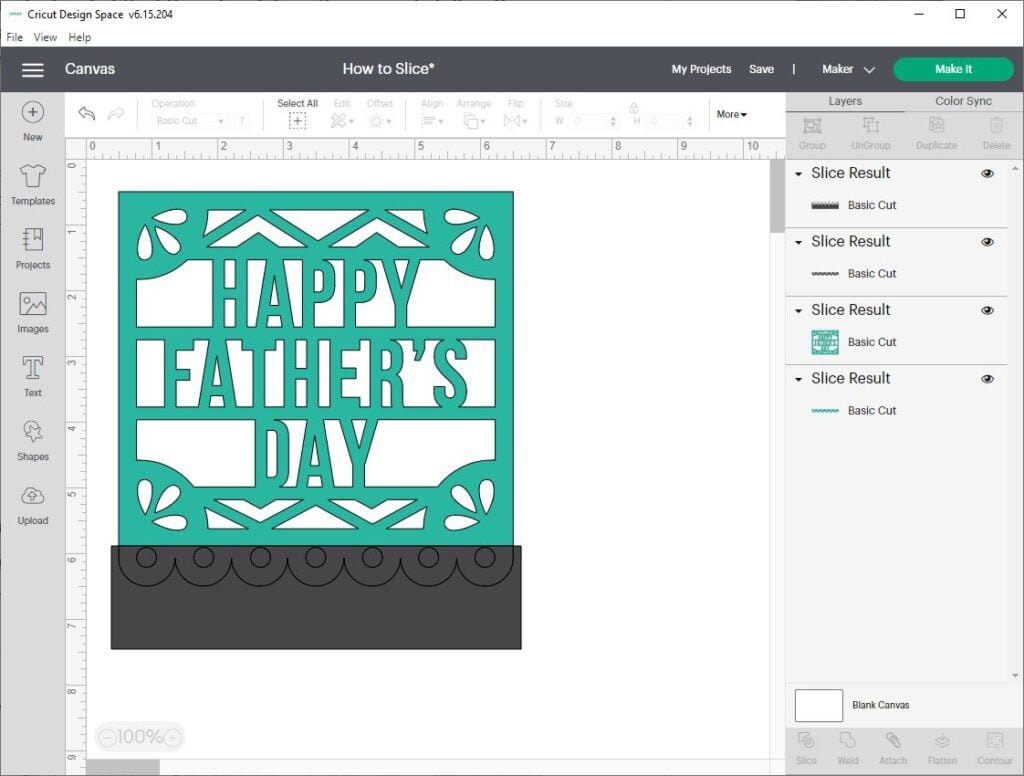
Now, let’s look at the results. You’ll see four pieces: the original banner, the part we sliced off, the original rectangle, and the part of the rectangle that overlapped the banner.
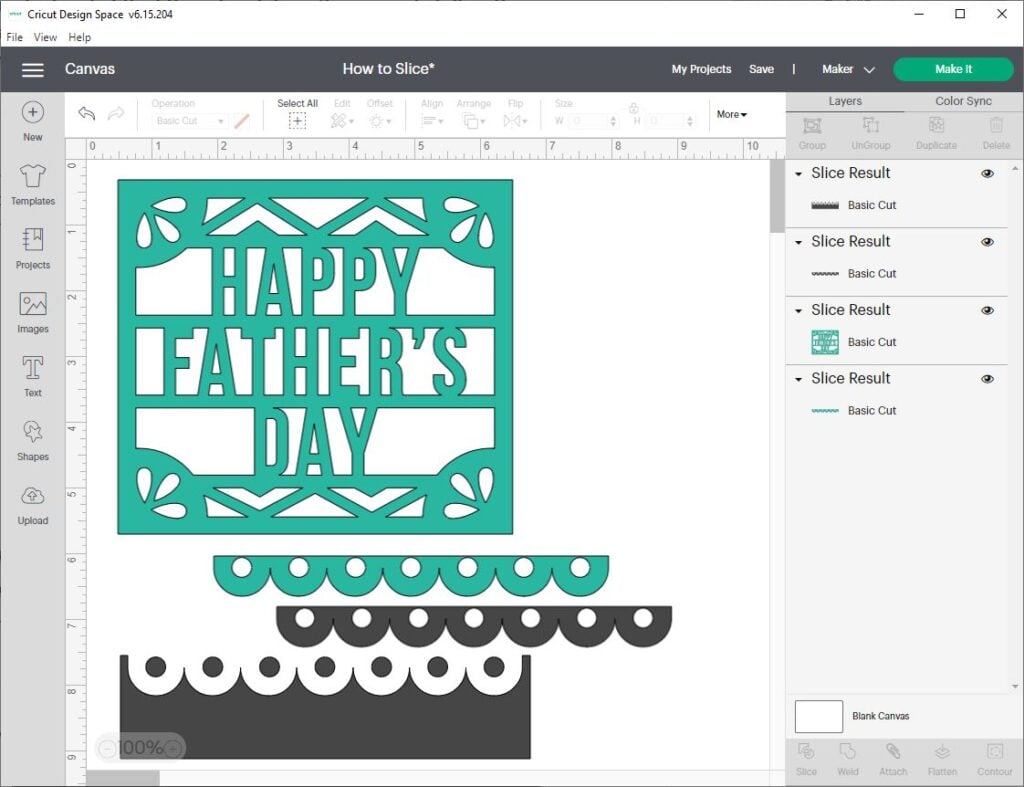
Delete the extra layers, and you’ll be left with a banner design with four straight edges.
Cut an image into multiple pieces and layers.
Here’s a super simple way to use the slice tool to split an image into multiple parts.
In this example, I’ll be using the Slice tool to cut a heart into two halves to create a split monogram.

- Use the Shapes menu in the left-hand toolbar to add a heart shape to your canvas. Then, in the same way, add a square to the canvas.
- Resize the square into a long rectangle, and drag it so that it overlaps the center of the heart. You can also click Align > Center vertically so that the two shapes line up perfectly.
- Select both shapes and click Slice. After you delete the extra layers, you’ll be left with a heart shape divided into two separate pieces.
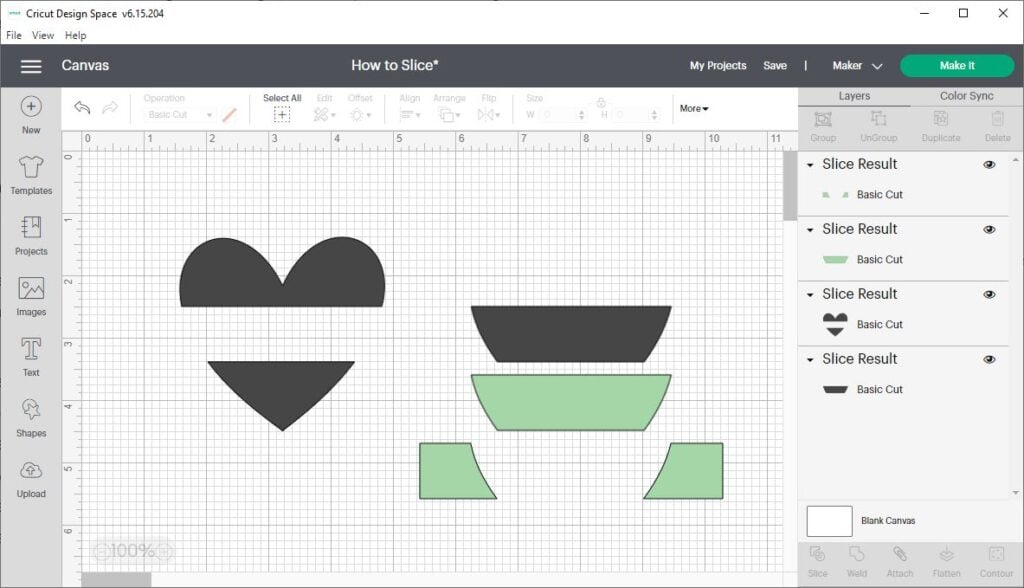
Here are the results. After you delete the layers you don’t want, you’ll be left with a split heart image. Now, you can add whatever text you like to create the split monogram.
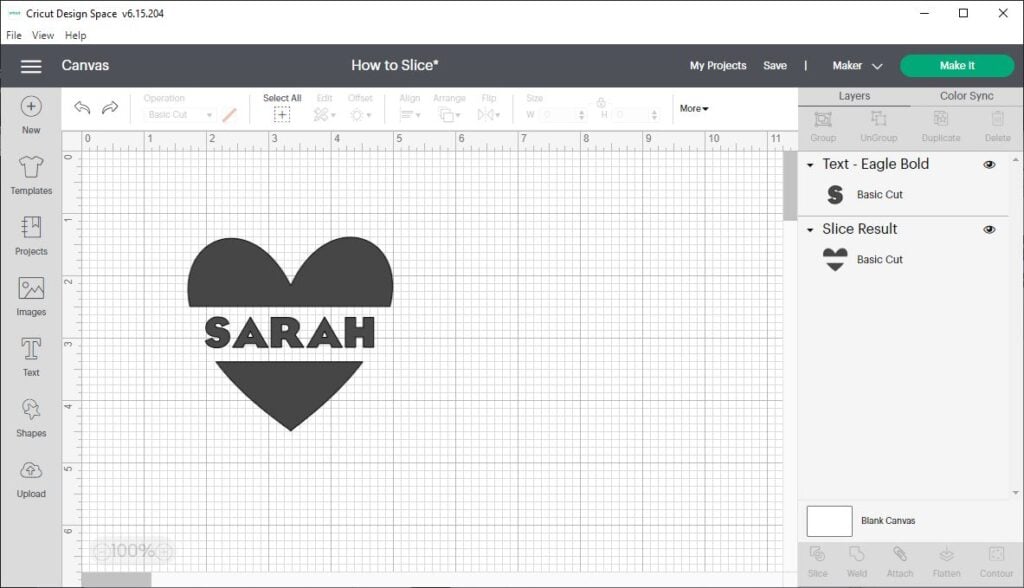
Note: Even though the heart looks like it’s split into separate halves, the shape is still one Slice Result layer. If you want to be able to move the top and bottom pieces of the heart independently, then you will need to put them on their own layers. To do that, you’ll need to slice the image one more time.
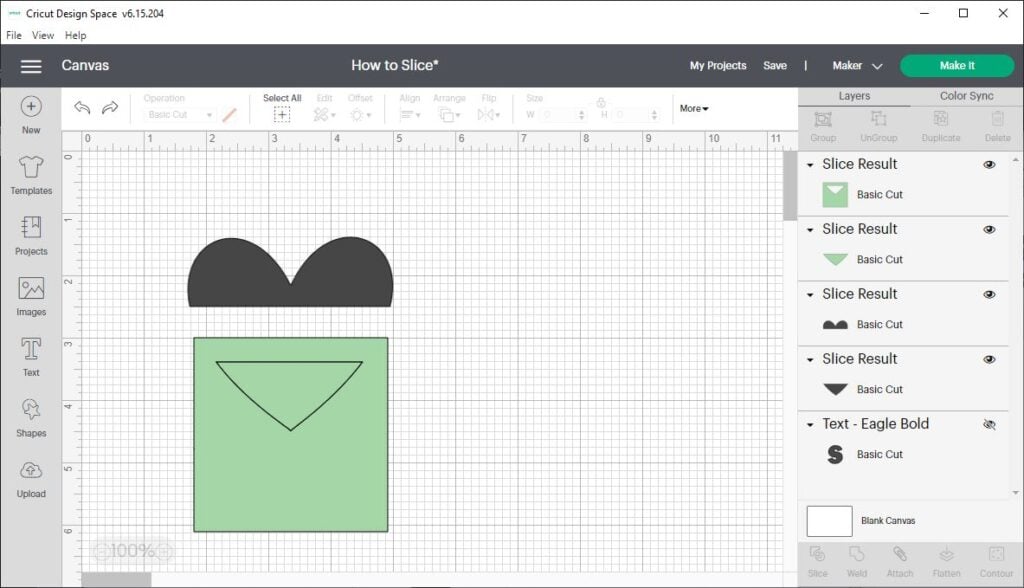
Create a new rectangle and place it over the entire bottom half of the heart. Select the heart and the rectangle and press Slice again. This will put each half on its own layer.
Modify or rearrange a ready-made image.
Here is another way to use the Slice tool to modify or rearrange a ready-made design.
Let’s say I want to use a ready-made design from the Cricut Image Library, but it’s too long to fit on my project. I can use the Slice tool to cut the image apart and rearrange it, so it fits.
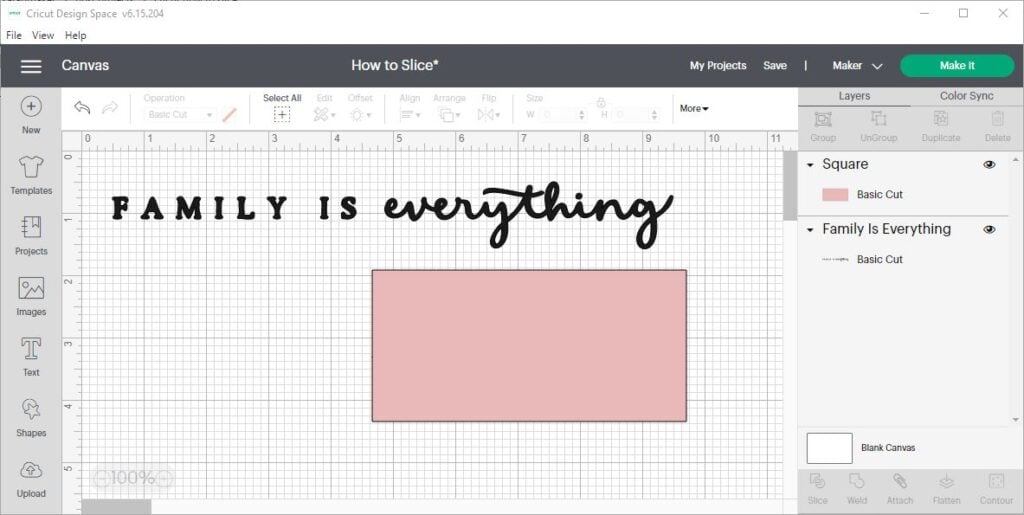
In this example, I’m using the quote “family is everything”. This is an image layer from the Images library, not something I’ve typed.
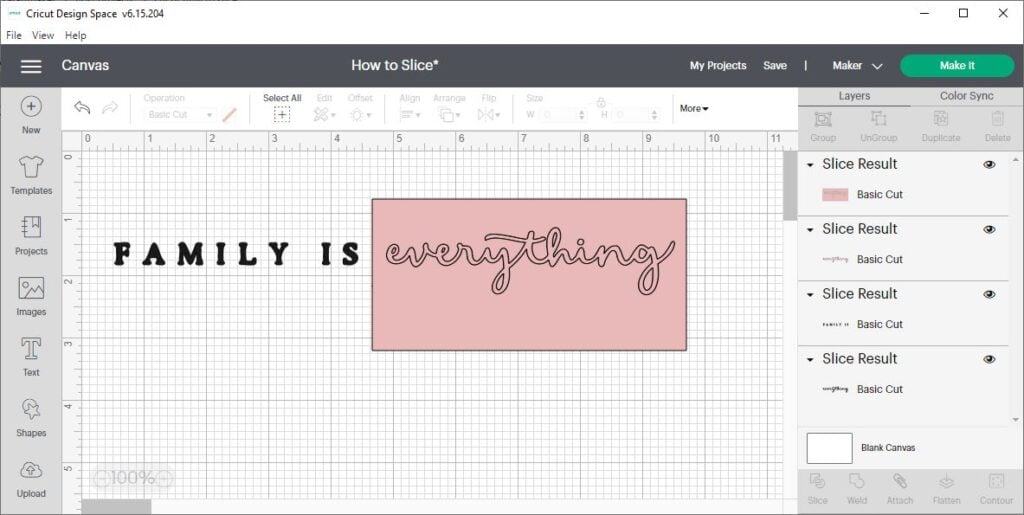
- Start a new project and add a quote design to the Canvas. If you look in the Layers panel, you’ll see that the “family is everything” quote is all one image layer. It’s not something I’ve typed myself, so I can’t just edit it with the Text tool.
- What I can do is cut it apart with the Slice tool, and rearrange it. To do this, add a rectangle to the Canvas and resize it so it overlaps the word “everything.”
- Select both layers, and Click Slice. Now click and drag the layers to pull them apart and see your results.
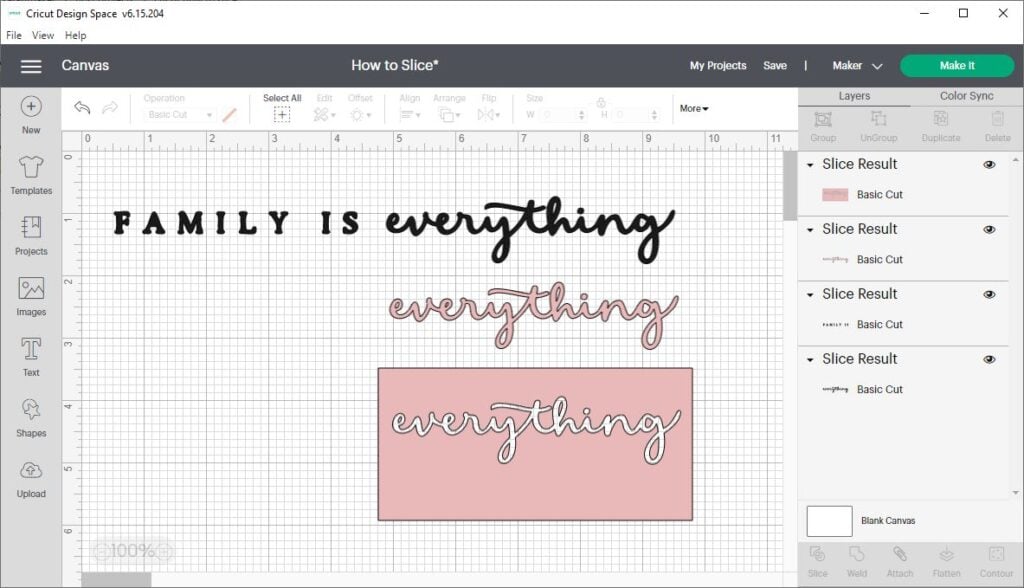
Here are the results. After you delete the extra layers, so you’re left with the two layers you want: the words “family is” on one layer and “everything” on a second layer. Now, you can click and drag the word “everything” below the “family is” layer.

Using Slice with Text
You can use the Slice tool to cut out text from another image, too. The Slice tool treats all of the individual letters as one single layer. So, in most cases, using Slice with text is the same as using Slice with images.
- Add a text layer to the Canvas, and edit it with the text tools as usual.
- Drag the text so that it overlaps another layer.
- Select both layers and click Slice.
After you use Slice on a text layer, it will become a Slice Result layer – aka an image layer. This means that you will no longer be able to edit it with the text tools – like font size or letter spacing.
Multi-layer Text
The Slice tool treats multi-layered text a little differently than it treats other images. Here are those differences:
- If the text is multi-layered and one layer is hidden, you can use the Slice tool.
- But, when the Slice function is performed with hidden layers, all hidden layers will be removed from the Canvas and the Layers panel. So, if you want to keep those hidden layers in your project, you must ungroup them before using the Slice tool.
Troubleshooting Common Problems
Here are some FAQs and common issues that you may run into when using the slice tool.
Why can’t I use Slice in Cricut Design Space?
If you can’t use the Slice button, it’s unavailable to use with the layers you currently have selected. Here are some reasons why the Slice button isn’t working.
- You only have one layer selected. To use Slice, you need to have two layers selected.
- You have more than two layers selected. Slice works with two layers at a time.
- One of the layers is in a Group. To use that layer, Ungroup it before using Slice.
- One of the layers is Hidden. Unhide that layer before using Slice.
Why is the Slice button grayed out?
If the Slice button is grayed out, it means that the Slice option is unavailable to use with your current selection. To fix it, make sure that you’ve selected only two layers, and that each layer is Ungrouped and Visible.
How do I select more than one layer?
In order to use Slice, you need to select two layers in Design Space. Here are a few ways to select more than one layer in Cricut Design Space
On Desktop
- Click and drag a selection box around two shapes to select both of them.
- Hold down the Shift key ( on PC) or the Ctrl key (on Mac) on your keyboard while clicking on each layer on the Canvas.
- Hold down the Shift key ( on PC) or the Ctrl key (on Mac) on your keyboard while clicking on each layer in the Layers panel.
On Mobile
- Tap on the screen and drag a selection box around both layers.
- On the Canvas, tap on one layer to select it, then long-press on the second layer to select it.
- In the layers panel, tap on one layer to select it, then long-press on the second layer to select it.
Why are there so many layers after using Slice?
Slice cuts two images into multiple pieces by creating new cut lines wherever their edges overlap. If you have two overlapping circles, Circle A will be cut into multiple pieces wherever it overlaps with Circle B. Circle B will be cut into multiple pieces wherever it overlaps with Circle A.
Depending on which shapes you choose and how they overlap, you could end up with 3, 4, or even more different parts.
Even so, if you pull the layers apart and put them back together like a puzzle, you’ll see that nothing was added to the Canvas. Everything was already there; it’s just sliced apart into multiple Layers now.
Can I use Slice on text layers?
Yes, you can use Slice on text layers. Drag the text layer so it overlaps another layer. Select both layers, and click Slice.
Why is my text not editable after Slice?
Like we talked about in the examples above, Slice treats single-layer text as an image. After using Slice on a text layer, it becomes a Slice Result – aka an image layer. That means you cannot go back and edit it with the usual text tools, such as font and letter spacing.
How can I use Slice on multiple layers?
As I mentioned before, Slice works on two layers at a time. If you have three or more layers you want to Slice, you’ll have to Slice them in steps, two at a time.
More About Cricut Design Space
Isn’t Slice such a great tool? I hope you’ve learned some cool tricks to use the next time you’re in Design Space!
When you’re ready for more awesome Design Space tips, check out these posts:
- How to Upload Images to Cricut Design Space
- How to Upload Fonts to Cricut Design Space
- When to Use Weld vs. Attach in Cricut Design Space
- How to Connect Cursive Letters in Cricut Design Space
What’s Next?
Pin this post: Save this tutorial to your Pinterest boards so that you can come back to it later.
Leave a comment: We love to hear your feedback. Tell me in the comments below!
Share on Instagram or Facebook: When you make this project, share it on social media and tag me @sarahmaker_. We love to see what you make!
Have questions? Join the Facebook Group!
We hope this article was useful for you! If you have any additional questions, feel free to join my Facebook Group. We created this group for you to share pictures, ask questions, and help each other out.


How to Slice in Cricut Design Space
How to use the Slice tool in Cricut Design Space to cut images or text out of another image.
Materials
- SVG files or images within Design Space
Tools
- Cricut Design Space
Instructions
- Arrange 2 images so that they are overlapping. Click and drag the images so that they overlap. If you try to Slice two images that aren't overlapping, nothing will happen.
- Select both layers. Remember that when you're using Slice with images, you can only work with two layers at one time. Once you select the two layers, a gray bounding box will appear around both images, and the individual layers will be highlighted in the Layers panel.
- Click the Slice button at the bottom of the Layers panel if you're on a computer or in the Actions menu at the bottom of the screen if you're using the iOS and Android app.
- See your results. Separate the layers to see your new shapes. Now you can edit the layers individually, and delete any layers you don't need.


Similar Posts
How to Connect Cursive Letters in Cricut Design Space
What is a Cricut Machine, and What Can it Do?
25+ Easy Cricut Christmas Gift Ideas
35 Best Free Monogram Fonts (For Cricut and More!)
How to Upload Images to Cricut Design Space in 4 Easy Steps
How to Cut Vinyl with Cricut: A Step by Step Guide for Beginners