Learn how to use the Attach tool in Cricut Design Space with this easy step-by-step guide for beginners. This blog post will explain how the Attach feature works and how to use it to create awesome projects with your Cricut.
Keep reading to learn how to attach text, attach writing to shapes, attach score lines, and more. I’ll also explain why the Attach button might be “grayed out” or not working, and show you how to fix common mistakes.

Have you ever sent a design to the mat, but the shapes and letters were in the wrong spot on the mat preview?
Luckily, the solution is simple – it’s the Attach button.
The Attach tool is one of the most useful tools in Cricut Design Space. You’ll find it at the bottom of the Layers panel, along with other important tools like Slice, Weld, Contour, and Flatten.
Once you understand what the Attach tool does and when to use it, Cricut Design Space will be so much easier and more fun to use.
In this blog post, you’ll learn everything you need to know about Attach. I’ll walk you through several examples with step-by-step screenshots to show you exactly what I’m talking about.
You’ll learn:
- What the Attach tool does, and where to find it
- How to Attach images, so they stay in the same position
- How to Attach letters, so they don’t look jumbled up on the mat
- How to Attach writing to shapes and images
- How to Attach score lines and perforation lines to shapes
- Why the Attach tool might be “grayed out,” and how to fix it
After that, I’ll give you my best tips for working with Attach in Design Space. And, I’ll answer some frequently asked questions about Attach to help you avoid the most common mistakes.
Attach in Design Space
The Attach tool has two main functions in Cricut Design Space.
First, Attach holds the different elements of your design in the same position relative to each other on the cutting mat as on the Canvas. Basically, the Attach tool “freezes” the layout of your design, so that it looks the same on the cutting mat as it does on the Canvas. When you go to cut out your design, the objects will have the exact same position and spacing.
Second, the Attach tool fastens other Linetypes (such as Draw lines, Score lines, Foil lines, and Performation lines) to a Cut layer. When you use the Attach tool to attach your writing lines and score lines to a shape, your Cricut will know to write and score on top of the shape, rather than on a separate mat.
If you don’t use Attach to hold your cuts in the same layout, Design Space will assume you want to cut out the project in “Material Saving Mode.” This means that Design Space will rearrange your objects on the cutting mat and position them as close together as possible to conserve material.
The default “Material Saving Mode” is great for projects where the cutting mat layout doesn’t really matter. But when the layout does matter, you’ll want to use Attach.
What Attach means in Design Space
We just talked about how the Attach tool tells Design Space that you want your objects cut out in the exact same layout as you have on the Canvas. This means that the image you see on the Mat preview screen will be the same layout you see on the Canvas screen.
You can think of Attach like a paper clip. It holds things in place when you move them from the Canvas to the cutting mat. But, Attach doesn’t actually alter the shapes themselves or remove any overlapping cut lines. And, just like a paper clip, Attach is easily reversible.
Where to Find Attach
You’ll find the Attach tool inside the Cricut Design Space desktop app or mobile app. The button icon looks like a paper clip.
On Desktop: You’ll find the Attach tool in the Layers Panel in the bottom right-hand corner of the screen, right next to the Weld Tool. You can also find the Attach function in the right-click menu.
On Mobile: You’ll find the Attach tool in the Actions sub-menu in the toolbar at the bottom of the screen.
When to Use Attach
The Attach tool holds your objects in the same position or arrangement on the cutting mat as they were on the Design Space Canvas.
Use Attach whenever you’d like to “freeze” the position of two or more shapes relative to each other, so that they’re cut out in the same position.
Or, use Attach whenever you’d like to add a Draw line or a Score Line on top of a shape.
If you don’t Attach, Design Space will default to “Material Saving Mode” and arrange the objects on the cutting mat as close together as possible to use the least amount of material.
What types of objects can you Attach?
You can use the Attach tool on any object: basic shapes from the Shapes panel, text from the Text box, and images from the Cricut Access Library.
How to Attach in Cricut Design Space
Let’s open up Design Space and work with some examples. All you’ll need is the free Design Space software, and a Cricut machine if you want to cut out your finished design.
Here are the basic steps to use Attach.
- Open up Design Space, and start a new project. Add images and/or text to the project and arrange the layers as desired.
- Select two or more layers that you would like to Attach. You can attach shapes, text, and Linetypes such as Draw and Score layers.
- Click Attach. Your layers will now be inside an Attach drop-down “folder” in the Design Space layers panel.
Keep reading to see specific examples of 3 different ways you can use the Cricut Attach tool.
Here are a few things to keep in mind when using Attach:
- The Attach tool works on two or more layers. If you only have one layer selected, the button will be “grayed out,” and you won’t be able to use it.
- Attach will work whether the objects are overlapping or separate. Attach just holds the objects in the same position – it doesn’t alter or remove any of the overlapping cut lines.
- Attach will also work on objects even if they’re already Attached, in a Group, Hidden or Multi-layered.
- Text layers will still be editable after using Attach. This means you can still edit for typos, change the font, and fix the letter-spacing.
- Attached objects will be cut on the same mat, which means they will turn the same color on the Canvas. Don’t Attach items that you want to cut out in different colors.
- Attached layers take on the properties of the bottom layer. For example, if you Attach a red circle on top of a blue square, the resulting Attached layers will both be blue.
Is there a Detach button?
Yes, there is a Detach button in Design Space. It looks like a broken paper clip. You can use the Detach tool to “unattach” layers at any time, even after you’ve saved your project.
Here’s how to find it:
On Desktop: To activate the Detach button, you’ll first need to select the Attached layers. You can do this quickly by clicking the Attach label in the Layers panel. Then, you’ll be able to click the Detach tool at the bottom of the Layers Panel. You can also find the Detach function in the right-click menu.
On Mobile: You’ll find the Detach tool in the Actions sub-menu in the toolbar at the bottom of the screen, right next to Attach.
Another way to “unattach” layers is to press the Undo button, or Command/Ctrl + Z on your keyboard.
What’s the difference between Weld and Attach?
The Weld tool and the Attach tool seem similar at first glance, but they have different functions.
The Attach tool keeps your shapes in the same arrangement when you send the design to the cutting mat. The shapes are still separate pieces on separate layers, but their layout is frozen in place.
The Weld tool, on the other hand, merges two or more separate images into one single image on a single layer. For more detail, read this post: When to Use Weld vs. Attach in Cricut Design Space
3 Ways to Use the Attach Tool
Now that we’ve covered the Attach tool basics, let’s open up Design Space and walk through some examples.
Note: If you don’t already have Cricut Design Space, you can download it for free.
Attaching Text and Images
In this example, we’ll use the Attach button to hold the layout of both text and shape layers in a vinyl sign design.
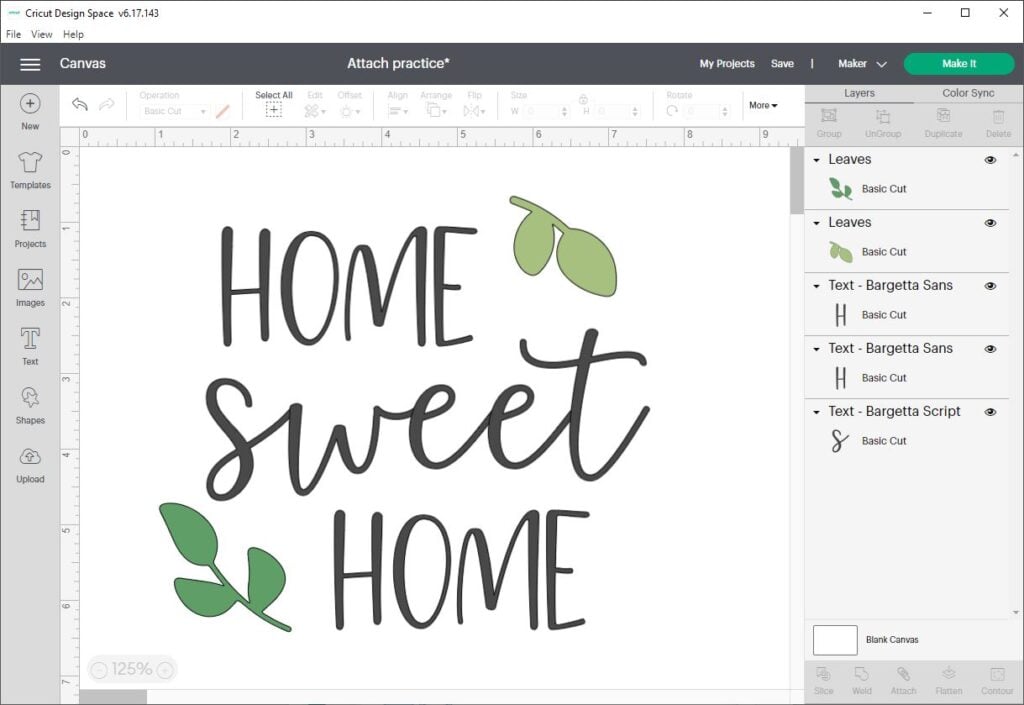
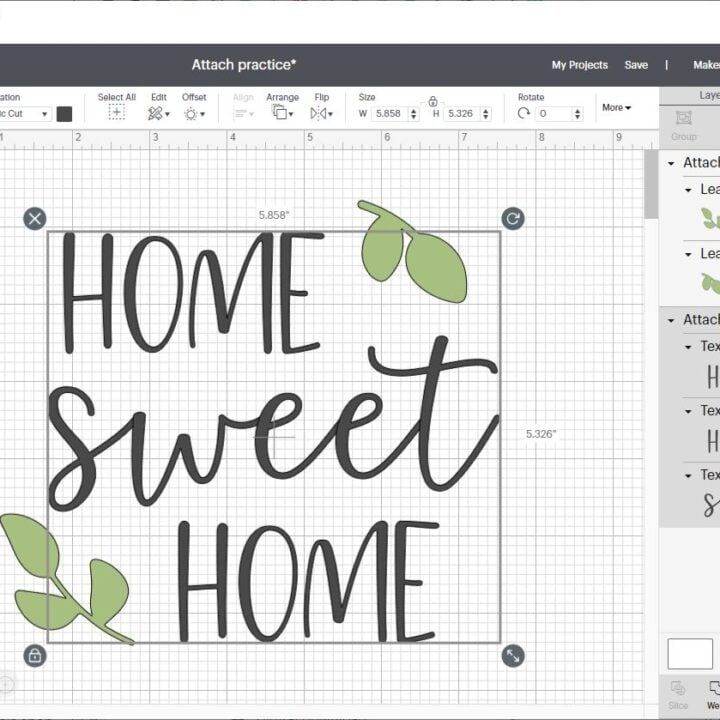
Start by using the Text box tool to add a few words to the Design Space Canvas. I’m using the phrase “Home Sweet Home” in two different fonts. Each word is on its own layer so that I arrange them how I want.
Then, add two leaf shapes. I found these small leaf shapes in the Cricut Access library.

If I send this design to the mat as is, Design Space will rearrange the objects on the mat to use the least amount of material. I don’t want this.
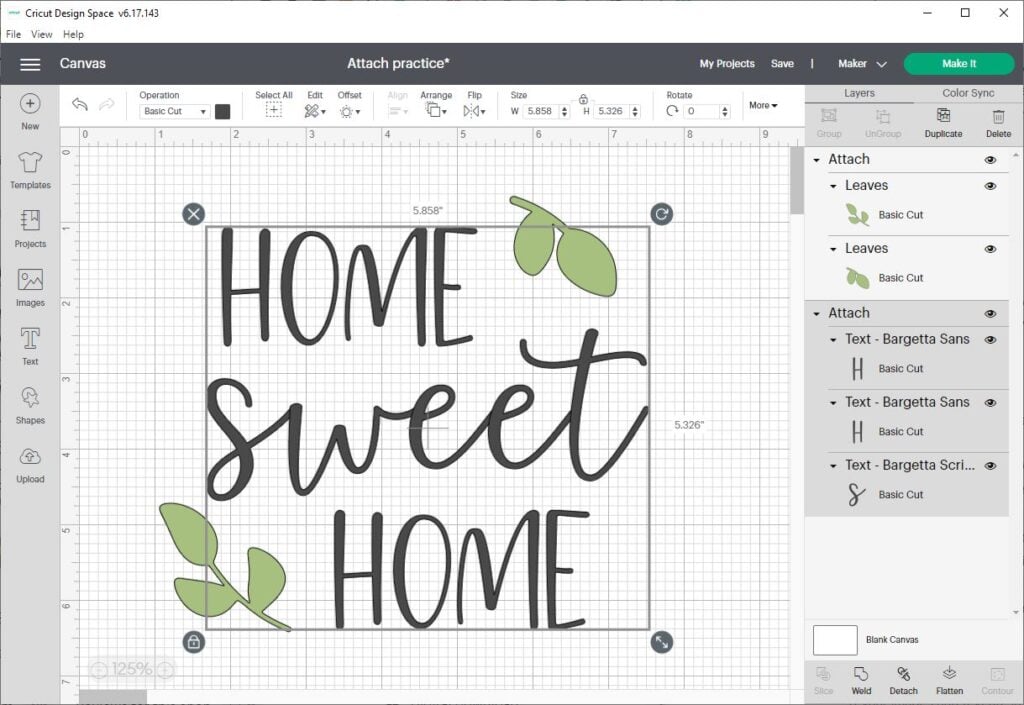
So, I cancel the cut to go back to the Canvas screen. I select all of the text layers and click Attach. Then, I select both leaf layers and click attach. Now, both leaves are the same color and will be cut on the same mat.
If you look at the Layers panel, you’ll see that all 5 layers are still there. The words and leaves are still separate elements on different layers – they’re just arranged in two Attach “subfolders.”

Now when I send the design to the mat, Design Space knows to keep the position of all the objects the same, and cut them out just as I had them on the mat.
This is just what I want. Now, after I cut the design, I can easily use transfer tape to transfer the vinyl in the exact layout I designed.
Attaching Writing to a Shape
In this example, we’ll use the Attach tool to fasten a Writing layer to a shape.

First, add a gift tag shape to the Canvas. Then use the Text tool to add the words Happy Birthday. Double click on the text, and change the Style to Writing. Move the Writing layer so that it is on top of the shape layer.
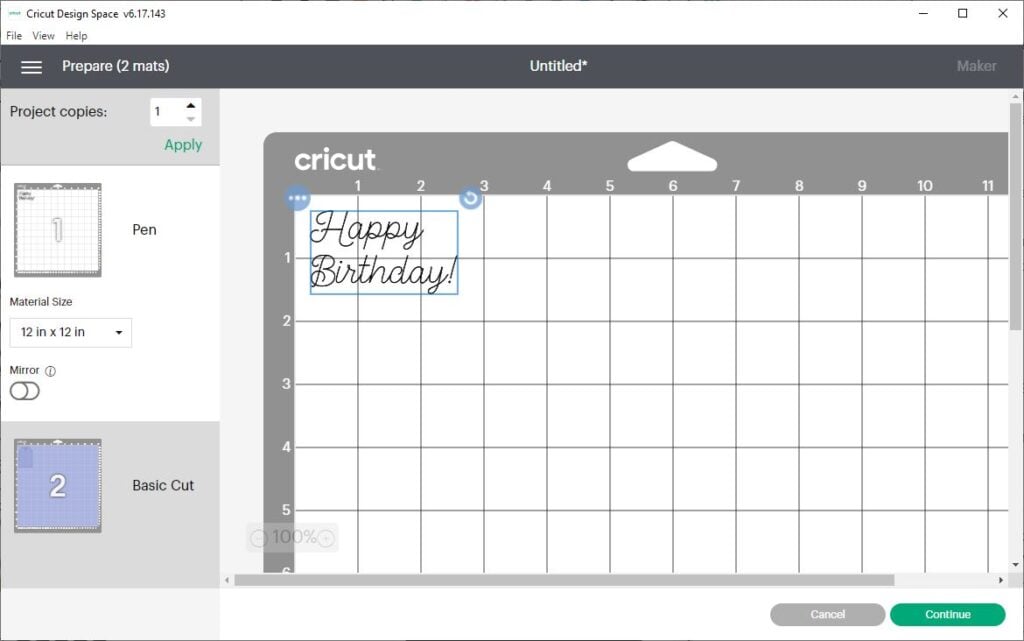
If I send this design to the mat without Attaching it, Design Space won’t know I want to write the words on top of the tag shape. Since I didn’t attach the writing to the shape, Design Space will write the text on its own layer. Obviously, this is not what we want.
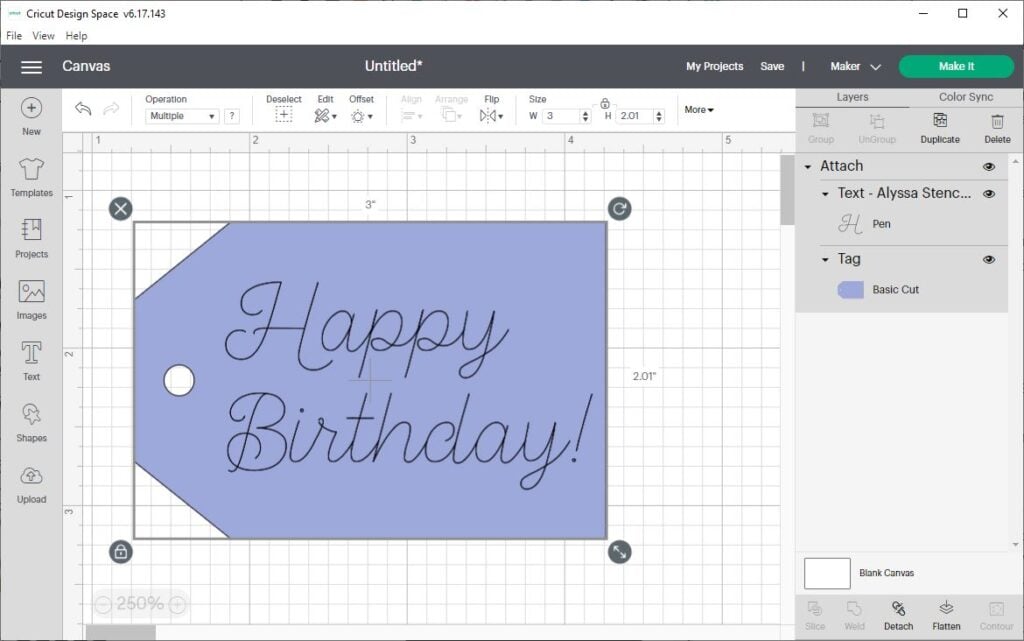
So, go back to the Canvas screen, select both layers, and Click Attach. Both layers are still there, organized and labeled with “Attach”.
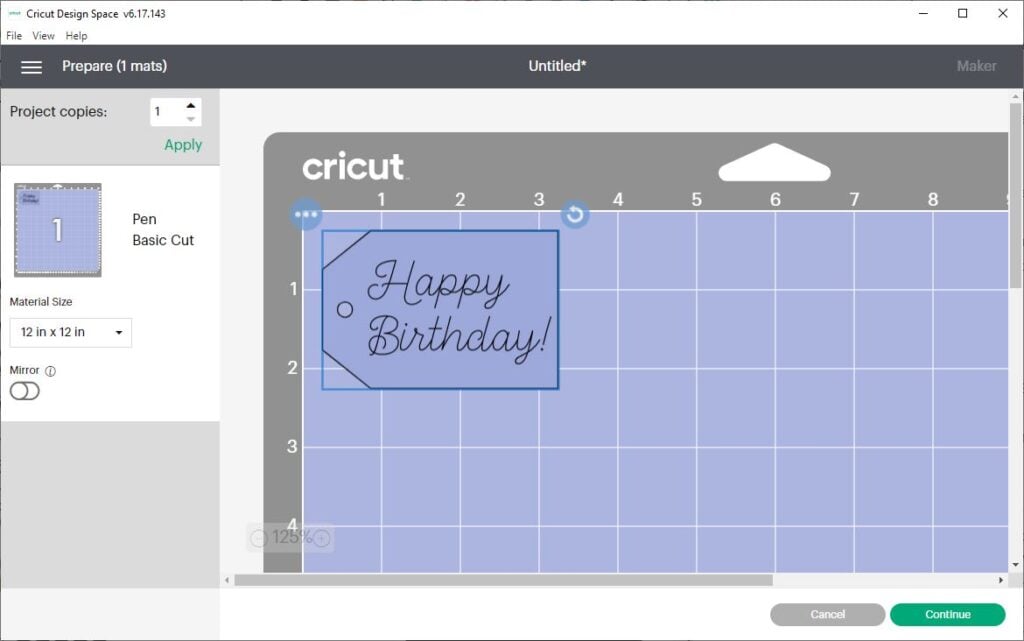
Now, when you send the design to the mat, Design Space knows to write Happy Birthday with the Cricut pen, and then cut out the tag shape on the same cutting mat.
Attaching Score Lines to a Shape
In this example, we’ll use Attach to fasten scoring lines to a 3D box template. This technique will come in handy if you like to make greeting cards or 3D paper projects.
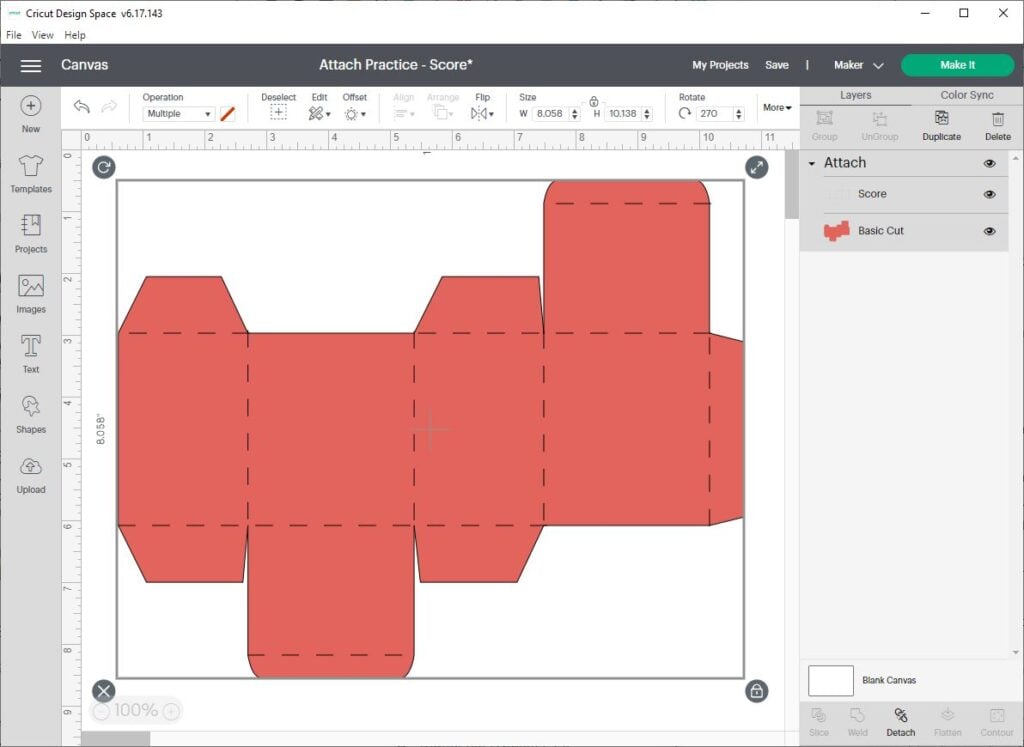
On the Canvas, you’ll see two layers. A red box template shape and a bunch of dashed lines. The dashed lines are Score Lines.
To make sure Cricut knows to make the score lines on top of the box shape, select both layers and click Attach. If I forget to attach these layers, Cricut will try to put them on different mats.
How to Connect Letters in a Word
You might be tempted to use the Attach button to connect the individual letters in a word, especially when using a script font. But wait – you should probably use Weld instead. Click here to read all about How to Connect Cursive Letters in Cricut Design Space.
Troubleshooting Common Problems
Here are some FAQs and common issues that you may run into when using the Attach tool.
Why are my images rearranged on the mat?
If your images and text are in the wrong position on the Mat Preview screen, you probably forgot to Attach them. This is easy to fix. Go back to the Canvas screen, select all the layers you want to keep in the same position, and click Attach. Then, when you go back to the Mat Preview screen, everything should be in the right place.
Why does Attach turn everything the same color?
Attach tells Design Space that you want to cut all of the Attached items on the same mat. So, since they will all be cut out of the same material, Design Space makes them the same color. By default, Design Space chooses the color of the bottom-most layer in the Attached group.
Why is the Attach button “grayed out” or not working?
If the Attach button isn’t clickable, that means it’s unavailable to use. More than likely, it means you only have one layer selected. To fix it, make sure you have at least two layers selected.
How do I select more than one layer?
In order to use Attach, you need to select two layers in Design Space. Here are a few ways to select more than one layer in Cricut Design Space
On Desktop
Click and drag a selection box around two shapes to select both of them.
Or, hold down the Shift key (on PC) or the Ctrl key (on Mac) on your keyboard while clicking on each layer on the Canvas or Layers panel.
On Mobile
Tap on the screen and drag a selection box around both layers.
Or, tap on one layer to select it, then long-press on the second layer to select it.
Where is the Detach button?
There is a Detach button in Design Space. To find it on Desktop, you’ll first need to select the Attached layers. You can do this quickly by clicking the Attach label in the Layers panel. After that, you’ll be able to see the Detach tool at the bottom of the Layers Panel. You can also find Detach in the right-click menu.
More About Cricut Design Space
Isn’t Attach such a great tool? I hope this tutorial helped you understand the Attach tool, and that you’ve learned some cool tricks to use the next time you’re in Design Space!
When you’re ready for more Design Space tutorials, check out these related posts:
- How to Upload Images to Cricut Design Space
- How to Upload Fonts to Cricut Design Space
- When to Use Weld vs. Attach in Cricut Design Space
- How to Use the Slice Tool in Cricut Design Space
- How to Weld Text and Images in Cricut Design Space
Have questions? Join the Facebook Group!
We hope this article was useful for you! If you have any additional questions, feel free to join my Facebook Group. We created this group for you to share pictures, ask questions, and help each other out.

I hope this article was useful for you! If you have any additional questions, feel free to join my Facebook Group for Cricut Crafts.
Join the group to share pictures, ask questions, and help each other out.
What’s Next?
Pin this post: Save this tutorial to your Pinterest boards so that you can come back to it later.
Leave a comment: We love to hear your feedback. Tell me in the comments below!
Share on Instagram or Facebook: When you make this project, share it on social media and tag me @sarahmaker_. We love to see what you make!
How to Attach in Cricut Design Space
Learn how to use the Attach tool in Cricut Design Space to hold the elements of your design in place when you send them to the cutting mat.
Tools
- Cricut Design Space
- Cricut machine
Instructions
- Open Design Space and start a new project. Add images and text to the Canvas, and arrange them as desired.
- Select two or more images you would like to Attach. Remember that all attached objects will be cut on the same mat - so they will turn the same color.
- Click Attach in the Layers panel. You'll know your images are attached if they are labeled Attach in the Layers panel.


Similar Posts
How to Upload Fonts to Cricut Design Space in 4 Easy Steps
12 Cricut Christmas Cards Ideas
Ultimate Guide to Cricut Blades for Beginners
How to Make Stickers with Cricut “Print then Cut”
How to Use Flatten in Cricut Design Space
Ultimate Guide to Cricut Tools and Accessories