

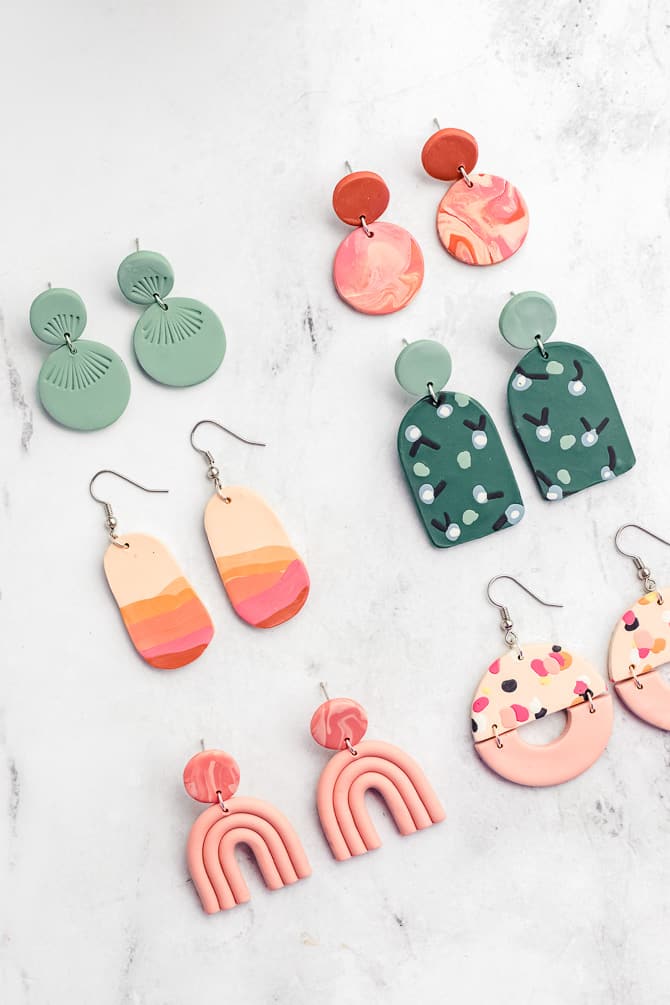
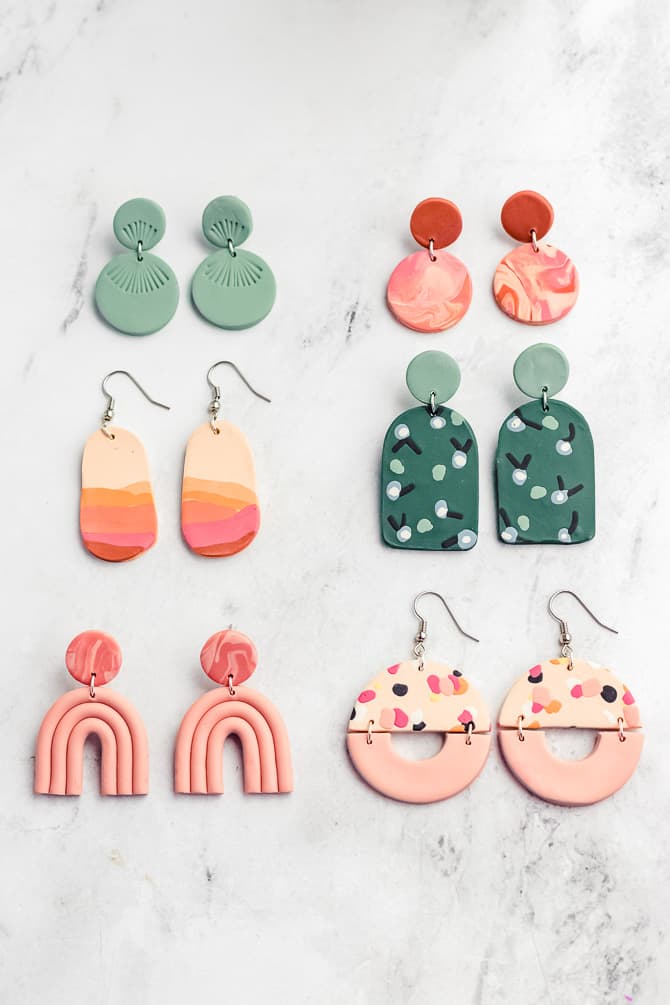
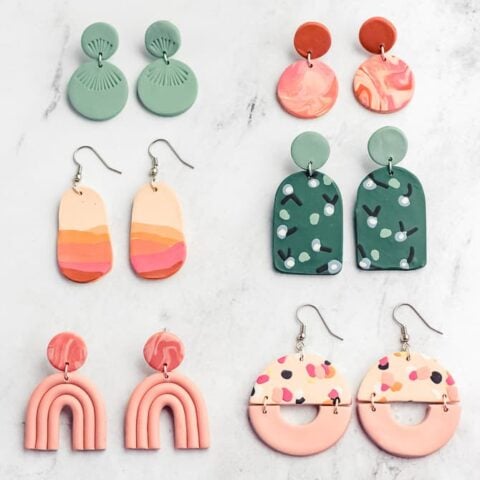
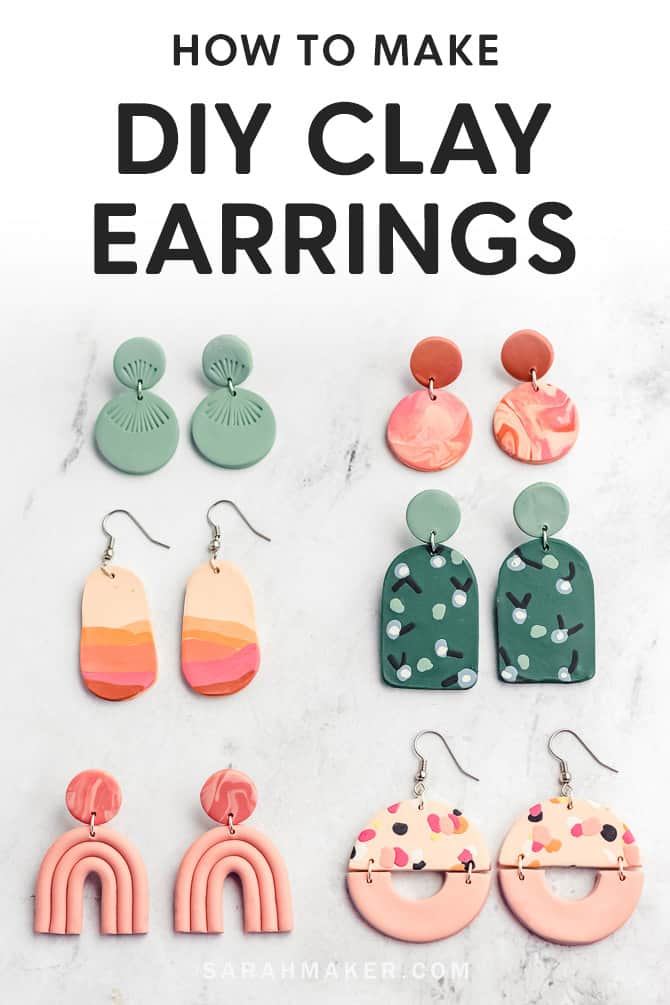
Polymer clay earrings are fun, easy, and fast to make. Make yourself a pair of these popular and trendy designs. Create custom colors and designs like modern marble, floral and botanical patterns, abstract landscapes, and arch shapes.
What is Polymer Clay?
Polymer clay is a type of modeling clay made from vinyl. It’s great for crafting because it stays soft until it’s baked in a regular home oven. It does not dry out, so you can store extra clay to reuse it another day.
You can blend it to create custom colors, sculpt it, or impress it with a variety of textures. After baking, you can sand it, polish it, or paint it.
It’s a very versatile medium. You can sculpt it into miniatures, make ring dishes, roll it into beads, and of course, make earrings and jewelry.
Choosing the Right Brand
You’ll want to choose a high-quality brand of polymer clay that is suitable for jewelry making. The clay needs to be soft enough to work with your hands, but firm enough to hold the details of your earring designs.
Plus, you’ll want to use a durable and flexible clay that won’t break with daily wear.
Here are some of the brands of polymer clay I recommend for jewelry-making:
- Premo Sculpey. This is a very popular brand to use for polymer clay jewelry. It has a nice firm texture that holds details well. It’s strong and flexible, so it works well for earrings. The colors are bright and easy to mix.
- Sculpey Soufflé. This lightweight polymer clay is soft and is easy to work with your hands. When baked, it has a nice soft, matte finish that hides fingerprints well. It comes in a nice range of colors, too.
- Brands to avoid. You may find Sculpey III or Sculpey Bake Shop clay at the store. You may also see cheap 50-packs of unbranded clay online. I don’t recommend them for this project. I find these clays too soft to work with, and the baked pieces break too easily.
For a breakdown of the best and worst brands of polymer clay for earrings and jewelry making, check out this post: Best Polymer Clay for Earrings and Jewelry
Prepping Your Workspace
Polymer clay is generally very safe, but it can stain or damage some surfaces. So, it’s best to protect your table by working on top of a sheet of parchment or wax paper, a metal baking sheet, or a piece of glass.
If you don’t have any of those, you could even tape down a piece of printer paper, and work on top of that.
Before you start, wipe down your table and tools so you don’t get any dust or lint in your clay.
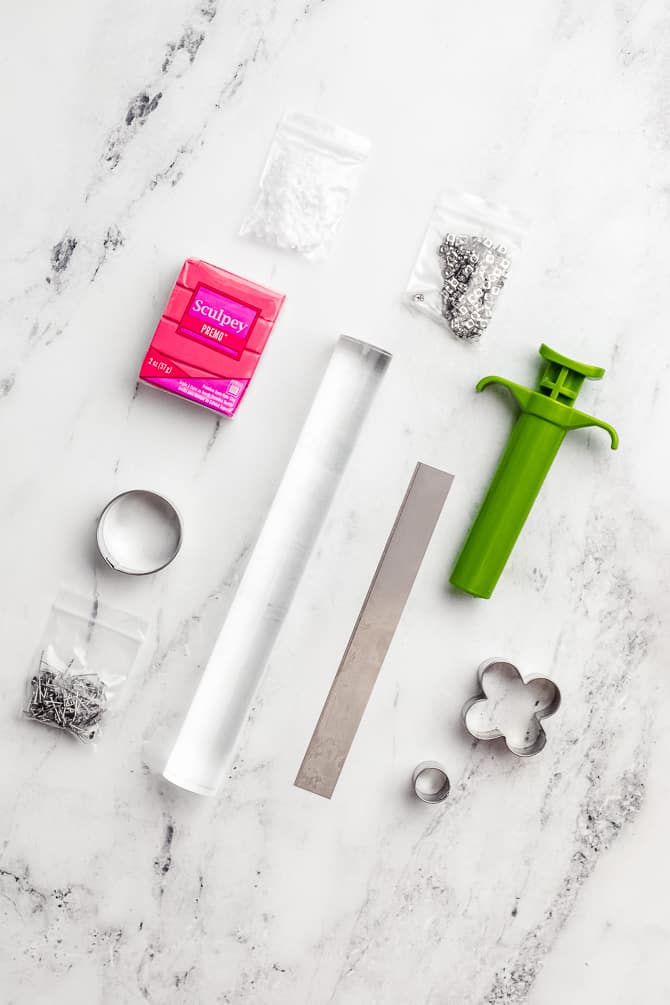
Gather Your Supplies
You don’t need much to get started making polymer clay earrings. I’ve listed the basic materials and tools below.
If you don’t have the specific tools I’ve listed below, don’t worry. You can easily substitute similar tools you can find in your kitchen or toolbox.
Materials
- polymer clay in various colors
- earring backs (either posts, hooks, or hoops)
- jump rings
- flexible superglue such as Loctite Gel or Gorilla Glue Gel Superglue
- parchment paper or foil
Tools
- acrylic rolling pin (Don’t use the same wooden rolling pin that you use with food.)
- X-Acto, craft knife, or clay slicer
- clay cutters or cookie cutters
- toothpick or a large needle
- flat baking sheet
- jewelry pliers
If you don’t have these specific tools, you can substitute a straight drinking glass for the rolling pin and a straightened paper clip for the needle tool.
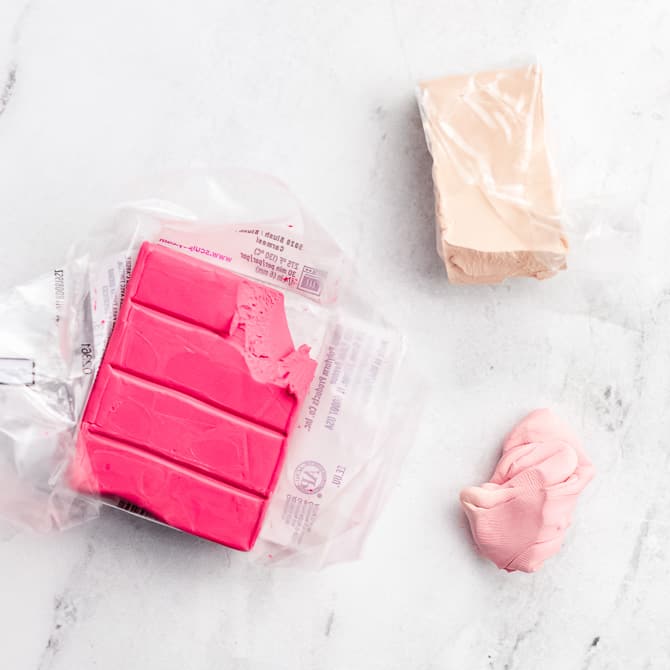
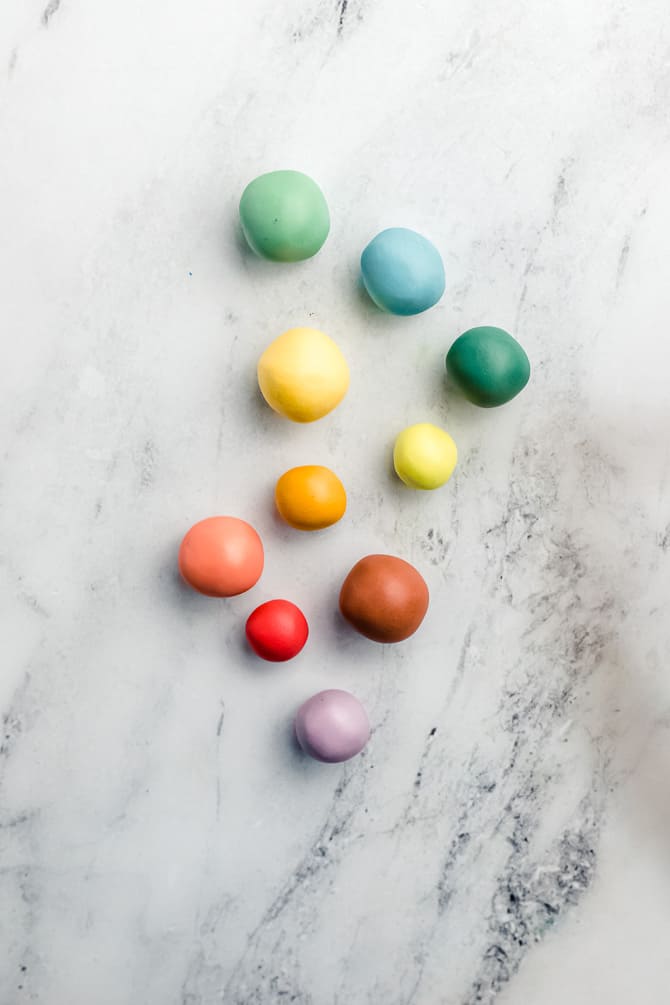
Softening Clay and Mixing Colors
Before you start making earrings, you’ll need to condition the polymer clay.
What’s conditioning? It’s the process of kneading the clay to make it softer, more flexible, and easier to shape.
You can condition the clay by rolling and kneading it in your hands. Or, you can run it through a pasta machine a couple of dozen times. You’ll know the clay is well-conditioned when you can easily roll out a long coil and bend it without cracks or rough edges.
Wash your hands (wipe them with baby wipes) in between colors to avoid color mixing.
Take care not to trap air bubbles in your clay while you are kneading and folding it. If you do happen to make air bubbles, simply pop them with a needle or craft knife.
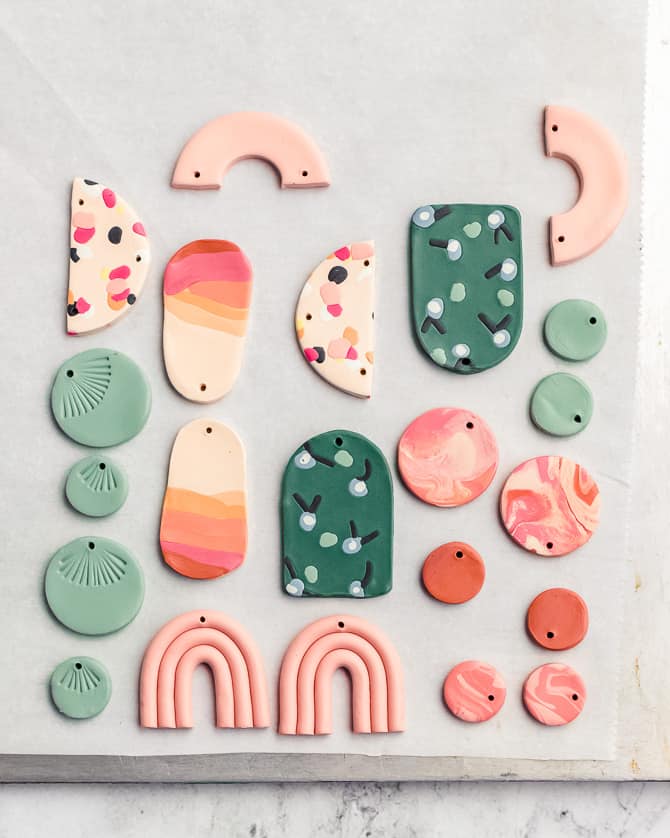
Polymer Clay Earring Ideas
Here are some techniques and ideas for making color designs in your polymer clay slabs.


Rainbow Arch Shaped Earrings
First, using your fingertips and gentle pressure, roll 3 thin ropes of clay. Try to make them as even as possible. Or, use a clay extruder to get perfectly even coils.
Then, use your fingertips to bend the first coil into a narrow arch shape. Then, bend the middle arch. Then, add the outer arch.
Using very gentle pressure, press the coils together, and make sure they are attached to each other. Don’t push too hard or you could flatten the coils.
Repeat this process for the second rainbow. Then, line up both of the rainbows and trim the bottoms even with one another.


Floral Patterned Slab Earrings
For this design, you’ll create a pattern on a flat slab of background clay. You can create an abstract design, a floral or botanical design, or a geometric pattern.
Knead a large ball of clay for the background color. Using an acrylic rolling pin, roll the clay out flat.
How thick should polymer clay earrings be? I like to roll out to a thickness of 1/8″, or just a bit thicker.
Then, using cutters or a craft knife, cut small pieces out of other colors of clay. Arrange them on the background slab to make a design. Gently pat the pieces with your fingertips to attach them to the slab. Then, use a rolling pin to flatten the whole slab.
After the slab is complete, use cutters or a craft knife to cut out your earring shapes.


Terrazzo Pattern Earrings
This technique is very similar to the floral patterned slab, except even easier.
First, condition a large ball of clay for the background color. Using an acrylic rolling pin, roll the clay out flat to a thickness of 1/8″, or just bit thicker.
Then, using a craft knife, cut small pieces out of other colors of clay. Arrange them randomly on the background slab to make a terrazzo design. Gently pat the pieces with your fingertips to attach them to the slab. Then, use a rolling pin to flatten the whole slab.
After the slab is complete, use cutters or a craft knife to cut out your earring shapes.
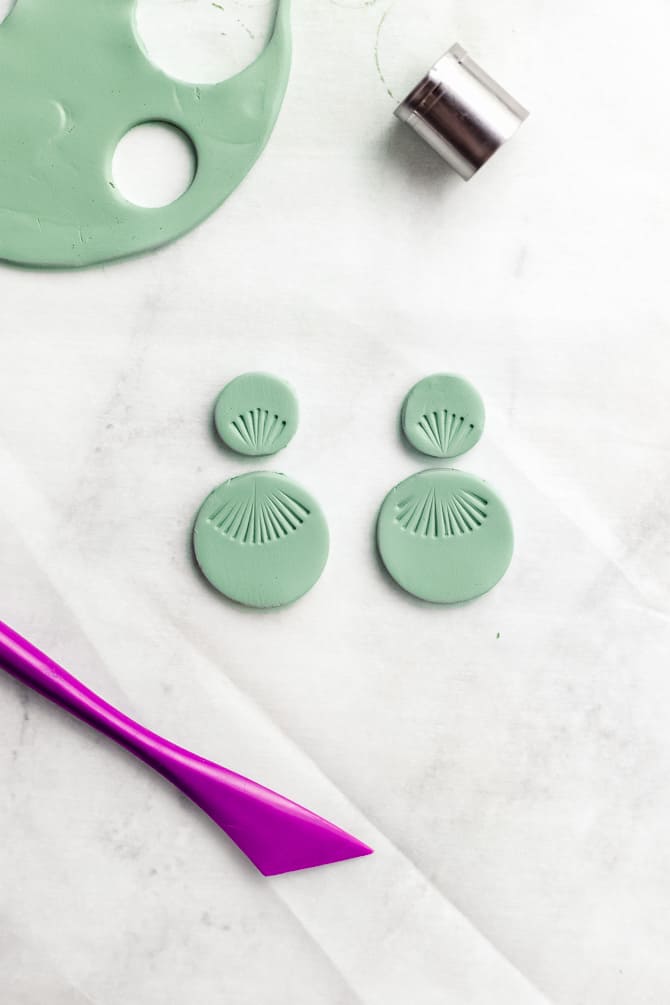
Easy Textured Earrings
Here’s a simple monochrome design, with a hint of texture.
Roll our a slab of polymer clay. Cut out your earring pieces with a cutter or craft knife.
Then, using a texture tool, lightly press radiating lines into the surface of the clay. Don’t press too deep, or you might create weak spots that will crack once the clay is baked.


Abstract Landscape Earrings
Here’s a cool abstract design that resembles a landscape scene or a sunset. You can make these earrings with just a small amount of several different colors.
First, condition a few small balls of clay in a range of coordinating colors. Shape the balls into thin coils. Arrange the coils in the order you want, and lightly press them together.
Then, use a roller to flatten the coils into a slab. Use clay cutters or a craft knife to cut earring shapes out of the slab.


Marbled Clay Earrings
This is the perfect design to make with all of your scrap clay.
You can make marbled polymer clay earrings by mixing a variety of colors. Pick a combination with enough contrast so the marble pattern will show up. If you get stuck choosing a color combo, you can also go with one color plus the classic white and black.
Condition each color and make coils. Twist all the coils together. Keep twisting and folding the clay until you see a pattern you like. Be careful not to overmix!
Roll the ball flat into a slab to reveal the marble pattern. Cut shapes with your cutters or knife.
Shaping and Cutting
After you’ve created the design in clay, use special clay cutters, mini cookie cutters, or a craft knife to cut out your earring shapes.
Sometimes, plastic cutters leave jagged edges around the bottom edge of the shape. You try to smooth this edge before baking the clay, or you can sand it off after baking.
If you don’t want to purchase cutters, you can trace around shape templates with a sharp craft knife. In my experience, a craft knife leavers a neater, cleaner edge.
I’ve created a sheet of popular earring shapes that you are free to download.
Don’t forget: You’ll also need to poke small holes in the clay shapes to attach your metal jewelry components after baking. I like to use a blunt tapestry needle for this step. But you can just as easily use a sharp toothpick or a paperclip.
Remember to make the hole large enough in diameter to insert your jump rings and other jewelry components in the next step. You’ll want to keep the holes close to the edge of the piece, too.
Baking Polymer Clay
You can bake polymer clay in your regular home oven. You can also use a toaster oven if it holds a consistent temperature (with no hot spots!) Never try to bake polymer clay in a microwave.
Before you bake:
It’s much easier to clean up little mistakes while the clay is still wet. Double-check your pieces for bits of lint and fuzz.
To smooth the clay before baking, you can use a cotton swab dipped in rubbing alcohol to brush away bits of dust and leftover fingerprints.
Preheat your oven.
Following the instructions on the package, preheat the oven to the indicated temperature. Use an oven thermometer to verify your oven’s accuracy. It’s not uncommon for home ovens to run hot or cold. Adjust the temperature as needed to compensate.
What temperature?
Check the back of the package for instructions. Brands like Souffle and Premo bake at 275°.
How long?
Once the oven is finished preheating, put your tray of earring pieces into the oven. Cover with a tent of aluminum foil to protect them against browning or discoloration.
Bake for 30 minutes for each ¼” of thickness. For most earring components, 30 minutes will be enough time. Be sure to set a timer so you don’t forget about them!
For more information and a lot more detail, be sure to read this complete tutorial for the best way to bake polymer clay for great results.
Sanding and Smoothing
If the edges of the earrings are a little sharp after baking, you can use fine-grit sandpaper to smooth them. If you need to sand a lot of earrings, you can use a Dremel tool to speed up the process.
If you need to smooth the surface of the polymer clay after baking, you can use a cotton swab dipped in acetone nail polish remover to brush away stray fingerprints.
Do you need to seal the clay with a clear coat?
Polymer clay is a durable plastic material, and you do not need to seal it to protect it.
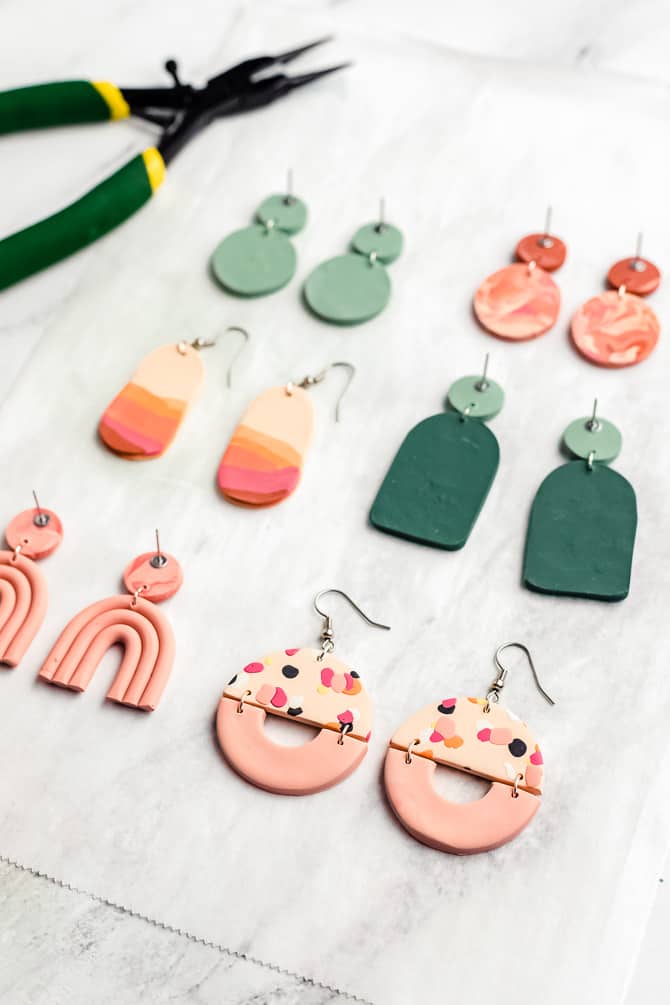
Adding Jump Rings and Earring Backs
The final step is to add the metal jewelry components to turn your clay shapes into earrings.
Studs: To make stud earrings, all you need are posts and backs. Use a dab of flexible gel superglue to attach the post to the back of the clay shape. Or, bury the pad of the earring post into the clay itself, and bake them together in the oven. (Find more information on glue in the next section.)
Dangling: You can make dangling earrings with an ear hook and a jump ring.
Tiered Earrings: You can attach clay shapes to each other with metal jump rings. To open a jump ring, grasp it on both sides of the split with pliers. Twist it side to side, don’t pull it apart. Then, insert your clay pieces, and twist the ring shut again.
Alternative Method for Attaching Earring Backs
The strongest way to attach polymer clay to metal is to create a mechanical attachment between the two pieces. What do I mean by that? You’ll want to encase the pad of the earring post into the raw clay itself.
To do this, position the earring post on the back o the polymer clay piece. Then, add a thin layer of clay on top of the post. Then, bake the clay piece and metal earring back together in the oven. Once the clay is cured, it will harden, and the metal back will not be able to pull out of the clay.
Troubleshooting and FAQ
Here are some common issues and questions you may have about working with polymer clay.
What’s the best glue for polymer clay?
This is such a common question, and the answer is: it depends. Different glues are good for different types of attachments. For example, Sculpey Oven Bake Clay Adhesive or other liquid polymer clay is the strongest “glue” for bonding polymer clay to polymer clay. Flexible gel superglues can work well for attaching clay to metal.
That said, the best and strongest way to attach polymer clay to metal jewelry findings is to create a mechanical attachment. Lay the earring post pad or pendant bail onto the back of the clay piece, and use a small slice of matching polymer clay to surround or bury the metal. Once the clay is cured and hardened, it will physically hold the post or bail in place.
My earrings look burned.
If your clay looks discolored or burnt, the temperature of your oven is probably too high. You can also try covering your clay pieces with a foil tent while baking to protect them from browning.
There are fingerprints and fuzz on my clay.
Polymer clay seems to act like a magnet, picking up dust, lint, and fingerprints.
To solve this problem, first, make sure that you’re not using cheap brands of unbranded clay (like the kind you can find online in 50-packs). These mushy clays attract dirt like no other.
Secondly, make sure that your hands and your workspace are super clean before you start working. Wipe down your tools and your table with a baby wipe. It’s good to wash your hands between colors, too.
And third, double-check your earring pieces for dirt and fingernail marks before baking. It’s much easier to fix mistakes before baking while your clay is still soft and malleable.
My earrings are brittle and keep breaking.
If your polymer clay earrings break easily, there could be a couple of things going on.
First, make sure that you aren’t using a brittle brand of clay, such as Sculpey III or Bakeshop.
If that’s not the issue, then it’s likely a case of underbaking. Underbaked polymer clay is brittle and likely to snap or chip with heavy use. Fully baked polymer clay will be stronger and more durable.
More Polymer Clay Ideas
For even more polymer clay ideas, be sure to read this list of 21 Polymer Clay Ideas and Projects.
Then, check out these related posts:
What’s Next?
Pin this post: Save this tutorial to your Pinterest boards so that you can come back to it later.
Leave a comment: We love to hear your feedback. Tell me in the comments below!
Share on Instagram or Facebook: When you make this project, share it on social media and tag me @sarahmaker_. We love to see what you make!
How to Make Polymer Clay Earrings
Learn how to make modern abstract polymer clay earrings with this easy DIY craft tutorial. Marble, terrazzo, ombre, arch, and more.
Materials
- polymer clay in various colors
- earring backs (either posts, hooks, or hoops)
- jump rings
- flexible superglue such as Loctite Gel or Gorilla Glue Gel Superglue
- parchment paper or foil
Tools
- acrylic rolling pin (Don't use the same wooden rolling pin that you use with food.)
- X-Acto, craft knife, or clay slicer
- clay cutters or cookie cutters
- toothpick or a large needle
- flat baking sheet
- jewelry pliers
Instructions
- Condition the clay by rolling and kneading it in your hands. Take care not to trap air bubbles in your clay.
- For slab designs, roll the clay out to a thickness of 1/8″, or just a bit thicker. Create a design or pattern on your slab with smaller pieces of clay. Roll flat.
- Use cutters or a craft knife to cut out your earring shapes. Use a needle or toothpick to makes holes for jump rings.
- Place on a parchment-lined baking sheet, and bake according to package directions.
- Add jewelry components with flexible gel superglue.
Notes
Be sure to read the FAQ sections for lots of troubleshooting tips.


Similar Posts
Clay Bead Bracelet Ideas and DIY Tutorial
Best Polymer Clay for Earrings and Jewelry
21 Polymer Clay Ideas and Projects
How to Make Stretchy Beaded Bracelets with Elastic Cord
How to Bake Polymer Clay for the Best Results