

Learn how to start your friendship bracelets with a simple loop buckle with this beginner-friendly tutorial. Removable closures, like this teardrop loop buckle, give your bracelets a polished, professional finish. Plus, they make it so much easier to take bracelets off and on!

Friendship Bracelet Loops and Buckles
Loop closures, also called buckles, are an awesome technique to add to your DIY friendship bracelet making repertoire.
I love starting my friendship bracelets with loops or buckles because they create a removable closure. Loops and buckles make it easy to take friendship bracelets off and on.
This tutorial will walk you through the process of tying a loop or buckle made from one of the strings in the bracelet pattern.
Before we get started, feel free to review my other articles, How to make Friendship Bracelets and How to Tie the 4 Basic Friendship Bracelet Knots.
Loop Tutorial
Step 1: Choose your pattern and bracelet colors.
This tutorial will work with any bracelet pattern that has an even number of strings, and two strings of each color. (i.e. patterns where you fold the strings in half to create a symmetrical design.)
If you need some examples of good patterns, the Chevron bracelet pattern and the Diamonds bracelet pattern work really well with this technique.
Cut your strings to the desired length, but be sure to cut the string you want to use for the loop about 6-8 inches longer than the rest.


Step 2: The loop starts with a simple Lark’s Head knot.
Fold the loop string (pink in the photos) in half. Slip the folded end of the loop string beneath the other bracelet strings at their half-way point.
Pull the ends of the loop thread up through the folded end. Pull to tighten.


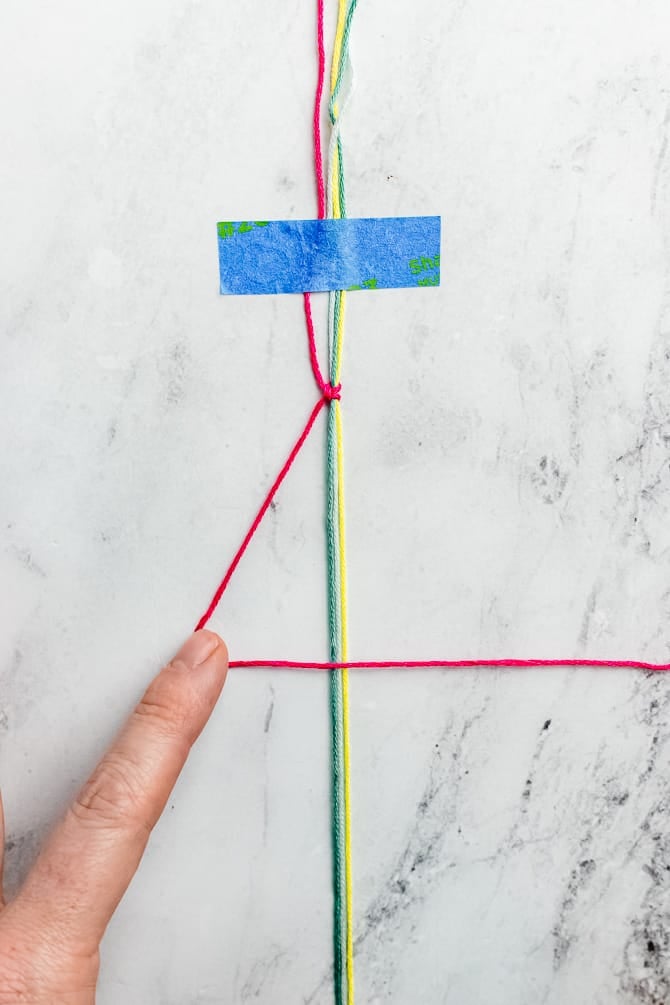
Step 3: Now that loop string is tied on to the rest of the bracelet strings, we can start the rest of the loop.
Use tape or a clipboard to secure the strings. Starting on one side, alternate tying forward half hitches and backward half hitches. Work until you have about 1/2 inch of knots.
The string should start on the left side, and end on the left side when you’re done.
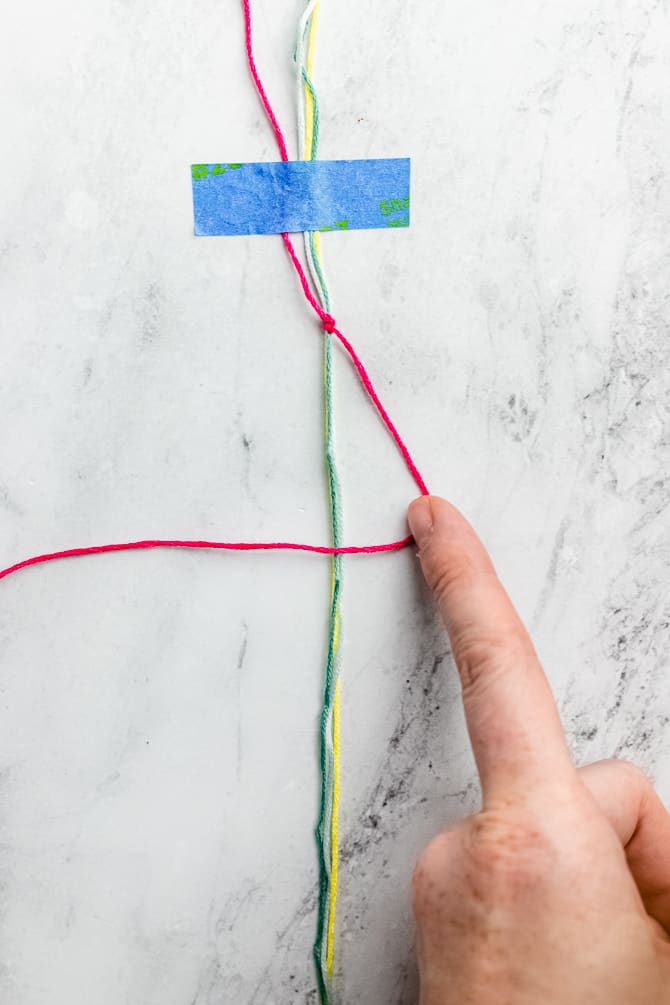
Step 4: Turn the bracelet around, and work down the other side.
Use the same technique, tying alternating forward and backward half hitches until you reach your desired length. The string should start and end on the right side.
For bracelets with 8-10 strings, I like to tie an inch of knots.

Step 5: The loop/buckle section is complete! Fold it in half and arrange your strings in the correct order to begin your bracelet pattern.
If you need any help reading pattern charts, be sure to check out How to Read Friendship Bracelet Patterns.

Step 6: At this point, you can choose to just start your bracelet pattern or tie some macrame square knots around the pattern strings. This makes a narrower closure that can be useful to secure bracelets.

More Buckle Techniques
For even more easy ways to start and end friendship bracelets, check out this article: How to Start and End Friendship Bracelets for A Finished Look
Click the link to learn how to finish your bracelets with an adjustable bead or button closure for a professional-looking finish.
Explore More Friendship Bracelet Ideas
If you like making friendship bracelets, you may be interested in these free tutorials and bracelet patterns.
- Easy Friendship Bracelet Patterns for Beginners
- How to Make a Diamond Friendship Bracelet Pattern
- How to Make a Chevron Friendship Bracelet
- How to Make a Candy Stripe Friendship Bracelet
What’s Next?
Pin this post: Save this tutorial to your Pinterest boards so that you can come back to it later.
Leave a comment: We love to hear your feedback. Tell me in the comments below!
Share on Instagram or Facebook: When you make this project, share it on social media and tag me @sarahmaker_. We love to see what you make!


Friendship Bracelet Loop Buckle
Learn the easy way to start friendship bracelets with a loop or buckle. A fun craft for kids, teens, and adults. Step-by-step tutorial for making professional-looking removable closures.
Materials
- embroidery floss
Tools
- scissors
- masking tape
Instructions
- Cut your strings to the desired length, and cut the string you want to use for the loop about 6-8 inches longer than the rest.
- Make a lark's head knot with the loop string: Fold the loop string in half. Slip the folded end of the loop string beneath the other bracelet strings at their half-way point. Pull the ends of the loop thread up through the folded end. Pull to tighten.
- Use tape or a clipboard to secure the strings. Starting on one side, alternate tying forward half hitches and backward half hitches. Work until you have about 1/2 inch of knots.
- Turn the bracelet around, and work down the other side. Tie alternating forward and backward half hitches until you've tied a total 1-inch length of knots.
- Fold the strings in half to make the loop. Optionally, tie some macrame square knots around the pattern strings.


Similar Posts
How to Make a Chevron Friendship Bracelet
How to Make Friendship Bracelets
How to Read Friendship Bracelet Patterns
How to Start and End Friendship Bracelets for A Finished Look
19 Easy Friendship Bracelet Patterns for Beginners
How to Make a Candy Stripe Friendship Bracelet