

Have you ever wondered how to crochet a solid granny square with no gaps or holes?
It’s easier than you think! The trick to making a modern, solid granny square is to eliminate the chain spaces, and use triple crochet stitches to turn the corners. This will give you a nice, clean, solid-looking square.
Keep reading for the step-by-step tutorial where I’ll show you exactly how to crochet a solid granny square with no gaps. Pick up your hook and let’s get started!
Solid Granny Square Pattern
Difficulty: Beginner/Easy
Finished Size: 5″ square
Materials
Hook: H (5.0 mm)
Yarn: Worsted weight yarn (Category 4)
You’ll also need:
- yarn needle
- stitch markers, if desired
- ruler or tape measure, if desired
Terms and Abbreviations:
- st/sts: stitch/stitches
- ch: chain
- ch-sp: chain space
- dc: double crochet
- sl st: slip stitch
- tr: triple crochet
Pattern Notes:
- This pattern is written in American terms.
- Chain stitches at the beginning of the rounds count as a stitch unless otherwise specified.
- I use 4 chain stitches for 1 triple crochet stitch. If the starting corner is too loose, use ch 3 instead.
- To change the size of the granny square, add more rounds following the pattern.
Instructions
Foundation Ring: Chain 5 and join with sl st to make a ring. Or, use the magic ring technique.

Round 1: Ch 4 (counts as tr here and throughout). Into the ring, work 3 dc,
(1 tr, 3 dc) three times. Join with sl st to the top of the beginning ch 4 to close the round. [16 sts – 4 corner tr and 3 dc per side]

Round 2: Ch 4, 2 dc in the same stitch (which is the top of previous round’s turning chain). * Dc in each dc on the first side of the square. Work (2dc, tr, 2dc) in the corner tr. Repeat from * for each side. In the last corner, work 2 dc in the base of the ch 4 to finish the corner. Join with a sl st to the top of the beginning ch 4 to close the round. [32 sts – 4 corner tr and 7 dc per side]

Repeat the pattern established in Round 2 until your square is the desired size.

Round 3: 48 sts [4 corner tr and 11 dc per side]
Round 4: 64 sts [4 corner tr and 15 dc per side]
Round 5: 80 sts [4 corner tr and 19 dc per side]
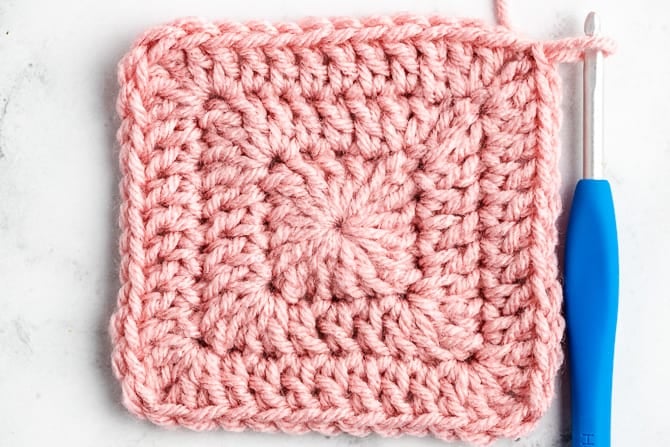
To finish: When the granny square is as large as you’d like, cut yarn, fasten off, and weave in ends. You can use the starting tail to close up the center hole, if one remains.
And ta da! You’ve just completed a solid granny square with no holes at the corners. Why not make a bunch and sew up a cool granny square blanket?
More Granny Square Patterns
Here are a few more crochet granny square patterns for you to try.
- Solid Granny Square Crochet Pattern
- How to Crochet a Classic Granny Square
- Sunburst Granny Square (Sunflower Pattern)
Even More Crochet Tutorials
If you love to crochet, you’ll love these other free crochet patterns and tutorials.
Have questions? Join the Facebook Group!
We hope this article was useful for you! If you have any additional questions, feel free to join my Facebook Group. We created this group for you to share pictures, ask questions, and help each other out.

What’s Next?
Pin this post: Save this tutorial to your Pinterest boards so that you can come back to it later.
Leave a comment: We love to hear your feedback. Tell me in the comments below!
Share on Instagram or Facebook: When you make this project, share it on social media and tag me @sarahmaker_. We love to see what you make!

Solid Granny Square Pattern (with no gaps!)
A crochet pattern for a solid granny square with no gaps or holes at the corners.
Materials
- worsted weight yarn, or yarn of your choice
Tools
- 5 mm crochet hook, or hook or your choice
- tapestry needle
- stitch markers, optional
- measuring tape, optional
Instructions
- Foundation Ring: Chain 5 and join with sl st to make a ring. Or, use the magic ring technique.
- Round 1: Ch 4 (counts as tr here and throughout). Into the ring, work 3 dc, (1 tr, 3 dc) three times. Join with sl st to the top of the beginning ch 4 to close the round. [16 sts - 4 corner tr and 3 dc per side]
- Round 2: Ch 4, 2 dc in the same stitch (which is the top of previous round’s turning chain). * Dc in each dc on the first side of the square. Work (2dc, tr, 2dc) in the corner tr. Repeat from * for each side. In the last corner, work 2 dc in the base of the ch 4 to finish the corner. Join with a sl st to the top of the beginning ch 4 to close the round. [32 sts - 4 corner tr and 7 dc per side]
- Add additional rounds as desired, following the established pattern.
Notes
- Round 3: 48 sts [4 corner tr and 11 dc per side]
- Round 4: 64 sts [4 corner tr and 15 dc per side]
- Round 5: 80 sts [4 corner tr and 19 dc per side]


Similar Posts
How to Crochet a Shamrock: Free Pattern
15 Free Crochet Fingerless Gloves Patterns
30 Tunisian Crochet Stitches and Tutorials
Twisted Crochet Ear Warmer Headband – Free Pattern
Solid Granny Square Crochet Pattern for Beginners
How to Crochet the Granny Stripe Stitch